Advanced
Actors and Components
This article refers to PFM v0.4.3 and newer and may not be representative of older versions.
 Actors in PFM are entities (i.e. game objects) that are part of your animation, not including map entities or other entities that exist independently of your project. An actor can be anything from a camera to a light source, prop or particle system. An articulated actor is an actor with a skeletal rig or morph targets (i.e. flexes/flex controllers).
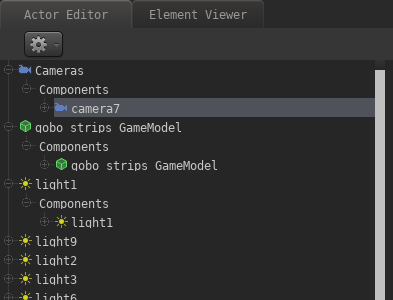
In the PFM interface you can find a list of all actors in the currently selected film clip in the "Actor Editor" window.
Creating an actor
To create a new actor, click the gear icon at the top of the actor editor:
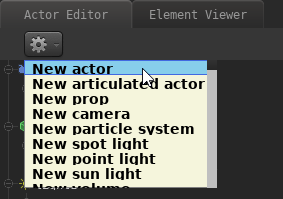
Choosing "New Actor" will create an empty actor without any components, the other options will automatically add the required components for the chosen option. Components are explained in the following section:
Components
Contrary to SFM, there are no concrete actor types in PFM. Instead, every actor has a list of components associated with it which define the behavior/function of that actor. For instance, if you create a camera in SFM, that actor is a camera entity. If you create a camera in PFM, that actor is an entity with a camera component. The key difference is that components in PFM can be freely added or removed to/from an actor.
Example: You create an actor X and add a camera component to it, which turns that actor into a camera. If you add another component to actor X, for instance a light source component, then actor X is both a camera and a light source at the same time. If you then remove the camera component from the actor, it ceases to be a camera, but remains to be a light source (This should ring a bell if you're familiar with entity-component-systems.). This allows you to flexibly change or enhance the behavior of an actor. Some other examples:
- You can add a "retarget" component to an actor to change its model to another, even if the new model has different proportions or a different rig, while keeping the animation intact.
- You can add a "physics" component to make an actor move in a physically accurate manner (e.g. dropping on the ground).
- You can then add a "gravity" component to change the actor's gravity (e.g. make it fall upwards instead).
- etc.
If you have some programming experience, you can also create custom components with Lua, and then add those components to your actors. Custom components can also add new animatable properties. See here for details.
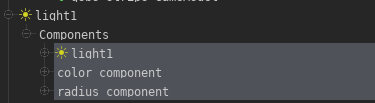
You can find a list of components an actor has in the "Actor Editor":
To avoid cluttering the interface, not all of the actor's components are listed by default. Right-click on "Components" and choose "Add Component" to see which ones of the actor's current components are hidden. By clicking one of the components it will be added to the interface (along with its properties, if it has any). You should only do this if you intend to modify the properties of one of the components.
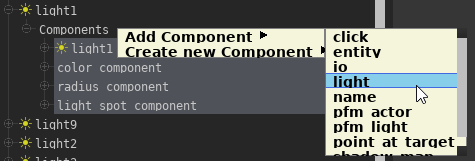
The option "Create new Component" allows you to add an entirely new component to the actor:
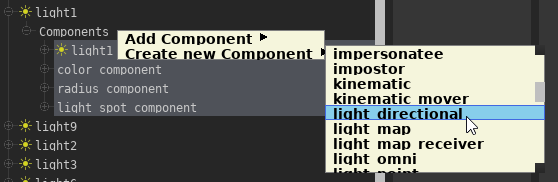
This list includes all components known by the engine, many of which may not be suited for use in PFM!
Custom Lua-based components will also appear in this list automatically.
If you select one or more components from the actor component list, you will get a set of properties on the right-hand side of the editor:
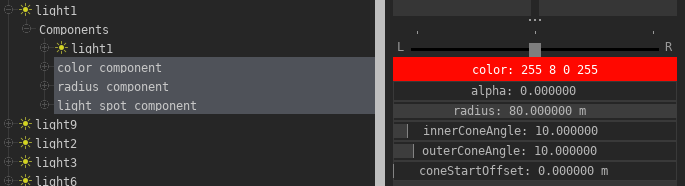
Most of these properties can be animated (with the exception of strings and a few other types).
Creating custom components
To create a new Lua-based component for use in PFM, follow these steps:
- Create a new addon in the "addons" directory
- Within that directory create the path and file "lua/entities/components/<component_name>/client/client.lua"
- "component_name" has to be lower-case and must not contain any special characters (aside from '_') or spaces!
- If the component is specific to PFM only, you should use the "pfm_" prefix for the component name.
- Open the "client.lua" in a text-editor and paste the following contents into it (and make sure to follow the comments):
-- Replace "CustomComponent" with a name of your choice (make sure it doesn't exist yet)
local Component = util.register_class("ents.CustomComponent",BaseEntityComponent)

-- Register properties for this component. These will be editable (and animatable) in PFM
Component:RegisterMember(
	"ExampleProperty", -- Property name
	udm.TYPE_FLOAT, -- Property type
	1.0, -- Default value
	{
		min = 0.0, -- Min value (hint for the UI)
		max = 10.0 -- Max value (hint for the UI)
	}
)

function Component:Initialize()
	BaseEntityComponent.Initialize(self)
	print("Initializing component of type '" .. self:GetComponentName() .. "'...")
	-- Do something when this component has been added to an entity/actor
end
function Component:OnRemove()
	print("Removing component of type '" .. self:GetComponentName() .. "'...")
	-- Do some cleanup?
end

-- Register the component. "component_name" has to match the name of the directory in "entities/components/"!
-- "COMPONENT_CUSTOM" should also reflect this name!
-- e.g. if your component name is "apple_tree", "COMPONENT_CUSTOM" should be "COMPONENT_APPLE_TREE"
ents.COMPONENT_CUSTOM = ents.register_component("component_name",Component)
The next time you start PFM, your component should appear in the component list automatically and you can add it to your actors.
Below is an example of the pfm_sky component, which enables animating the sky orientation and strength when rendering with raytracing:
util.register_class("ents.PFMSky",BaseEntityComponent)

local Component = ents.PFMSky
Component:RegisterMember("Strength",udm.TYPE_FLOAT,1.0,{
	min = 0.0,
	max = 10.0
})
Component:RegisterMember("Transparent",udm.TYPE_BOOLEAN,false)
Component:RegisterMember("SkyTexture",udm.TYPE_STRING,"",{
	specializationType = ents.ComponentInfo.MemberInfo.SPECIALIZATION_TYPE_FILE,
	metaData = {
		rootPath = "materials/skies/",
		basePath = "skies/",
		extensions = {"hdr"},
		stripExtension = true
	}
})

function Component:Initialize()
	BaseEntityComponent.Initialize(self)

	self.m_callbacks = {}
	table.insert(self.m_callbacks,ents.add_component_creation_listener("unirender",function(c)
		table.insert(self.m_callbacks,c:AddEventCallback(ents.UnirenderComponent.EVENT_INITIALIZE_SCENE,function(scene,renderSettings)
			scene:SetSkyAngles(self:GetEntity():GetAngles())
			scene:SetSkyStrength(self:GetStrength())
			local tex = self:GetSkyTexture()
			if(#tex > 0) then scene:SetSky(tex) end
			scene:SetSkyTransparent(self:GetTransparent())
		end))
	end))
end
function Component:OnRemove()
	util.remove(self.m_callbacks)
end
ents.COMPONENT_PFM_SKY = ents.register_component("pfm_sky",Component)
External Render Tool
While it's possible to render images directly in the Filmmaker, it is not recommended for final renders or animations. You can use the external render tool instead, which has the following advantages:
- It's much faster than rendering directly in Pragma (since more GPU resources are available if Pragma is not running)
- You don't have to keep Pragma running in the background during the render process
- You can keep working on projects without affecting the rendering
- If Pragma crashes, the render will continue
- You can use both your CPU and GPU simultaneously when rendering animations
- You can cancel it any time, frames that have already been rendered will not be lost (except for the current one)
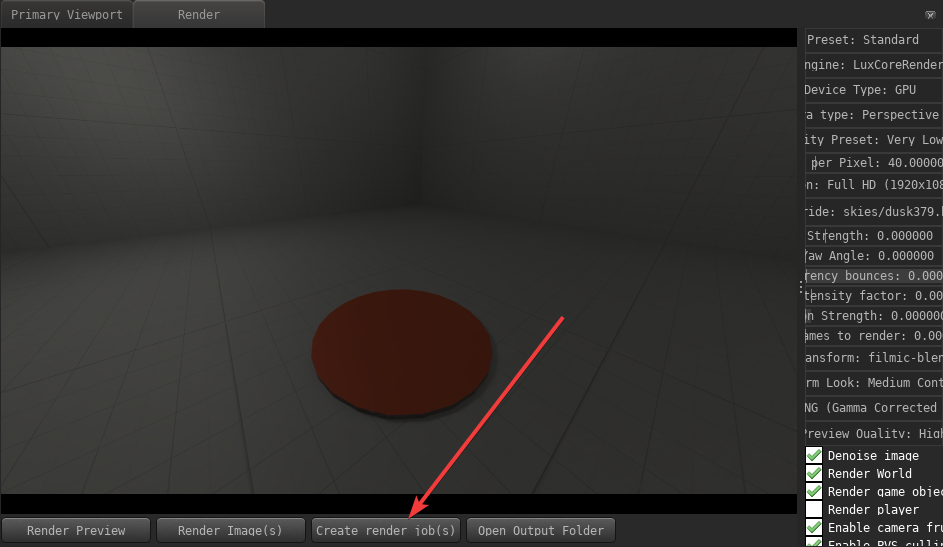
To use the external rendering tool, follow these instructions:
- Launch PFM like usual and load your project
- Switch to the "Render" tab
- Instead of clicking "Render Image(s)" to render your images, click the "Create render job(s)" button
Once the render jobs have been generated, an explorer window should open with a bunch of ".prt"-files, a "cache" directory (which contain all of the information needed to render your images), as well as a "render.bat". To start the render, simply double-click the .bat-file, which should open a black console window. Pragma is no longer required at this point and can be closed.
The images will be rendered one after another and placed in the same directory as the ".prt"-files. Once all images have been rendered you can remove all of the .prt-files, as well as the "cache" directory, as they are no longer required.
Commands
TODO
pause
resume
stop
preview
suspend
export
Material Overrides
Material overrides allow you to change the material (or material properties) for an individual actor, without having to change the material itself (which would affect all actors with the same model).
Material override properties can currently not be animated.
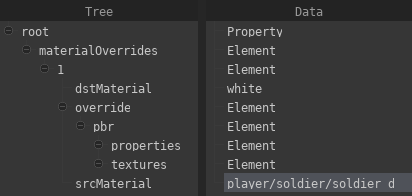
To add a material override, go to the actor editor and select the pfm_model component of the actor, then click on Edit materialOverrides. This will take you to the UDM Editor window, where you have to set up the following data structure:
You can do so manually, or by copying the following code block to your clipboard, right-clicking the root item, and selecting Paste from clipboard:
"pfm_udm_copy"
{
	$array materialOverrides [element;1][
		{
			$string srcMaterial ""
			$string dstMaterial ""
			"override"
			{
				"pbr"
				{
					"properties"
					{

					}
					"textures"
					{

					}
				}
			}
		}
	]
}
Now double-click the value for the srcMaterial property and enter the path and filename (without extension) of the material you want to override (e.g. enter player/soldier/soldier_d, if the material is materials/player/soldier/soldier_d.pmat).
If you want to override the material with another material, double-click the value for the dstMaterial property and enter the path of the replacement material.
You can also replace individual material properties and textures manually by adding them to the properties and textures sections. For instance, if you want to override the color_factor property, right-click properties, select Add Property > vec3 and name the property color_factor. On the right side you can now double-click the value to edit it:

If you want to replace the albedo map, right-click textures, select Add Property > string, name the property albedo_map and input the texture you want to use as a replacement as the value.
Make sure to press Save to apply the changes you have made, and save the project afterwards.
If you want to add more than one material override, follow these steps:
- Right-click
materialOverridesand chooseAdd Item. - Right-click the first item in
materialOverridesand chooseCopy to clipboard. - Right-click the second item in
materialOverridesand choosePaste from clipboard.
You can repeat these steps for any number of additional overrides.