Rendering
How to render your project and how to use specific rendering effects (motion blur, fog, etc.).
- Rendering
- Depth of Field
- Motion Blur
- Fog
- Volumetric Lighting
- Virtual Reality
- HDRI Skies
- Pragma Renderer
- Live Preview
- Animations
- Lighting
- Decals
- Color Correction
Rendering
To render your scene, switch to the "Render" tab above the viewport and you should see a window similar to this one (but with a black viewport):
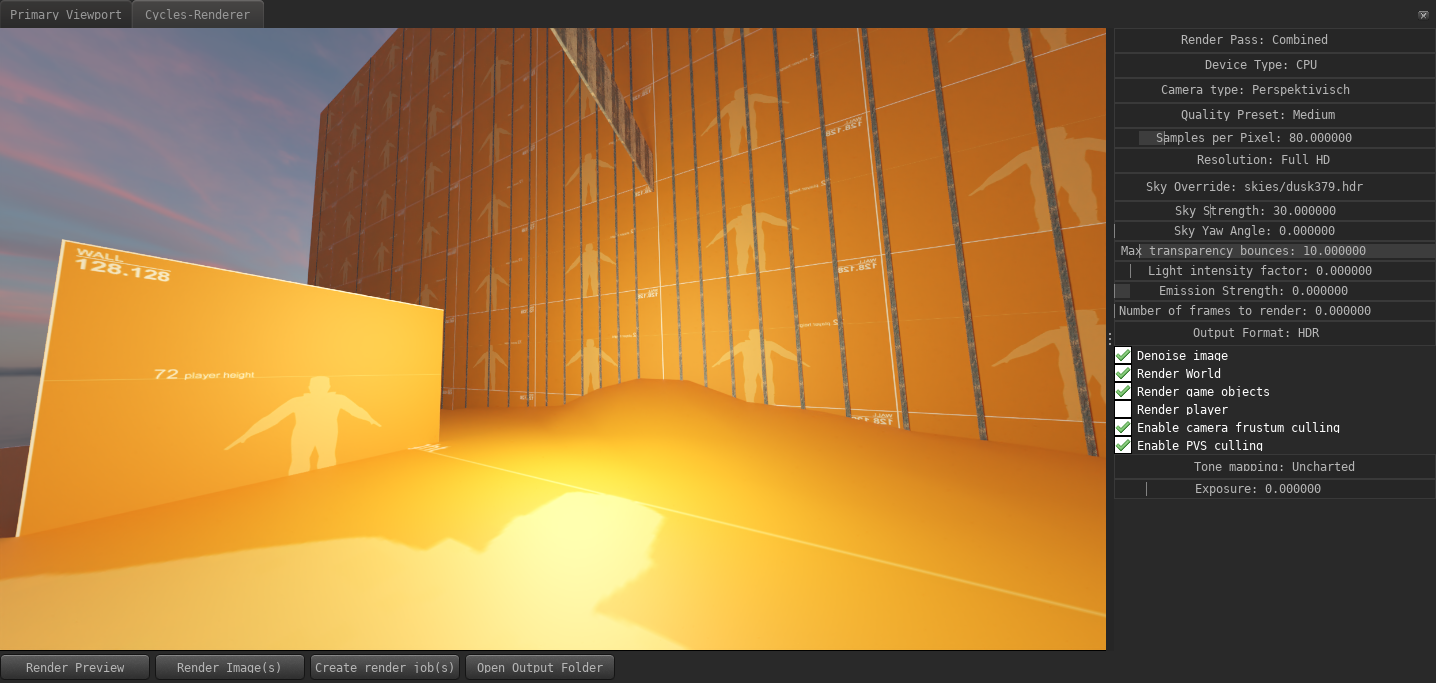
Here you can choose between three renderers:
- Cycles: The same renderer as used by Blender to create highly realistic images.
- LuxCoreRender: Another path-tracing renderer (like Cycles)
- Pragma: Pragma's internal renderer. Requires a bit of setup for good looking results.
Which renderer you should choose depends on your goal and hardware setup. If you're planning on creating a poster or single-frame images, Cycles or LuxCoreRender would be the best choice to get the highest possible quality.
For animations, Pragma is the recommended renderer. You can use Cycles or LuxCoreRender for animations, however you can expect many hours or render time, even for short animations and with modern hardware.
If you want to get a quick preview render, click the "Render Preview" button. This will render an image with a very low sample count and low resolution, which will give you a rough idea of what the final render will look like. To render your final image(s), press the "Render Image(s)" button.
When rendering an image for a new project or a new map for the first time, Pragma may appear frozen for a few minutes, this is because some additional asset conversions are required for the Cycles/LuxCoreRender renderers, and some shaders may have to be recompiled. Subsequent renders should not take as long.
The render options to the right can be used to change the resolution of your render, sample count, number of frames, etc. You can leave most of these options on their defaults in most cases, but here are some of the more important options:
- Render Engine: Which render engine to use. You can choose between "Cycles X", "LuxCoreRender" and "Pragma".
- Device Type: You can render with either your CPU or your GPU. This option only affects rendering speed, the end-result is the same. If you have a modern GPU, you may want to consider switching to GPU rendering.
- Samples per Pixel: The higher the sample count, the higher quality your render will be, at the cost of rendering time. If you notice weird discolorations in your final render, or if you're using advanced render features (like subsurface scattering), you'll likely have to increase this value to get good results.
- Resolution: The resolution of the render. You can choose between the presets, or hold the alt-key and click into the field to enter manual values (e.g. "1000x1200"). Higher resolutions will result in longer rendering times.
- Max transparency bounces: This field is usually not important unless you have a lot of overlapping transparent objects in your scene. If you notice black spots around transparent objects, try increasing this value.
- Light intensity factor: Controls the global light intensity of the scene (excluding lighting caused by the sky).
- Number of frames to render: If you intend to render an image sequence, set this value to the number of frames you wish to render.
- Output Format: The image format that the frames will be saved as once rendering is complete. If set to HDR, no tone-mapping will be applied and the image will be saved with the original 16-bit colors.
- Enable camera frustum culling: If enabled, objects that are outside of the visible area of the camera are not included in the render. This can improve rendering times, but may also cause incorrect lighting in some scenes (especially indoor scenes).
- Tone mapping: The tone-mapping algorithm to use to transform the HDR colors to sRGB space. Some tone-mappers have additional parameters to tweak the result.
Once rendering is complete, the image will automatically get saved to your harddrive. You can press the "Open Output Folder" to navigate to it in the system explorer.
When rendering a large sequence of images or images with a large sample count / high resolution with Cycles X or LuxCoreRender, it is recommended to use the external render tool instead. Please see that section for details.
Depth of Field
Depth of Field is currently only available for the Pragma renderer.
To add a depth of field effect to your camera, expand the camera actor in the actor editor, right click "Components" and add the optical_camera component:
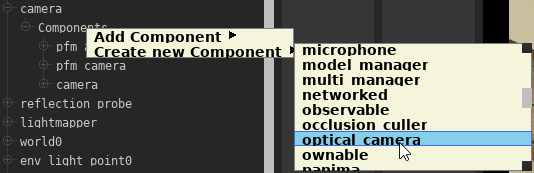
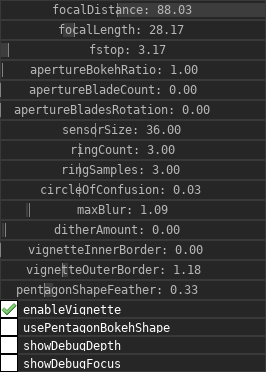
Now select the "optical_component" from the component list, and you will see a number of DoF options appearing on the right:
Make sure to switch from the work camera to the scene camera if you want to make changes to the DoF settings, otherwise you will not see what changes. Additionally, whenever you make changes to the DoF settings, you should enable the "showDebugFocus" option. This will enable a helper overlay, which will make it easier to define the DoF area:
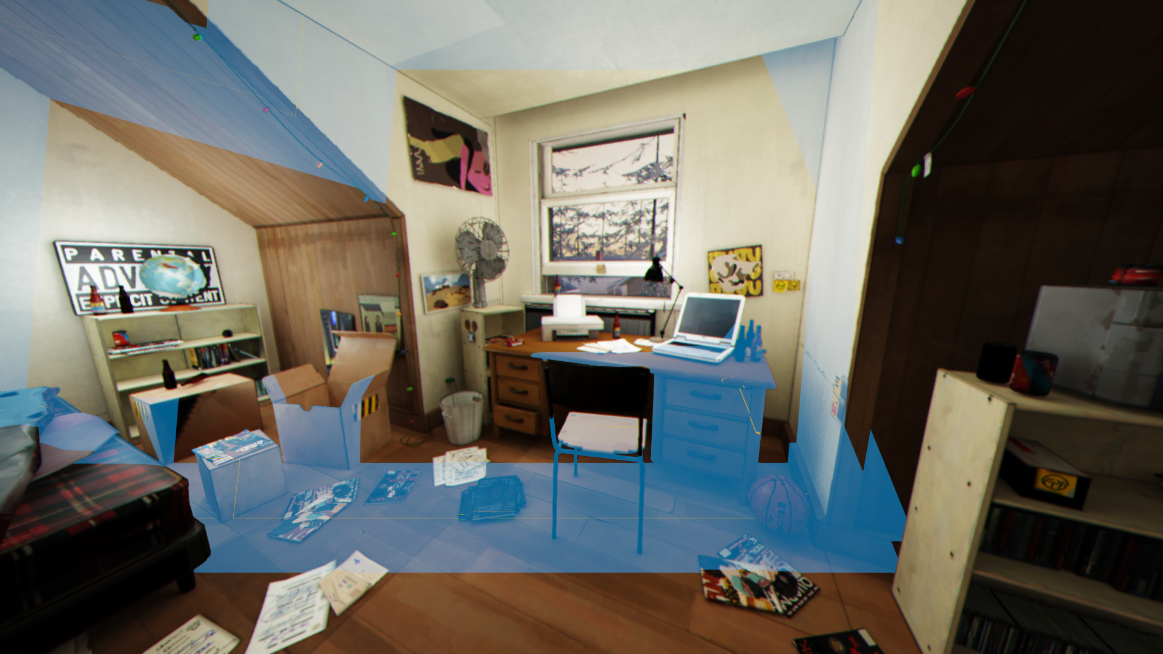
The blue area represents the focal range and the yellow line the focus point. These can be adjusted with the "focalDistance", "focalLength" and "fstop" properties. Make sure to disable this option when you're done.
Here's a list of some of the available properties:
- focalDistance: The distance from the camera to the center of the focal area in game units.
- focalLength: The length of the focal area in game units.
- fstop: Defines the amount of blurring.
- ringSamples: Quality of the blur effect.
- circleOfConfusion: Circle of confusion in mm.
- maxBlur: Intensity of the blur. Higher values will require a higher number of ringSamples as well.
- ditherAmount: Adds random noise to the effect.
- enableVignette: Adds a camera vignette effect near the borders.
- vignetteInnerBorder: Controls the start border distance for the vignette effect.
- vignetteOuterrBorder: Controls the end border distance for the vignette effect.
- usePentagonBokehShape: Changes the bokeh to use a pentagon shape.
- pentagonShapeFeather: Pentagon shape feather.
- showDebugFocus: Toggles the helper overlay.
Motion Blur
Motion blur is currently only available for the Pragma renderer.
PFM supports both per-object and camera motion blur. Especially on lower frame rates (<=30 FPS), adding motion blur to the scene can be very effective.
The setup is very simple as well. Simply locate the camera actor in the actor editor, expand it, right click Components and add the pfm_motion_blur component:

That's all you have to do to enable motion blur. There are a few things to keep in mind, however:
- Motion Blur currently only works properly in the viewport if you play back the animation frame by frame (by using
 ), and only if you go through the frames forward and sequentially. If you randomly jump somewhere in the timeline, you'll likely notice a very warped effect until you step to the next frame. Using the
  -button to play back the animation will also not work.
You don't have to worry about this for rendering, however. Simply render your image sequence like you would normally. - The very first frame of your animation will never have motion blur, because motion is determined by comparing the actor poses of the current frame with the previous frame (and the first frame has no previous frame, therefore there is no motion). If you want your animation to start with motion blur in the first frame, you'll have to take this into account by increasing the length of your animation by one frame at the start, which you can then discard when rendering is complete.


Camera motion blur works in the same way, all you have to do is animate the camera position and/or rotation and the blur will appear automatically.
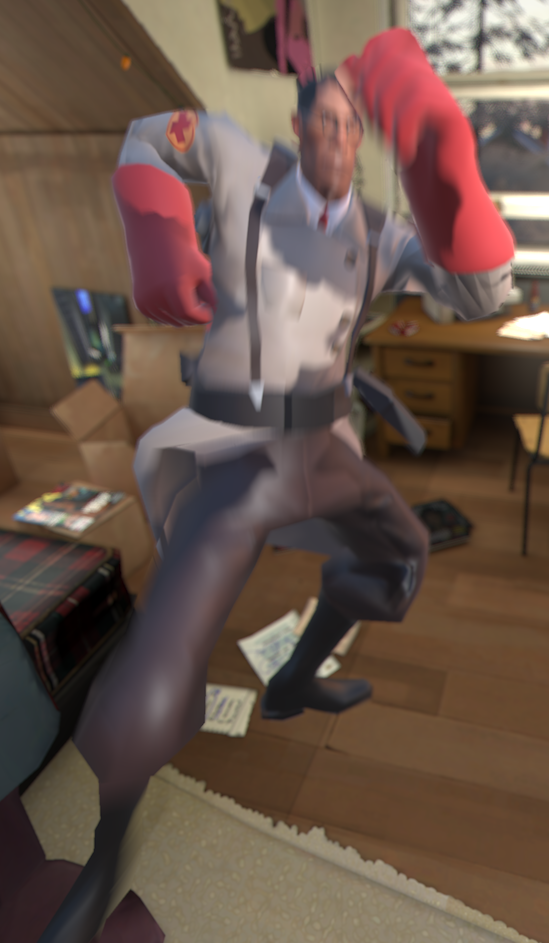
Motion Blur in Posters
To use motion blur for a poster, you need to have at least two frames, with moving actors or actor poses. When rendering, start at the first frame, and set the Number of frames to render in the Render window to 2. The second frame will have the proper motion blur effect:
Fog
Fog is currently only available for the Pragma renderer. To get a similar effect with Cycles/LuxCoreRender, see Volumetric Lighting.
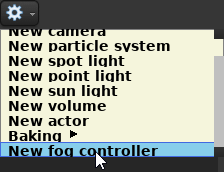
To add fog to your scene, click the  -button in the actor editor and select
 New fog controller. If the option is not available, you probably already have a fog controller actor in your scene (only one is allowed).
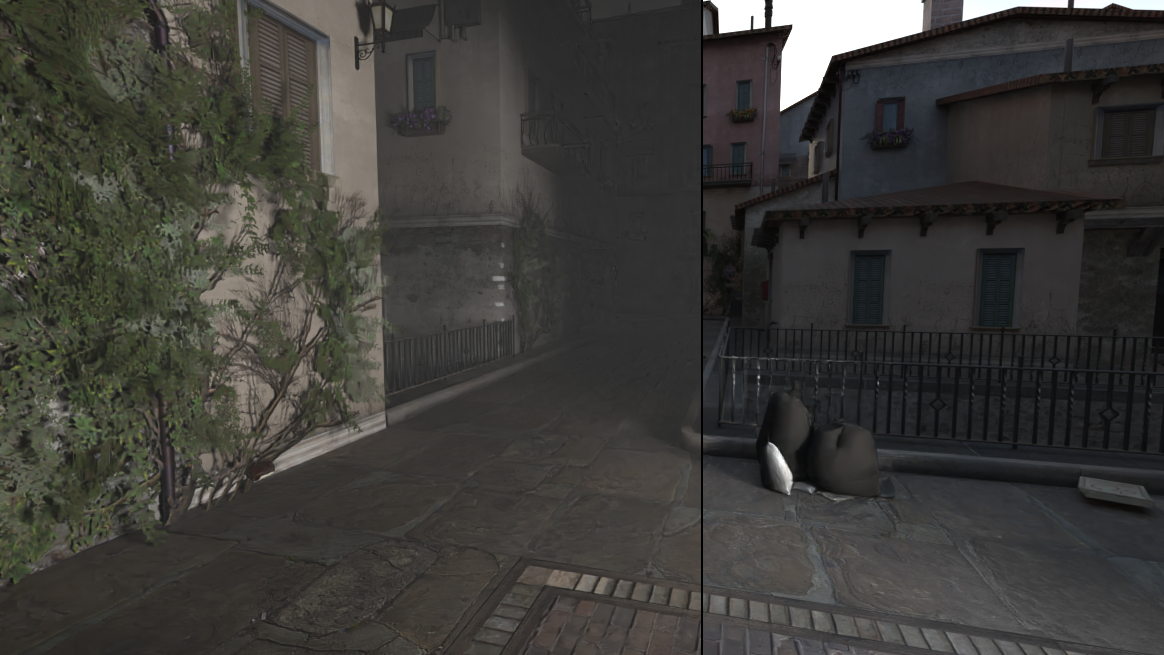
Now select the fog_controller from the component list of the new actor, and you will see a number of fog options appearing on the right:
- start: Start distance of the fog in game units, only has an effect if the fog type is
Linear. - end: End distance of the fog in game units, only has an effect if the fog type is
Linear. - density: How dense the fog should be. The meaning of the value is dependent on the fog type.
- type: The type of fog. Exponential fog creates more realistic results.
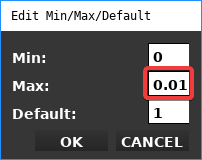
When using the exponential fog, the density value should be very low (< 0.01). The default range of the slider is significantly higher than that, so you may want to remap the range by right-clicking the property and choosing Remap Slider Range: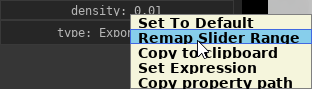
The fog color can be changed via the color component of the same actor.
Volumetric Lighting
Volumetric lighting can be used to create fog, light beams, dust in the air and similar effects. In PFM there are several different volumetric effects available depending on the renderer you're using.
Volumetric Spot-Lights
Volumetric spot-lights are currently only supported for the Pragma renderer!
You can add a volumetric effect to a spot-light source to create a simple, visible light beam.
To add a volumetric effect to a spot-light source, simply right-click the Components element of the spot-light actor in the actor editor and select Create new Component > light_spot_volume. The intensity of the volumetric effect depends on the light's intensity, but can also modified with the intensity property of the light_spot_volume component.
General Volumetric Lighting
General volumes are currently not supported for the Pragma renderer.
Adding a volume to your scene will significantly increase the number of samples required for the scene, increasing render times. It is therefore not recommended for animations.
When using the LuxCoreRender renderer, the volume will affect the entire scene globally, regardless of the volume bounds.
To achieve a volumetric affect such as the one from the top-most image, you can add a new Volume actor to your scene via the actor editor. The volume is a cube-shared area, which encompasses the entire scene by default. All lighting within the bounds of the cube will be affected. Configuration options are available in the pfm_volumetric component of the actor:
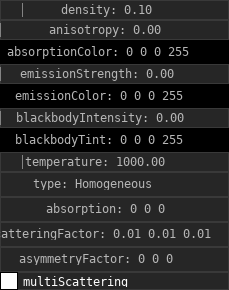
Please note that some of the options only have an effect for certain renderers.
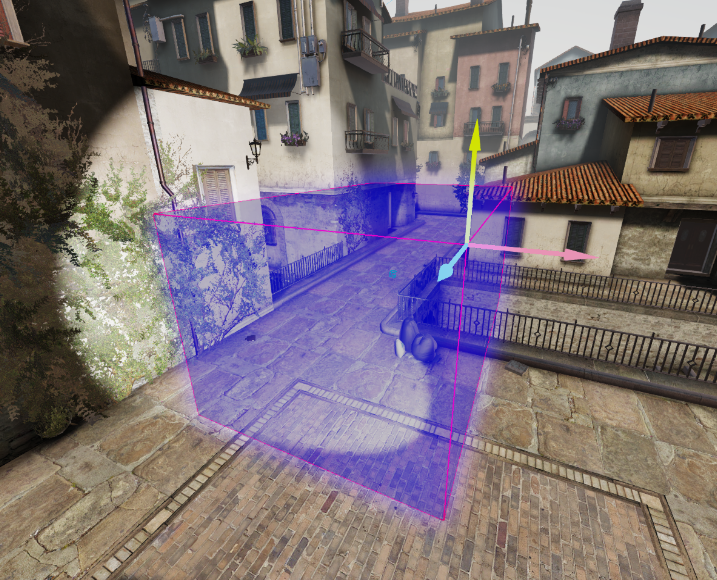
You can also change the bounds of the volume if you only wish the volumetric effect to apply to a certain area of the scene. To do so, select the pfm_cuboid_bounds component of the volume actor and enable the showDebugBounds property to visualize the bounds of the volume. This is merely a visual aid, so make sure to disable the property when you're done changing the bounds.
To change the bounds, select the minBounds and maxBounds properties respectively and move them around using the move transform tool in the viewport.
Virtual Reality
PFM allows you to easily render image sequences for VR videos:
(Click and drag your left mouse button in the video to look around the scene.)
Since Pragma can only render image sequences, you will still need a VR-capable video editing software (like Adobe Premiere 2019) to create the final video. There is also free software available online to do this, but this tutorial only describes the approach for Adobe Premiere.
Setup
To render images for VR, go to the render tab in PFM and change the preset to "VR": 
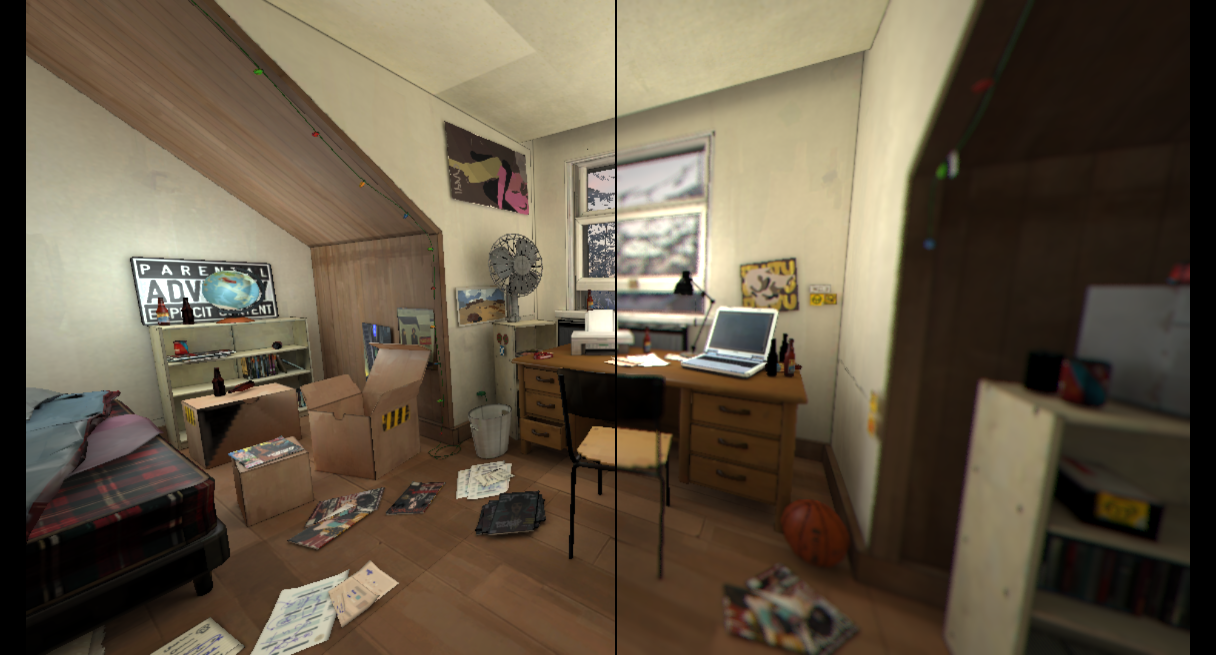
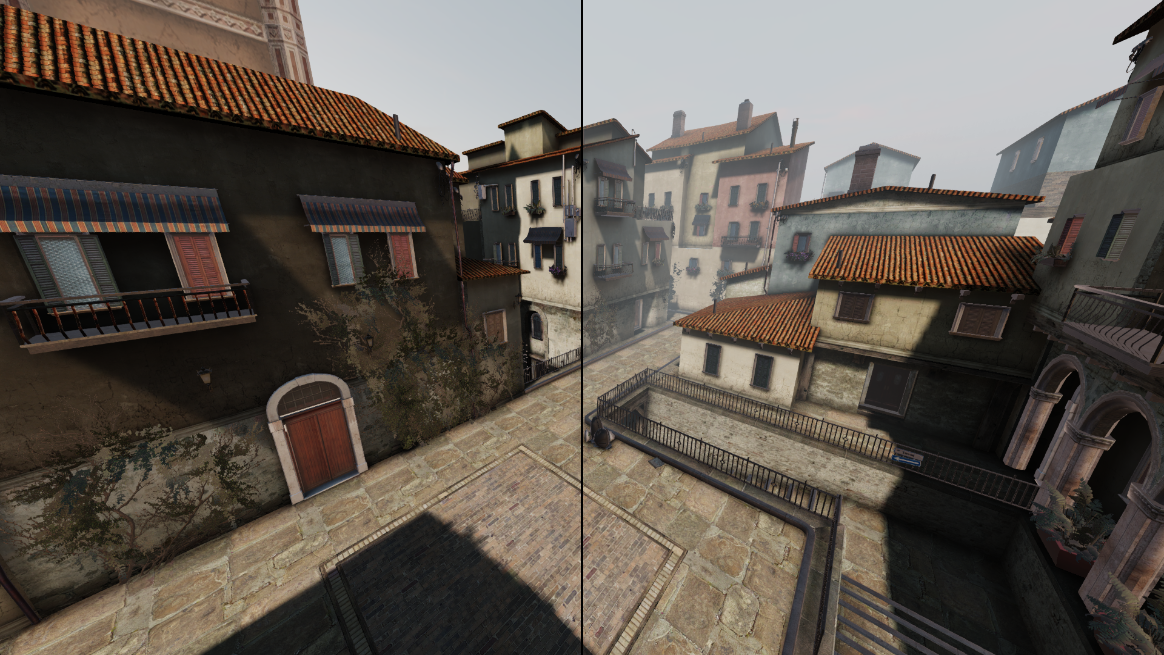
If you render an image now, it will render a stereoscopic 360° equirectangular image, which can be used for VR videos:
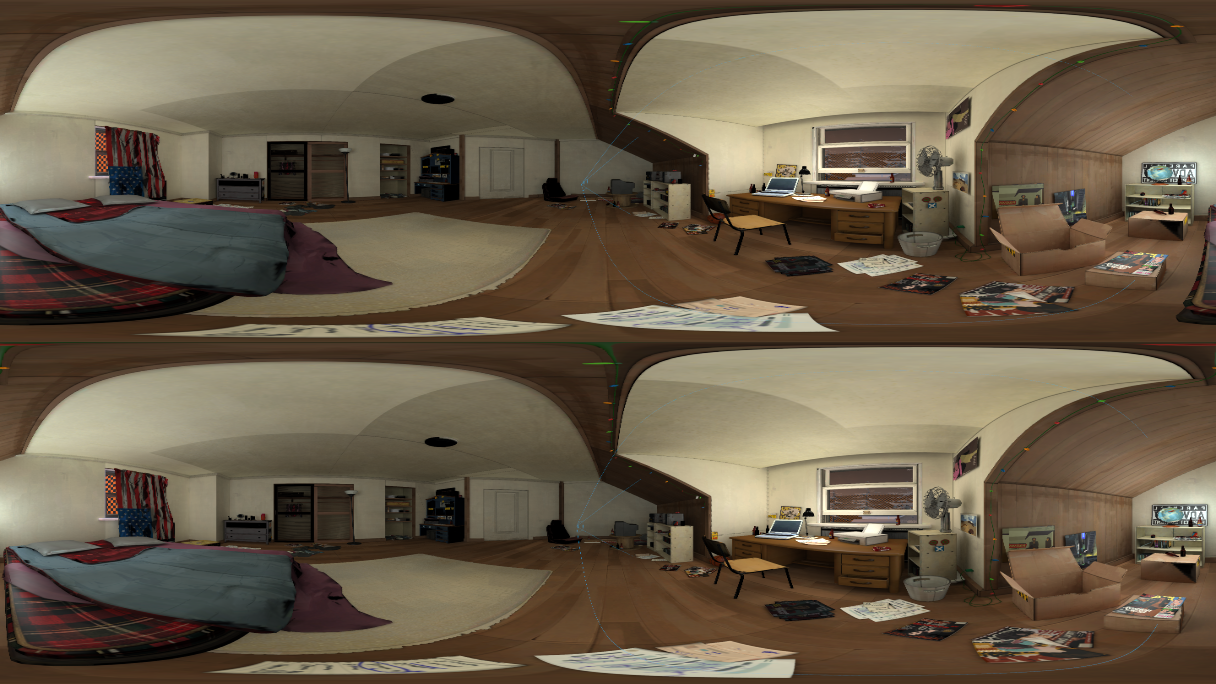
The scene has to be rendered from two perspectives – once for the left eye and once for the right eye, which is why it appears twice in the rendered image. You can change the mode to monoscopic to get a single image from the camera perspective, however this will make depth perception in the final video impossible and is therefore only recommended for non-VR videos.
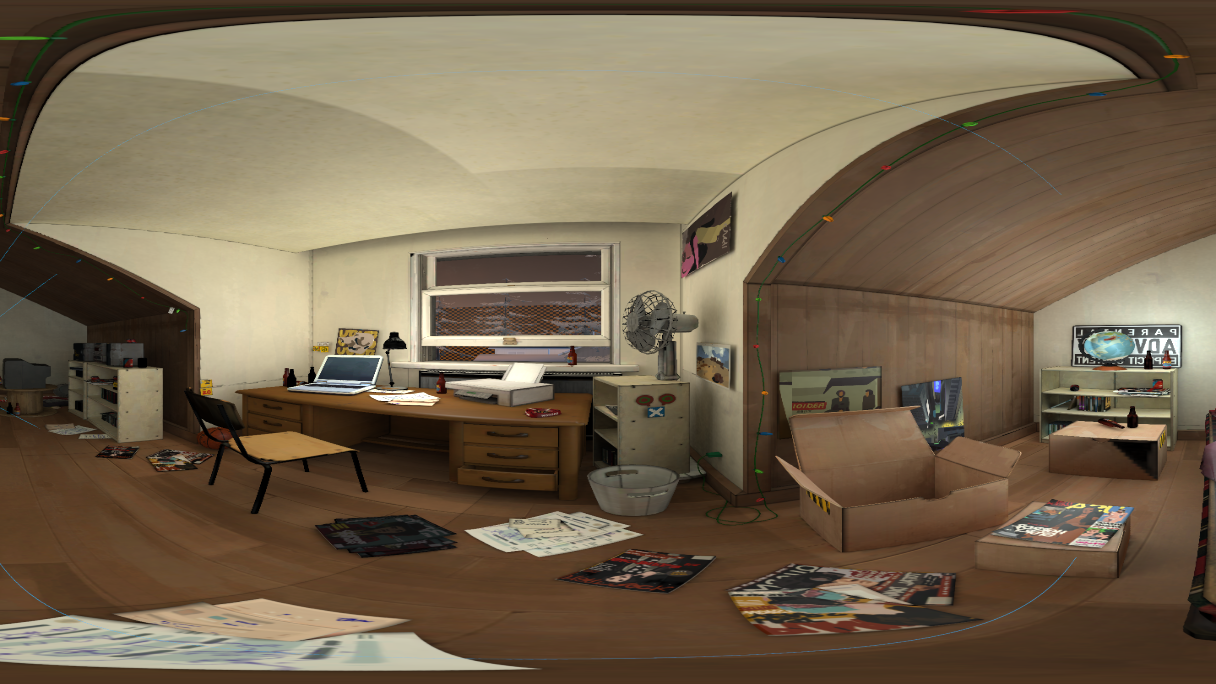
In some cases you may also want to restrict the scene to 180°: 
This effectively doubles the available vertical resolution (therefore improving the overall quality), but only half of the scene will be visible in the video:
Rendering VR / 360° videos requires significantly more time and rendering resources compared to regular images. For this reason it is highly recommended to use the Pragma renderer for these types of videos.
You can use Cycles X or LuxCoreRender as well, but this requires top-of-the-line, modern hardware to get even reasonable render times.
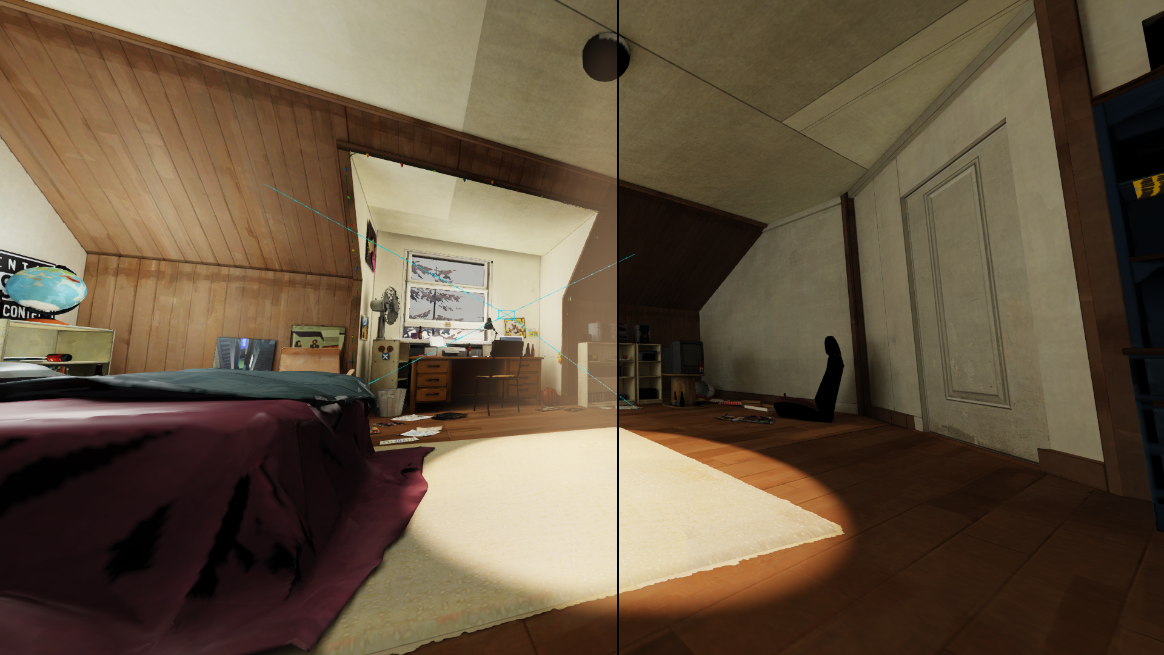
Once the image has been rendered, you can change the viewport mode to inspect it: 
If the image is stereoscopic, you can toggle between a preview for the left eye and the right eye. You can click (and hold) into the image with the left mouse button and move the mouse around to look around the rendered scene for each eye.
The third mode is "flat", which displays the actual image as is.
Camera Orientation
When rendering images of this type, make sure that both the pitch and roll angle of your camera are 0 (or more specifically, make sure the orientation is horizontal to the ground), otherwise the perspective in the rendered image will look very unnatural.
Adobe Premiere
Once you've rendered the image sequence for your VR video, import the images into a new Adobe Premiere project like you would for regular videos. Then, go to Sequence > Sequence Settings in the menu. At the bottom of the dialog box, you should find the following options:

Make sure Projection is set to Equirectangular and Layout to Stereoscopic - Over/Under. Vertical should always be set to 180°, Horizontal Captured View should be set to 180° or 360°, depending on your render settings in Pragma.
If you've set it up correctly, you should be able to right-click the image in the viewport and choose VR Video > Enable. You should now be able to look around the scene by clicking and dragging with your left mouse button.
If you render the video now, it should automatically create a VR video with the correct settings.
HDRI Skies
If you want to use a sky in your scene, you can do so by using a HDRI sky texture. PFM already ships with a few different HDRI skies, but you can also find plenty for free online, such as on https://hdri-skies.com/ or https://hdrihaven.com. Custom HDRIs should be extracted to Pragma/addons/filmmaker/materials/skies/.
To use a HDRI sky, all you have to do is add a sky actor to your scene. Click the -button in the actor editor and select New sky. If the option is not available, you probably already have a sky actor in your scene (only one is allowed).
You can change the sky texture by clicking the pfm_sky component of the sky actor and changing the skyTexture property. The choice of HDRI texture can have a significant effect on the lighting conditions in your scene when rendering with one of the raytracing renderers. The lighting influence intensity of the sky is controlled through the strength property.
HDRI skies can be used with the Pragma renderer as well, but in this case they currently only work if the map has a skybox.
Sky Orientation
The position of the sky does not matter, but you can change the rotation of the sky with the  -tool. This property can also be animated, which you can use to give the impression of moving clouds.
Pragma Renderer
Please see the Rendering Animations workflow for information on how to use the Pragma renderer.
Live Preview
If you're planning on using Cycles X or LuxCoreRender for rendering, you can enable the live raytracing mode in the viewport window to get an immediate render preview while making changes to the scene:
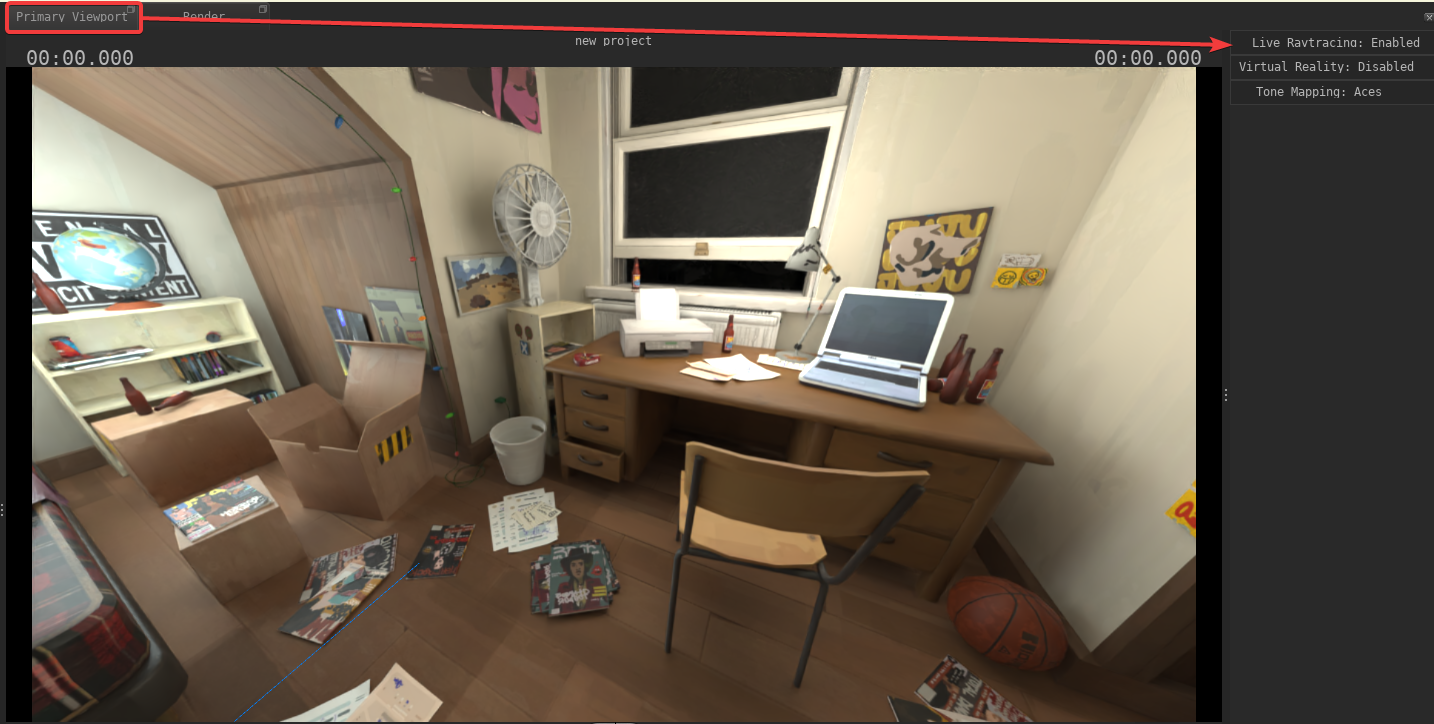
This mode will use the same render engine as specified in the "Render" tab. Not all scene changes are supported yet, but you can move actors and edit light sources while in this mode.
Animations
Pragma currently only supports rendering image sequences, which means you still need a video editing program to merge the individual frames into a video.
To render an image sequence in Pragma, all you have to do is increase the Number of frames slider in the Render tab: 
If you want to render all of the frames of the current clip/session, you can just right-click on the slider and choose To end of clip/To end of session. If you now click on Render Image(s), all of the frames will be rendered one after another. You can click Open Output Folder to open the image location in the explorer.
The Number of frames session does not affect preview renders. The Render Preview button will always only render a single frame, and it will also not save the rendered image to the disk.
Pragma does not check if you have enough disk space available for all of the images, so make sure there is enough space before to start the render.
Lighting
PFM supports four light source types:
- Sun Lights (aka directional light or environmental light)
- Point Lights (aka omni light)
- Spot Lights
- HDRI lighting
To create a light source, open the actor editor and click the gear icon, then select "New spot light", "New point light" or "New sun light" respectively. The light source will appear in front of the camera, so make sure you're not standing right in front of a wall or an object, otherwise the light may appear behind it.
When creating a light source (or any other actor), make sure a film clip is selected in the timeline window first! The light source will only be valid for that particular film clip.
To change the properties of the light source, select it in the actor editor. The available properties depend on the light source type and will appear in the righthand window of the actor editor.
PFM uses Pragma's renderer for rendering your scene in real-time in the viewport, however the final render is processed using the Cycles path-tracing renderer. Due to the different rendering method between the two, the lighting in your scene may look quite a bit different (especially with outdoor scenes). For this reason it's recommended to render a preview image of your scene from time to time to ensure the lighting in the final render matches your expectations.
Point Light
Point light sources are omnidirectional lights, which means they emit the same amount of light in all directions from a point in space.
Intensity
The intensity of the light source in Lumen or Candela (depending on the specified unit type).
Intensity Unit
The intensity unit field specifies the base unit that the intensity value represents, which can be either Lumen or Candela. If you're unsure which value to choose, you can just use the Lumen intensity value printed on the side of most light bulb packages.
Radius
The maximum radius of the light source in meters.
This property is currently ignored when rendering with Cycles!
Spot Light
Spot lights emit light as a cone in a particular direction.
Intensity
The intensity of the light source in Lumen or Candela (depending on the specified unit type).
If you're specifying the light intensity for a spot light in Lumen, beware that the perceived light intensity will depend on the outer cone angle of the light source, i.e. a smaller cone angle will create a brighter light. If you want to have consistent light intensities regardless of the angle, use Candela instead!
Intensity Unit
The intensity unit field specifies the base unit that the intensity value represents, which can be either Lumen or Candela. If you're unsure which value to choose, you can just use the Lumen intensity value printed on the side of most light bulb packages.
Radius
The maximum radius of the light source in meters.
This property is currently ignored when rendering with Cycles!
Outer Cone Angle
The angle (in degrees) of the cone in which light should be emitted. The angle mustn't exceed 180 degrees.
Inner Cone Angle
The difference between the outer and inner cone angles determines the smoothness towards the edges of the cone. The smaller the inner cone (relative to the outer cone), the smoother the light falloff will appear. This value should always be lower than the outer cone angle.
Sun Light
A sun light source does not have an origin in space and emits the same light everywhere from the same direction.
Intensity
Contrary to point and spot lights, the intensity of a sun light source is measured in Lux (Lumen per square meter). This means that the value doesn't actually represent the amount of light emitted by the light source, but rather the amount of light received by a surface that is being lit by this light source.
HDRI Lighting
HDRI lighting is special in that it's not a conventional light source, but rather based on a HDR panorama image. This type of lighting can have a substantial effect on your scene, but only works for outdoor scenes and you can only specify one HDRI image for your entire scene.
HDRI Lighting currently only works when rendering with Cycles and has no visible effect in PFM's viewport.
To specify a HDRI image, open the Cycles render settings and click the "Sky Override" field. You can then press "..." to select your HDRI image file. Pragma already ships with several HDRI skies you can choose from, but you can also get additional skies from websites like https://hdri-skies.com/ or https://hdrihaven.com.
Decals
Color Correction
This is a stub