User Interface
Here you can find a list of articles describing the individual windows in PFM and how to use them.
- Overview
- Viewport
- Actor Editor
- Graph Editor
- Model Catalog
- Material Editor
- Web Browser
- Particle Editor
- UDM Editor
Overview

Above is the initial view you should be seeing when launching PFM for the first time. The interface is very similar to that of SFM, so if you're familiar with SFM you should feel mostly at home. That being said, there are significant differences as well. Here is a short overview over the most important windows:
- Primary Viewport: The viewport is where you can view your scene, play back your animation, select and transform actors, etc.
- Render: This is where you can render your scene. You can render single images or animations, use one of several renderer engines, render VR images and more.
- Timeline: In this window you will find the
Clip Editor, for managing film clips and theGraph Editorfor animating. TheMotion Editoris currently not implemented and is not available. - Actor Editor: After selecting a film clip from the
Timelinewindow, this is where you will find a list of all of the actors in the scene and where you can edit actor properties or add new actors.
All windows can be detached from the main window using the icon at the top right, which can be particularly handy if you want to work with multiple monitors:
Menu Bar
Here are some of the most important options in the menu bar:
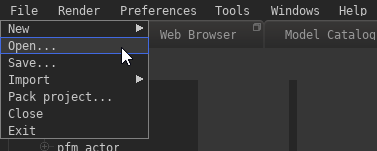
File > New: Create a new empty or simple project.
An empty project will start out with no actors whatsoever, while a simple project contains a few commonly used base actors (such as a camera and a sky actor).
The directory for opening or saving a project is Pragma/addons/filmmaker/projects/, you cannot choose any other destination. PFM also has an autosave which is triggered approximately every 10 minutes. Autosaved projects can be found in the same directory as the main project, but with the suffix _autosaveX at the end of the file name.
File > Import: Import a SFM project or a map.
Importing a SFM project can take several minutes, since all of the assets used in the project will have to be converted to Pragma's formats. Importing a SFM project is also not a 1:1 process, it is likely that the scene will look significantly different in SFM and will require some adjustments.
You also have to make sure that all actor transforms are unlocked and all rigs are detached before importing the project into PFM. You can find more information on how to do that here.
You can also import a map. This is not a full import and will only import the map geometry and map props, which will be added to the scene as actors. Other entities will not be imported. It is only recommended to use this option for small maps.
File > Pack project...: This option allows you to pack up the entire project, including all of its used assets, into a zip-archive. This archive can be used to share the project with other people.
Preferences > Language: Allows you to change the interface language. Only English and German are fully translated, other languages will default to English for non-translated texts.
Windows: Not all available windows are open by default. Here you can find and open all available windows. Please read through the articles for the individual windows here to find out more information about them.
Keybinds
Below is a list of the available keybinds that are accessible everywhere. Some windows may provide additional keybinds, which you can find at the bottom of the wiki article for the respective window.
| Action | Default Key |
| Toggle Play | space |
| Previous Frame | , |
| Next Frame | . |
| Previous Bookmark | [ |
| Next Bookmark | ] |
| Create Bookmark | m |
| Clip Editor | F2 |
| Motion Editor | F3 |
| Graph Editor | F4 |
| Quick-Move X Axis | x |
| Quick-Move Y Axis | y |
| Quick-Move Z Axis | z |
| Undo | Ctrl+Z |
| Redo | Ctrl+Y |
| Select | q |
| Translate | t |
| Rotate | r |
| Scale | s |
| Save Project | Ctrl +S |
Viewport
The viewport window provides a real-time preview of your scene which you can interact with to select actors, move them around, etc.
Movement
To move the work camera around in the viewport, click (and hold) the right mouse button and drag the cursor around. As long as you are holding down the mouse button, you can move around with WASD. To move slower or faster, you can hold the alt- or shift-key respectively. Additionally, you can use the scroll wheel to change the field of view of the camera while in this mode.
Viewport Modes
Select 

Keyboard shortcut: Q
While in Select mode, you can simply left-click an actor to select them, which is indicated by a blue outline around the object. The actor will also be selected in the actor editor. You can also click-and-drag the mouse cursor to create a rectangle selection and select multiple objects at once.
You can select multiple actors by holding the ctrl-key. To deselect an actor, hold the alt-key. If you right-click a selected actor, you get a number of actions you can perform:
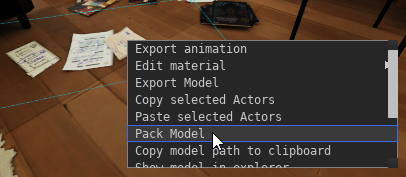
- Edit Material: Opens the specified material in the material editor for quick changes.
- Copy/Paste selected Actors: Copies the actor(s) to the clipboard. You can paste the actor to create a copy, or send the clipboard contents to someone else as plain-text, which allows them to insert the actors into their own projects, including the animation.
- Pack Model: Packs the model of the actor with its materials and textures into a zip-archive.
- Move work camera to actor: Moves the work camera to the actor's position.
- Move actor to work camera: Moves the actor to the work camera's position.
- Show model in explorer: Opens the file explorer for your operating system pointing to where the model asset file of the actor is located.
- Toggle camera link: See Camera-Actor Placement
- Retarget: Use this to retarget an actor to a different model.
Move 


Keyboard shortcut: T
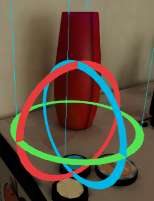
You can use the move-tool to move a selected actor. By clicking the move-tool multiple times, you can toggle between world-space, object-space and camera-space. Additionally you can also press the x, y or z keyboard shortcuts to move the actor on a specific axis only. Press the shortcut a second time to stop the movement. If multiple objects are selected, they will all be moved together.
You can also enable "snap-to-grid" by changing the "Snap to Grid Spacing" on the right-hand side of the viewport window.
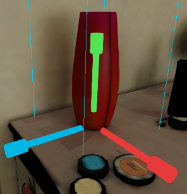
If the actor itself is selected, the move-gizmo will move the actor. If, however, a vector-based property of the actor is selected instead (such as the viewTarget property), the gizmo will affect that property instead:
Smart Move
Instead of using the gizmo in the 3D viewport to move the actor, you can also click and drag the actor itself to move it around. This allows you to quickly move an object to other surfaces, while keeping the distance to the ground the same.
Rotate 

Keyboard shortcut: R
The rotate-tool works the same as the move-tool but for rotating objects. To enable "snap-to-grid" for rotations, change the "Angular Spacing" option on the right-hand side of the viewport window.
Scale 

Keyboard shortcut: S
The scale-tool allows you to scale an object on a particular axis. Multi-object scaling (i.e. if multiple objects are selected) is currently not supported.
Camera-Actor Placement
You can also use the camera to move an actor. To do so, right-click the actor in the viewport or the actor editor, and choose Toggle camera link. This will attach the actor to the camera until you click the left mouse-button.
This is particularly useful for spot-light sources, as changing the field-of-view of the camera using the scroll wheel will also change the cone angle of the light source.
Camera Controls
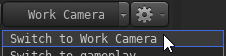
You can click the camera button near the bottom right to toggle between the work camera and the scene camera.
Secondary Viewport(s)
You can open additional viewports in the menu bar using Windows > Secondary Viewport and Windows > Tertiary Viewport. Please note than some functionality (like selecting actors) is currently only supported for the primary viewport.
Live Raytracing
The viewport also supports a "Live Raytracing" mode, which provides an almost real-time preview of your scene using raytracing. Click here for more information.
Keybinds
| Action | Default Key |
| Increase FOV | scrlup |
| Decrease FOV | scrldn |
| Select Mode | Q |
| Move Mode / Toggle Transform Space | T |
| Rotation Mode / Toggle Transform Space | R |
| Scale Mode | S |
| Delete | Del |
| Move object toward/away from camera (only while transforming) | scrlup/scrldn |
Actor Editor
The actor editor window is where you can add new actors to your scene, or change actor properties. An actor can be anything from a light source to a prop or the sky. The actors are all displayed in a tree-structure on the left-hand side of the actor editor:
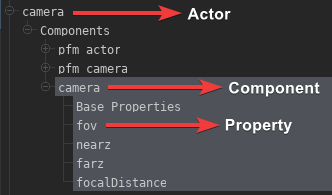
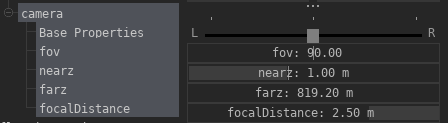
Every actor has a list of components attached to it, which define the actor's behavior and properties. If you select a component, you can edit its properties on the right-hand side of the editor:
Changing the value of a property will change it for the entire film clip, unless the graph editor ( ) is active. If the graph editor is selected, a keyframe will be added at the current playhead position and the value will be animated instead.
Some properties (like the model of an actor) are exempt from this, as they cannot be animated.
Animated properties have a yellow outline around them: 
In this case the property will be unmodifiable (and appear greyed out) outside of the graph editor. If you're not in the graph editor, you can just click the property and you will be directed there.
You can right-click a property on the right-hand side which will give a list of several actions:
- Set To Default: Resets the value to the original value.
- Remap Slider Range: Allows you to change the min/max range of the slider.
- Copy to clipboard: Copies the current value of the property to the clipboard.
- Set Expression: Allows you to specify a math expression to change the effective value of the property. This will only work if the property is animated.
- Copy property path: Copies the internal panima animation path to the clipboard.
- Clear Animation: Clears all animation data for the property.
Adding new Actors
To add a new actor, you can use the  -button at the top of the actor editor.
If you want to add a model-based actor, you may want to use the scene-drop feature of the model catalog instead.
Here is a description of some of the available actor types:
Static Props
A static prop is a prop that isn't animated and will never move. While you can technically still move and animate static props, you should avoid doing so, as it can interfere with some sub-systems. Static props are also automatically included in lightmap bakes, which is another reason why they should not be moved or animated.
If you wish to add a static prop to your scene, select New prop from the -menu, which will create a model explorer window. You can double click a model and it will create a new static actor in front of the camera with the selected model.
Alternatively you can also drag-and-drop models from the model catalog directly into the viewport to create static props more quickly.
Dynamic Props
Dynamic props are props that may be moved or animated, but don't have skeletal or facial (morph targets / flex controllers) animations. For instance, a soccer ball being kicked or a glass falling off a table.
Articulated Actors
Articulated actors can be animated whichever way you want. These should be used primarily for characters in the scene.
Actor components
You can add new components to an existing actor by right clicking the Components-item in the tree and selecting a component to add, however you should only do this if you know what you're doing or if a wiki article explicitly mentioned it. Many components are Engine-level components that are not intended for use in the Filmmaker, and can cause crashes or instability if added. Handle with care!
Actions
Right-clicking an actor in the actor editor gives you a list of actions. These are mostly the same as in the viewport window, you can find more information about them here.
This is also where you can delete, rename or copy actors:
Graph Editor
The Graph Editor () is where you can animate actors and actor properties:
Animating Properties
PFM uses keyframe animations and animation curves, please familiarize yourself with them if you aren't already.
Most actor properties can be animated, with the exception of text-based properties and a new others. To animate a property, make sure you've selected the film clip in the clip editor ( ) and the actor component properties you want to animate in the actor editor:
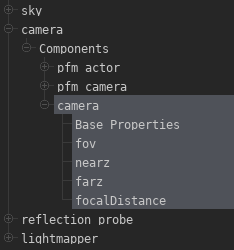
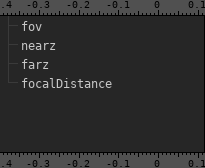
If you switch to the graph editor (), you should see the same properties listed there:
Now move the playhead ( ) to the timestamp at which you want to place a keyframe, and change the property value in the actor editor. This will automatically place a keyframe at the current timestamp. If you place a second keyframe at a different timestamp, an animation curve will be created between them:
You can also use the keyframe ( ) button to place a new keyframe. If the current timestamp is between two other keyframes, the new keyframe will be placed approximately at the position of the value of the curve at that timestamp.
Selection Mode 

You can select individual keyframes by clicking them directly, or select multiple keyframes by clicking and holding the left mouse button to create a selection rectangle.

You can move a keyframe by clicking and holding the left mouse button on it and moving your mouse.
Move Mode 

If you have keyframes selected, you can move them by clicking and holding the left mouse button on the graph editor and moving your mouse.
You can also move handles the same way:

Pan Mode 

Click and drag the graph editor view to pan the view. You can also use the middle mouse button to do this in the other modes as well.
Scale Mode 

Scaling is currently not implemented!
Zoom Mode 

Click and hold the left mouse button into the graph editor view and move the mouse to zoom in/out at the mouse cursor position.
Mouse Controls
Regardless of the mode, you can zoom in and out using the scroll wheel. By default this will zoom the time axis around the playhead position, but there are several ways to modify the scrolling behavior:
- Scroll Wheel +Ctrl: Zoom data axis instead of time axis
- Scroll Wheel +Alt: Zoom both time and data axis at the same time around the cursor position
Handle Types
Every keyframe has two handles that control the flow of the curve to the previous and the next keyframes respectively. The handles can be seen as two protruding points when a keyframe is selected: 
Handles can be moved by clicking and dragging them with the mouse, but the effect on the curve depends on the handle type. The handle type can be changed by right-clicking on the keyframe under the Handle Type menu, which will change the handle type for both handles. There are three handle types available:
Free
Both handles are independent from each other and can be moved arbitrarily.
Aligned
The handles stay aligned on both sides with the same length. Moving one of the handles will cause the other to move accordingly.
Vector
The left handle will point to the right handle of the previous keyframe and the right handle will point to the left handle of the next keyframe. Moving the the center, previous or next keyframe will affect the handle location. If you move one of the handles, it will automatically become a free type handle, however the other handle will remain a vector type.
Interpolation
The interpolation type changes the fundamental behavior of the curve. To change it, select a keyframe, right-click and choose an interpolation type from the Interpolation menu.
| Interpolation Type | Curve Effect |
| Constant |
|
| Linear |  |
|
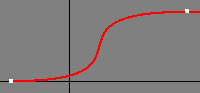
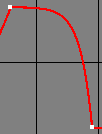
Bézier |
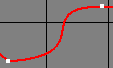 |
|
Bounce |
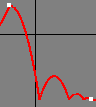 |
|
Circular |
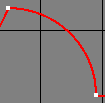 |
|
Cubic |
 |
|
Exponential |
 |
|
Quadratic |
 |
|
Quartic |
 |
|
Quintic |
 |
|
Sinusoidal |
 |

If the interpolation type is anything other than Bézier, the handles will have no effect on the curve.
Easing Type
The easing type can smooth out the beginning and/or end of the curve.
| Easing Type | Curve Effect |
| Automatic Easing | Depends on interpolation type |
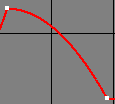
| Ease In | 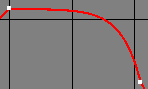 |
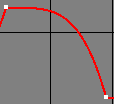
| Ease Out | 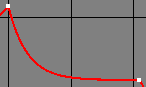 |
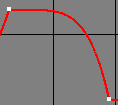
| Ease In and Out | 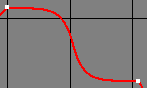 |
If the interpolation type is Bézier, the easing type will have effect on the curve.
Keybinds
| Action | Default Key |
| Bookmark | m |
| Select | q |
| Move | w |
| Pan | e |
| Scale | r |
| Zoom | t |
| Linear tangents | 1 |
| Flat tangents | 2 |
| Spline tangents | 3 |
| Step tangents | 4 |
| Unify tangents | 5 |
| Equalize tangent lengths | 6 |
| Weighted tangents | 7 |
| Unweighted tangents | 8 |
Model Catalog
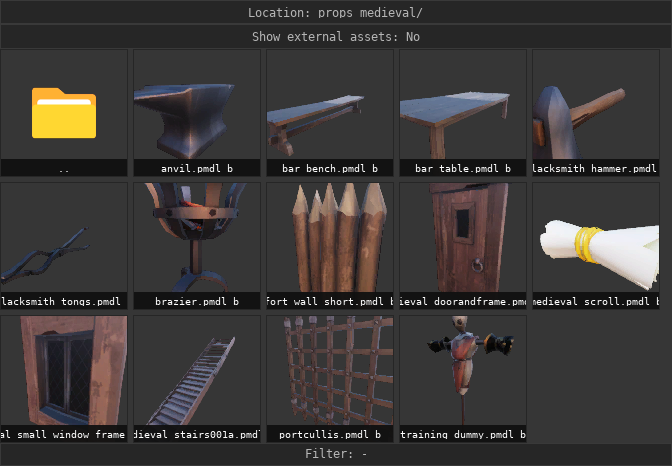
The model catalog shows a list of all of the available model assets. This includes all of the assets installed in Pragma, as well as all of the assets available through your installed Source Engine (and Source 2) Steam Games.
You can open the model catalog from the menu bar via Windows > Model Catalog. The first time you open the model catalog, or a new directory in it, Pragma may run slow for a few seconds while it's generating the model icons.
If you see an icon such as  , that means the asset is not immediately available and has to be imported and/or converted to Pragma's formats first. This is done automatically the first time the asset is used. If you want to do it manually, you can also right-click the icon and choose
 Import asset. You can also change it to only display Pragma asset models by setting the Show external assets option to No.
Search and Filter
If you know roughly what you're looking for, you can type it into the Filter entry at the bottom and press enter. The items will be displayed in the order of most similar to least similar.
Scene-Drop
If you want to place an object from the model catalog, you can simply drag-and-drop it into the scene and an actor will be created for it:
Material Editor
The material editor allows you to change the material properties used to render your models, which can drastically change the way they look in the final render. There are two ways to access it:
Method #1
If the material you want to edit is a material of one of the actors that already exist in the scene, you can simply right-click the actor in the viewport or the actor editor and choose Edit material > <Material>.
Method #2
- Open the "Model Catalog" from the "Windows" menu and find the model of which you want to edit a material.
- Right-click the icon.
- If you see "Import asset" in the list, click that option. This means it's an external asset, which needs to be converted to Pragma first.
- If you see "Load" in the list, click that option. This means the asset hasn't been loaded yet.
- Right-click the icon again and select "Edit Material" from the list.
- Select the material you wish to edit.
Method #3
- Open the "Material Catalog" from the "Windows" menu and find the material you wish to edit.
- Right-click the icon.
- If you see "Import asset" in the list, click that option. This means it's an external asset, which needs to be converted to Pragma first.
- If you see "Load" in the list, click that option. This means the asset hasn't been loaded yet.
- Right-click the icon again and select "Edit Material" from the list.
Both methods will open the material editor, the only difference being that with method #3 you will get a sphere in the material editor preview viewport instead of an actual model. In most cases you should prefer method #1 and #2.
You should be seeing a window like this:
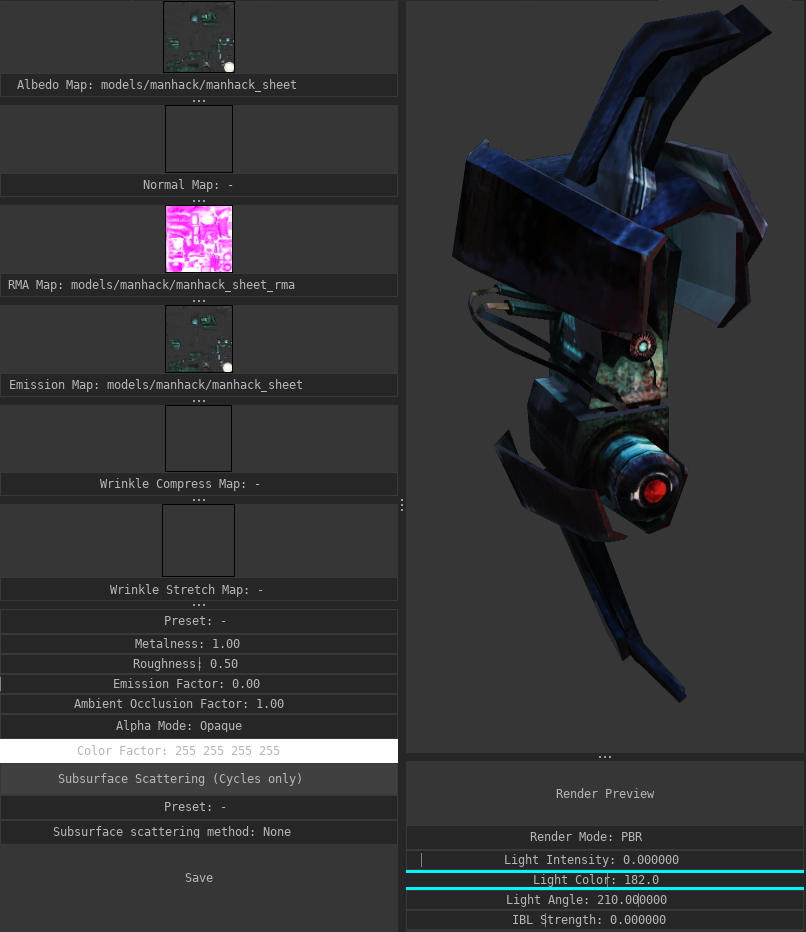
The left column contains all of the available material properties, the right column contains a live preview. Any changes to the material properties will immediately update the preview window.
The options below the preview viewport have no effect on the material itself.
Any changes you make to the material will be kept for this session, even if you close the material editor. If you close Pragma without pressing the "Save" button, however, the changes will be lost.
Textures
For each material there are multiple texture slots available: Albedo Map, Normal Map, RMA Map, etc. Pragma (and Cycles) uses a standardized PBR model with the metallic workflow.
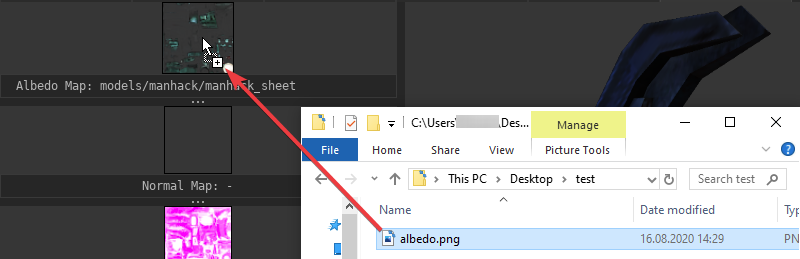
If you want to change the texture for one of the slots, all you have to do is open the file path in the system explorer and simply drag-and-drop the image file into the respective slot (make sure Pragma is running in windowed mode!).
To clear a texture slot, simply right-click on it and choose "Clear".
Some textures are affected by the material properties. For instance, if you assign an emission texture, it will not actually have an effect, unless the "Emission Factor" property is > 0.
RMA Map
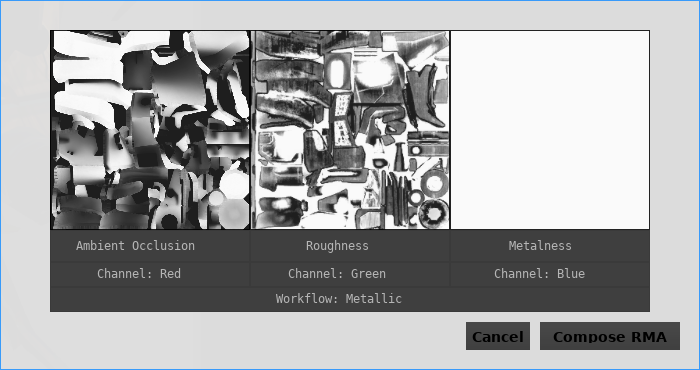
A RMA-map is a special texture that holds PBR components in the rgb-channels:
- Red: Ambient Occlusion
- Green: Roughness
- Blue: Metalness
If you don't have PBR-textures, you can clear the texture slot and control the PBR-properties with the sliders instead.
If you don't have a RMA-map, but you have the PBR-textures as separate image files, you can easily combine them to a RMA-map with the material editor. To do so, follow these steps:
- Right-click on the RMA texture slot
- Click "Compose RMA"
- A new window should pop up. Drag and drop your image files to the respective texture slots. If you don't have one of the textures, right-click on the respective slot and click "Clear".
- If you don't have an ambient occlusion map, and you've opened the material editor with method #1, you can also right-click on the ambient occlusion map slot and click "Generate ambient occlusion", which will automatically generate an ambient occlusion map for the model. This may take a few seconds to complete!
- If you have specular workflow textures (i.e. a specular map and a glossiness map), you can click the "Workflow" button to switch to the specular workflow. This will automatically convert the specular workflow textures to the metallic workflow.
- Click "Compose RMA" to generate the RMA texture
Material Properties
Texture Factors
The slider controls (Metalness/Roughness/Emission Factor/etc.) are multipliers for their respective textures. For instance a metalness factor of 0 effectively means that the metalness map will be ignored and the material will be fully non-metallic, a metalness factor of 1 means the metalness texture controls the metalness entirely. There are some special rules:
- If no emission map is specified, the emission factor will have no effect. Same applies for the ambient occlusion map.
- If no metalness map is specified, the metalness factor will control the metalness entirely. Same applies for the roughness map.
Transparency
The material's transparency is determined by the alpha-channel of the albedo map, however transparency is ignored by default.
To enable transparency, set the "Alpha Mode" to either "Mask" or "Blend":
- Opaque: The alpha channel will be ignored and transparency is disabled.
- Mask: Any alpha channel values above the alpha cutoff threshold will be treated as full opaque, and any values below it as fully transparent.
- Blend: The alpha channel values will be treated as smooth blend values.
Subsurface Scattering
Subsurface scattering can have a big impact on the quality of your render (especially if characters are involved) and is easy to set up.
To enable subsurface scattering, simply choose one of the presets (e.g. "Skin 01") from the preset list. Generally you shouldn't have to change the method or factor, but you may have to tweak the "Scatter Color" to match the skin color of your character more closely.
Subsurface scattering is not yet implemented for the real-time renderer, which means you will only see its effects when rendering with Cycles.
Cycles Preview
The viewport shows a real-time preview of the model with the current material properties, but in some cases you may want to see a preview of what it will look like when rendering with Cycles as well. To do so, simply click on "Render Mode" to switch to "Raytracing" and click the "Render Preview" button. It may take a few seconds for the render to complete.
Web Browser

PFM comes with an internal web-browser with bookmarks to various websites with a large amount of free 3D assets. You can open it via Windows > Web Browser in the menu bar. Downloading any files through this browser will automatically trigger Pragma's import system and Pragma should be able to detect and import any compatible assets automatically. Once the assets have been fully downloaded and imported, you should be able to find them in the respective explorer window (e.g. the model catalog).
This should also work for websites not listed in the default bookmarks.
Particle Editor
This article is a work-in-progress.
Creating a Particle System
To create a new particle system, open the particle explorer by selecting Windows > Particle Catalog in the menu bar. If you want to add a particle system to an existing particle system file/collection, double-click the .pptsys-file. If you want to create a new particle system file, right-click the empty space between two files in the explorer and select Add Particle Collection from the menu bar, then assign a name and press enter.
Next, right-click the empty space again, choose Add Particle System. Assign a name for the system and press enter. You can now double-click the particle system to open it in the particle system editor.
Adding Components
To add a new initializer/operator/renderer to a particle system, simply right-click the respective item (e.g. "Initializers") on the left-hand side of the particle editor and select the component to add. You can then expand the component in the editor and select one of its properties to change its value. Don't forget to Save after you have made some changes, otherwise the changes will be lost when Pragma is closed.
Adding Child Systems
A particle system can also have child systems (which may also have children), which will be automatically created with the parent. To add a child-system, right click the children item in the editor and enter the name of the child particle system. Make sure the name matches that of an existing system.
You can directly edit the properties of a child system by double-clicking it. The viewport will still show the entire particle system, but the properties on the left-hand side of the editor will only affect the child. Once you're done editing the child, you can double click the Go to parent (<particleName>) item at the top to go back to the parent system.
UDM Editor
The UDM editor can be used to make changes to UDM-based data, which includes most of Pragma's asset formats and the PFM project file format.
To use it, select Windows > UDM Editor from the menu bar, then click the -icon and choose Open. Now select the file you wish to edit (e.g. the model or material). If the file is a valid UDM file, the UI should get populated with the UDM data, which you can now edit.
Make sure to press Save when you're done, to ensure your changes aren't lost!
UDM data is represented as a simple tree-structure with key-value pairs. The key is always a name (string) and is displayed in the Tree column. Every key has a corresponding value, which can be an element, array or concrete data value and is displayed in the Data column:
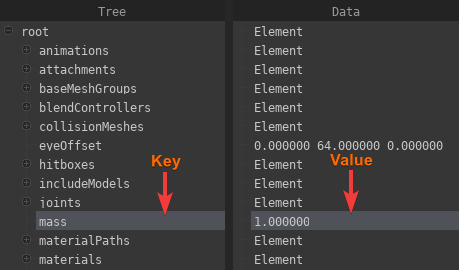
In the example above the key mass has the value 1.0 (float) assigned to it. You can double-click a value to change it.
An element represents a node in the tree and can have children, which also can have children, etc. You can expand or collapse the children of an element by clicking the +/- icon next to it:

An array is simply a list of concrete values (e.g. an array of vec3) or elements.
You can remove properties by right-clicking them and choosing Remove. To add a new property, right-click an element and choose Add Property, then select the type of the value. You can also select element to create a child-element, or Add Array to create an array of values/elements. After making your selection, you will have to enter a key-name and press enter.
If the tree is too large to work with effectively, you can right-click an element and choose Make Root, which will re-arrange the tree view to only display that element and its children. You can press the  -icon to get back to the original root.
If you are editing an asset file (like a model), the changes may not actually apply until Pragma has been reloaded. For editing materials, it is usually better to use the material editor.
You can also use the UDM editor to edit properties of a PFM project which may not be accessible otherwise (handle with care!):
