If you have the old (non-DLC) Steam version of Pragma/PFM, please note that it is several years out of date and is no longer being updated.
### Updating Pragma Pragma does not come with an auto-updater, so you will have to re-download it when there's a new Update. In most cases you will be able to extract the new version over the old version (overwriting the existing files), but you may have to remove the `cache` directory in this case. If you run into unexpected problems, try a clean installation of Pragma instead. ## Launch To launch PFM, simply double-click `pfm.exe`. Once loading is complete, you should see an interface similar to that of the Source Filmmaker. ## Navigating this Wiki On the top of every article you can find the navigation bar: [](https://wiki.pragma-engine.com/uploads/images/gallery/2022-08/chrome-2022-08-27-18-56-55.png) If you click on "Books", you get a list of all of the available books. The book "Pragma Filmmaker" contains all chapters related to PFM. In the "Pragma Engine" book you'll find chapters related to the Engine, such as what console commands are available. The "Lua API" book contains chapters related to the scripting language Lua and how to use it with PFM/Pragma. For learning how to use PFM, you'll probably want to stick to the "Pragma Filmmaker" book for now. If you click it, you'll find a list of all of the available chapters: [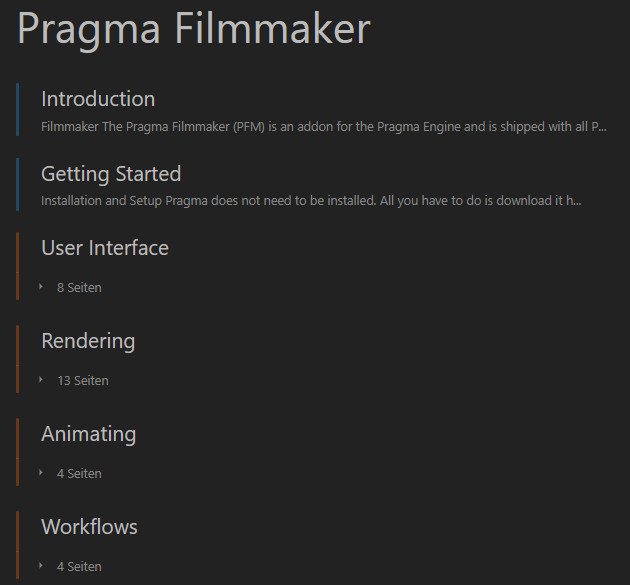](https://wiki.pragma-engine.com/uploads/images/gallery/2022-08/chrome-2022-08-27-19-02-00.png) You're currently in the "Getting Started" article. Once you're done with this article, it is recommended that you check out the chapter for the "User Interface", to familiarize yourself with the GUI, as well as the "Workflows" chapter, which contains articles describing the usual steps for how to import SFM projects, render animations, etc.. On the left-hand side you can find the book navigation, which allows you to easily jump between chapters or articles: [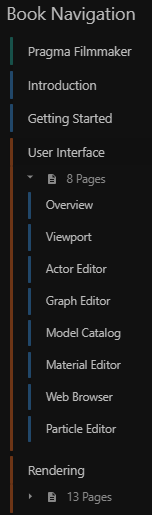](https://wiki.pragma-engine.com/uploads/images/gallery/2022-08/chrome-2022-08-27-19-15-58.png) If you want to go through all of the articles one by one, you can also scroll to the bottom of each article and simply click "Next": [](https://wiki.pragma-engine.com/uploads/images/gallery/2022-08/chrome-2022-08-27-19-16-45.png) # User Interface Here you can find a list of articles describing the individual windows in PFM and how to use them. # Overview [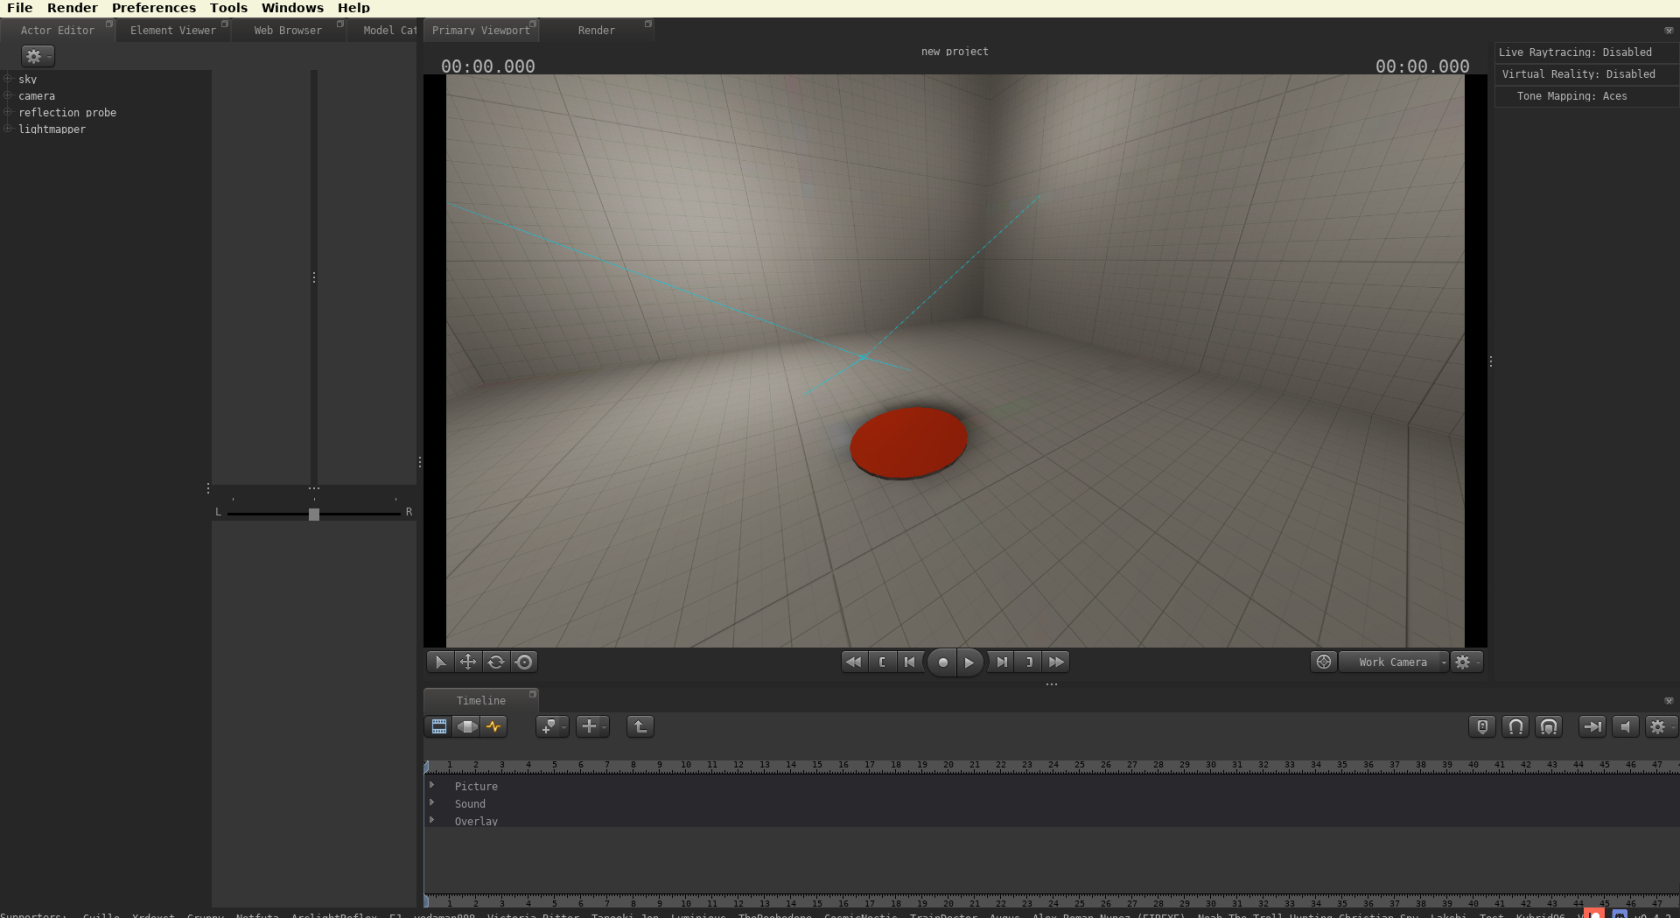](https://wiki.pragma-engine.com/uploads/images/gallery/2022-07/pragma-2022-07-29-13-04-05.png) Above is the initial view you should be seeing when launching PFM for the first time. The interface is very similar to that of SFM, so if you're familiar with SFM you should feel mostly at home. That being said, there are significant differences as well. Here is a short overview over the most important windows: - **Primary Viewport**: The viewport is where you can view your scene, play back your animation, select and transform actors, etc. - **Render**: This is where you can render your scene. You can render single images or animations, use one of several renderer engines, render VR images and more. - **Timeline**: In this window you will find the `Clip Editor`, for managing film clips and the `Graph Editor` for animating. The `Motion Editor` is currently not implemented and is not available. - **Actor Editor**: After selecting a film clip from the `Timeline` window, this is where you will find a list of all of the actors in the scene and where you can edit actor properties or add new actors. All windows can be detached from the main window using the icon at the top right, which can be particularly handy if you want to work with multiple monitors: ### Menu Bar [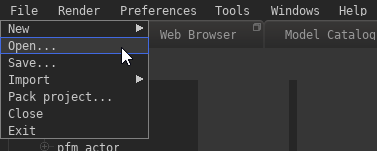](https://wiki.pragma-engine.com/uploads/images/gallery/2022-08/pragma-2022-08-27-19-42-21.png) Here are some of the most important options in the menu bar: `File > New`: Create a new empty or simple project. An empty project will start out with no actors whatsoever, while a simple project contains a few commonly used base actors (such as a camera and a sky actor). The directory for opening or saving a project is `Pragma/addons/filmmaker/projects/`, you cannot choose any other destination. PFM also has an autosave which is triggered approximately every 10 minutes. Autosaved projects can be found in the same directory as the main project, but with the suffix `_autosaveX` at the end of the file name. `File > Import`: Import a SFM project or a map. Importing a SFM project can take several minutes, since all of the assets used in the project will have to be converted to Pragma's formats. Importing a SFM project is also not a 1:1 process, it is likely that the scene will look significantly different in SFM and will require some adjustments. You also have to make sure that all actor transforms are unlocked and all rigs are detached before importing the project into PFM. You can find more information on how to do that [here](https://wiki.pragma-engine.com/books/pragma-filmmaker/page/sfm-to-pfm-workflow). You can also import a map. This is **not** a full import and will only import the map geometry and map props, which will be added to the scene as actors. Other entities will **not** be imported. It is only recommended to use this option for small maps. `File > Pack project...`: This option allows you to pack up the entire project, including all of its used assets, into a zip-archive. This archive can be used to share the project with other people. `Preferences > Language`: Allows you to change the interface language. Only English and German are fully translated, other languages will default to English for non-translated texts. `Windows:` Not all available windows are open by default. Here you can find and open all available windows. Please read through the articles for the individual windows [here](https://wiki.pragma-engine.com/books/pragma-filmmaker/chapter/user-interface) to find out more information about them. ### Keybinds Below is a list of the available keybinds that are accessible everywhere. Some windows may provide additional keybinds, which you can find at the bottom of the wiki article for the respective window.| **Action** | **Default Key** |
| Toggle Play | space |
| Previous Frame | , |
| Next Frame | . |
| Previous Bookmark | \[ |
| Next Bookmark | \] |
| Create Bookmark | m |
| Clip Editor | F2 |
| Motion Editor | F3 |
| Graph Editor | F4 |
| Quick-Move X Axis | x |
| Quick-Move Y Axis | y |
| Quick-Move Z Axis | z |
| Undo | Ctrl+Z |
| Redo | Ctrl+Y |
| Select | q |
| Translate | t |
| Rotate | r |
| Scale | s |
| Save Project | Ctrl +S |
| **Action** | **Default Key** |
| Increase FOV | scrlup |
| Decrease FOV | scrldn |
| Select Mode | Q |
| Move Mode / Toggle Transform Space | T |
| Rotation Mode / Toggle Transform Space | R |
| Scale Mode | S |
| Delete | Del |
| Move object toward/away from camera (only while transforming) | scrlup/scrldn |
Changing the value of a property will change it for the entire film clip, **unless the graph editor (**[](https://wiki.pragma-engine.com/uploads/images/gallery/2022-07/pragma-2022-07-17-15-57-14.png)**) is active**. If the graph editor is selected, a keyframe will be added at the current playhead position and the value will be **animated** instead. Some properties (like the model of an actor) are exempt from this, as they cannot be animated. Animated properties have a yellow outline around them: [](https://wiki.pragma-engine.com/uploads/images/gallery/2022-07/pragma-2022-07-23-11-24-47.png) In this case the property will be unmodifiable (and appear greyed out) outside of the [graph editor](https://wiki.pragma-engine.com/books/pragma-filmmaker/page/graph-editor). If you're not in the graph editor, you can just click the property and you will be directed there.
You can right-click a property on the right-hand side which will give a list of several actions: - **Set To Default**: Resets the value to the original value. - **Remap Slider Range**: Allows you to change the min/max range of the slider. - **Copy to clipboard**: Copies the current value of the property to the clipboard. - **Set Expression**: Allows you to specify a [math expression ](https://wiki.pragma-engine.com/books/pragma-filmmaker/page/expressions-and-drivers)to change the effective value of the property. This will only work if the property is animated. - **Copy property path**: Copies the internal panima animation path to the clipboard. - **Clear Animation**: Clears all animation data for the property. #### Adding new Actors To add a new actor, you can use the [](https://wiki.pragma-engine.com/uploads/images/gallery/2022-07/pragma-2022-07-17-12-59-15.png)-button at the top of the actor editor.If you want to add a model-based actor, you may want to use the [scene-drop feature](https://wiki.pragma-engine.com/books/pragma-filmmaker/page/model-catalog#bkmrk-scene-drop) of the [model catalog](https://wiki.pragma-engine.com/books/pragma-filmmaker/page/model-catalog) instead.
Here is a description of some of the available actor types: #### Static Props A static prop is a prop that isn't animated and will never move. While you can technically still move and animate static props, you should avoid doing so, as it can interfere with some sub-systems. Static props are also automatically included in [lightmap bakes](https://wiki.pragma-engine.com/books/pragma-filmmaker/page/pragma-renderer#bkmrk-lightmaps), which is another reason why they should not be moved or animated. If you wish to add a static prop to your scene, select `New prop` from the [](https://wiki.pragma-engine.com/uploads/images/gallery/2022-07/pragma-2022-07-17-12-59-15.png)-menu, which will create a model explorer window. You can double click a model and it will create a new static actor in front of the camera with the selected model. Alternatively you can also drag-and-drop models from the [model catalog ](https://wiki.pragma-engine.com/books/pragma-filmmaker/page/model-catalog)directly into the viewport to create static props more quickly. #### Dynamic Props Dynamic props are props that may be moved or animated, but don't have skeletal or facial (morph targets / flex controllers) animations. For instance, a soccer ball being kicked or a glass falling off a table. #### Articulated Actors Articulated actors can be animated whichever way you want. These should be used primarily for characters in the scene. #### Actor components You can add new components to an existing actor by right clicking the `Components`-item in the tree and selecting a component to add, however you should only do this if you know what you're doing or if a wiki article explicitly mentioned it. Many components are Engine-level components that are not intended for use in the Filmmaker, and can cause crashes or instability if added. **Handle with care!** ### Actions Right-clicking an actor in the actor editor gives you a list of actions. These are mostly the same as in the viewport window, you can find more information about them [here](https://wiki.pragma-engine.com/books/pragma-filmmaker/page/viewport#bkmrk-select). This is also where you can delete, rename or copy actors: # Graph Editor The Graph Editor ([](https://wiki.pragma-engine.com/uploads/images/gallery/2022-07/pragma-2022-07-17-15-57-14.png)) is where you can animate actors and actor properties: ### Animating Properties PFM uses keyframe animations and animation curves, please familiarize yourself with them if you aren't already. Most actor properties can be animated, with the exception of text-based properties and a new others. To animate a property, make sure you've selected the film clip in the clip editor ([](https://wiki.pragma-engine.com/uploads/images/gallery/2022-07/pragma-2022-07-23-12-40-45.png)) and the actor component properties you want to animate in the actor editor: [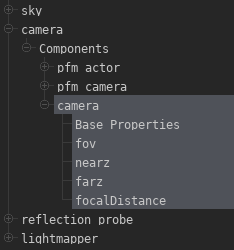](https://wiki.pragma-engine.com/uploads/images/gallery/2022-07/pragma-2022-07-23-12-41-24.png) If you switch to the graph editor ([](https://wiki.pragma-engine.com/uploads/images/gallery/2022-07/pragma-2022-07-17-15-57-14.png)), you should see the same properties listed there: [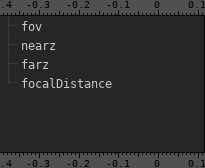](https://wiki.pragma-engine.com/uploads/images/gallery/2022-07/pragma-2022-07-23-12-42-40.png) Now move the playhead ([](https://wiki.pragma-engine.com/uploads/images/gallery/2022-07/pragma-2022-07-23-13-42-39.png)) to the timestamp at which you want to place a keyframe, and change the property value in the actor editor. This will automatically place a keyframe at the current timestamp. If you place a second keyframe at a different timestamp, an animation curve will be created between them: [](https://wiki.pragma-engine.com/uploads/images/gallery/2022-07/pragma-2022-07-23-14-17-16.png) You can also use the keyframe ([](https://wiki.pragma-engine.com/uploads/images/gallery/2022-07/pragma-2022-07-23-14-02-12.png)) button to place a new keyframe. If the current timestamp is between two other keyframes, the new keyframe will be placed approximately at the position of the value of the curve at that timestamp. #### Selection Mode [](https://wiki.pragma-engine.com/uploads/images/gallery/2022-07/pragma-2022-07-23-14-19-15.png) You can select individual keyframes by clicking them directly, or select multiple keyframes by clicking and holding the left mouse button to create a selection rectangle. [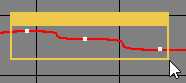](https://wiki.pragma-engine.com/uploads/images/gallery/2022-07/pragma-2022-07-23-14-28-09.png) You can move a keyframe by clicking and holding the left mouse button on it and moving your mouse. #### Move Mode [](https://wiki.pragma-engine.com/uploads/images/gallery/2022-07/pragma-2022-07-23-14-19-40.png) [](https://wiki.pragma-engine.com/uploads/images/gallery/2022-07/pragma-2022-07-23-14-55-15.gif) If you have keyframes selected, you can move them by clicking and holding the left mouse button on the graph editor and moving your mouse. You can also move handles the same way: [](https://wiki.pragma-engine.com/uploads/images/gallery/2022-07/pragma-2022-07-23-15-19-46.gif) #### Pan Mode [](https://wiki.pragma-engine.com/uploads/images/gallery/2022-07/pragma-2022-07-23-14-20-03.png) [](https://wiki.pragma-engine.com/uploads/images/gallery/2022-07/pragma-2022-07-23-14-53-14.gif) Click and drag the graph editor view to pan the view. You can also use the middle mouse button to do this in the other modes as well. #### Scale Mode [](https://wiki.pragma-engine.com/uploads/images/gallery/2022-07/pragma-2022-07-23-14-20-39.png) Scaling is currently not implemented! #### Zoom Mode [](https://wiki.pragma-engine.com/uploads/images/gallery/2022-07/pragma-2022-07-23-14-21-17.png) [](https://wiki.pragma-engine.com/uploads/images/gallery/2022-07/pragma-2022-07-23-14-50-55.gif) Click and hold the left mouse button into the graph editor view and move the mouse to zoom in/out at the mouse cursor position. ### Mouse Controls Regardless of the mode, you can zoom in and out using the scroll wheel. By default this will zoom the time axis around the playhead position, but there are several ways to modify the scrolling behavior: - **Scroll Wheel +Ctrl**: Zoom data axis instead of time axis - **Scroll Wheel +Alt**: Zoom both time and data axis at the same time around the cursor position ### Handle Types Every keyframe has two handles that control the flow of the curve to the previous and the next keyframes respectively. The handles can be seen as two protruding points when a keyframe is selected: [](https://wiki.pragma-engine.com/uploads/images/gallery/2022-07/pragma-2022-07-23-16-36-59.png) Handles can be moved by clicking and dragging them with the mouse, but the effect on the curve depends on the handle type. The handle type can be changed by right-clicking on the keyframe under the `Handle Type` menu, which will change the handle type for **both** handles. There are three handle types available: #### Free Both handles are independent from each other and can be moved arbitrarily. [](https://wiki.pragma-engine.com/uploads/images/gallery/2022-07/pragma-2022-07-23-17-02-18.gif) #### Aligned The handles stay aligned on both sides with the same length. Moving one of the handles will cause the other to move accordingly. [](https://wiki.pragma-engine.com/uploads/images/gallery/2022-07/pragma-2022-07-23-17-03-10.gif) #### Vector The left handle will point to the right handle of the previous keyframe and the right handle will point to the left handle of the next keyframe. Moving the the center, previous or next keyframe will affect the handle location. If you move one of the handles, it will automatically become a `free` type handle, however the other handle will remain a `vector` type. [](https://wiki.pragma-engine.com/uploads/images/gallery/2022-07/pragma-2022-07-23-17-04-30.gif) ### Interpolation The interpolation type changes the fundamental behavior of the curve. To change it, select a keyframe, right-click and choose an interpolation type from the `Interpolation` menu.| **Interpolation Type** | **Curve Effect** |
| Constant | [](https://wiki.pragma-engine.com/uploads/images/gallery/2022-07/pragma-2022-07-23-17-05-48.png) |
| Linear | [](https://wiki.pragma-engine.com/uploads/images/gallery/2022-07/pragma-2022-07-23-17-06-47.png) |
| Bézier | **[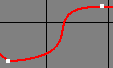](https://wiki.pragma-engine.com/uploads/images/gallery/2022-07/pragma-2022-07-23-17-08-14.png)** |
| Bounce | **[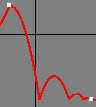](https://wiki.pragma-engine.com/uploads/images/gallery/2022-07/pragma-2022-07-23-17-09-24.png)** |
| Circular | **[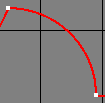](https://wiki.pragma-engine.com/uploads/images/gallery/2022-07/pragma-2022-07-23-17-10-11.png)** |
| Cubic | **[](https://wiki.pragma-engine.com/uploads/images/gallery/2022-07/pragma-2022-07-23-17-10-44.png)** |
| Exponential | **[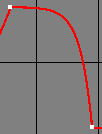](https://wiki.pragma-engine.com/uploads/images/gallery/2022-07/pragma-2022-07-23-17-11-12.png)** |
| Quadratic | **[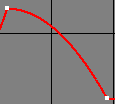](https://wiki.pragma-engine.com/uploads/images/gallery/2022-07/pragma-2022-07-23-17-11-42.png)** |
| Quartic | **[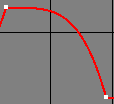](https://wiki.pragma-engine.com/uploads/images/gallery/2022-07/pragma-2022-07-23-17-12-05.png)** |
| Quintic | **[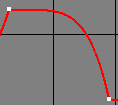](https://wiki.pragma-engine.com/uploads/images/gallery/2022-07/pragma-2022-07-23-17-12-29.png)** |
| Sinusoidal | **[](https://wiki.pragma-engine.com/uploads/images/gallery/2022-07/pragma-2022-07-23-17-13-07.png)** |
If the interpolation type is anything other than Bézier, the handles will have no effect on the curve.
### Easing Type The easing type can smooth out the beginning and/or end of the curve.| **Easing Type** | **Curve Effect** |
| Automatic Easing | Depends on interpolation type |
| Ease In | [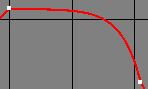](https://wiki.pragma-engine.com/uploads/images/gallery/2022-07/pragma-2022-07-23-17-24-39.png) |
| Ease Out | [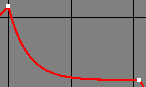](https://wiki.pragma-engine.com/uploads/images/gallery/2022-07/pragma-2022-07-23-17-24-50.png) |
| Ease In and Out | [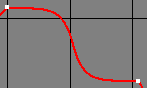](https://wiki.pragma-engine.com/uploads/images/gallery/2022-07/pragma-2022-07-23-17-24-57.png) |
If the interpolation type is Bézier, the easing type will have effect on the curve.
### Keybinds| **Action** | **Default Key** |
| Bookmark | m |
| Select | q |
| Move | w |
| Pan | e |
| Scale | r |
| Zoom | t |
| Linear tangents | 1 |
| Flat tangents | 2 |
| Spline tangents | 3 |
| Step tangents | 4 |
| Unify tangents | 5 |
| Equalize tangent lengths | 6 |
| Weighted tangents | 7 |
| Unweighted tangents | 8 |
Both methods will open the material editor, the only difference being that with method #3 you will get a sphere in the material editor preview viewport instead of an actual model. In most cases you should prefer method #1 and #2.
You should be seeing a window like this: [](https://wiki.pragma-engine.com/uploads/images/gallery/2020-08/pragma_2020-08-16_14-58-52.png) The left column contains all of the available material properties, the right column contains a live preview. Any changes to the material properties will immediately update the preview window. The options below the preview viewport have no effect on the material itself.Any changes you make to the material will be kept for this session, even if you close the material editor. If you close Pragma without pressing the "Save" button, however, the changes will be lost.
### Textures For each material there are multiple texture slots available: Albedo Map, Normal Map, RMA Map, etc. Pragma (and Cycles) uses a standardized PBR model with the metallic workflow. If you want to change the texture for one of the slots, all you have to do is open the file path in the system explorer and simply drag-and-drop the image file into the respective slot (make sure Pragma is running in windowed mode!). [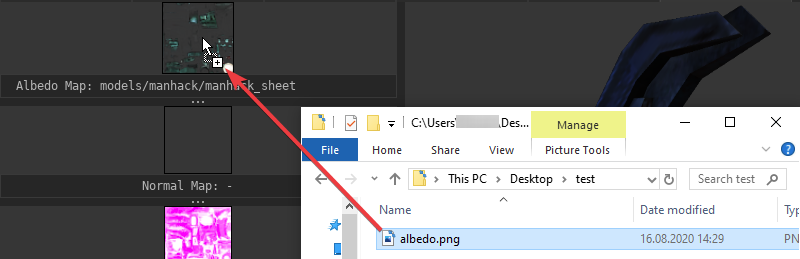](https://wiki.pragma-engine.com/uploads/images/gallery/2023-02/firefox-2023-02-23-10-36-01.png) To clear a texture slot, simply right-click on it and choose "Clear".Some textures are affected by the material properties. For instance, if you assign an emission texture, it will not actually have an effect, unless the "Emission Factor" property is > 0.
#### RMA Map A RMA-map is a special texture that holds PBR components in the rgb-channels: - **Red**: Ambient Occlusion - **Green**: Roughness - **Blue**: Metalness If you don't have PBR-textures, you can clear the texture slot and control the PBR-properties with the sliders instead. If you don't have a RMA-map, but you have the PBR-textures as separate image files, you can easily combine them to a RMA-map with the material editor. To do so, follow these steps: 1. Right-click on the RMA texture slot 2. Click "Compose RMA" 3. A new window should pop up. Drag and drop your image files to the respective texture slots. If you don't have one of the textures, right-click on the respective slot and click "Clear". 1. If you don't have an ambient occlusion map, and you've opened the material editor with [method #1](https://wiki.pragma-engine.com/books/pragma-filmmaker/page/material-editor#bkmrk-method-%231), you can also right-click on the ambient occlusion map slot and click "Generate ambient occlusion", which will automatically generate an ambient occlusion map for the model. **This may take a few seconds to complete!** 2. If you have specular workflow textures (i.e. a specular map and a glossiness map), you can click the "Workflow" button to switch to the specular workflow. This will automatically convert the specular workflow textures to the metallic workflow. 4. Click "Compose RMA" to generate the RMA texture [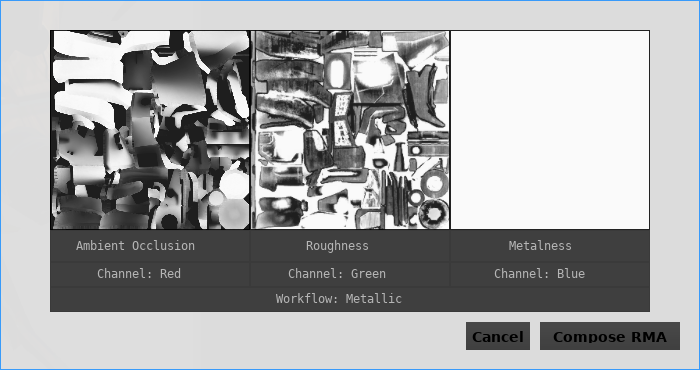](https://wiki.pragma-engine.com/uploads/images/gallery/2020-08/rma_composer.png) ### Material Properties #### Texture Factors The slider controls (Metalness/Roughness/Emission Factor/etc.) are multipliers for their respective textures. For instance a metalness factor of 0 effectively means that the metalness map will be ignored and the material will be fully non-metallic, a metalness factor of 1 means the metalness texture controls the metalness entirely. There are some special rules: - If no emission map is specified, the emission factor will have no effect. Same applies for the ambient occlusion map. - If no metalness map is specified, the metalness factor will control the metalness entirely. Same applies for the roughness map. #### Transparency The material's transparency is determined by the alpha-channel of the albedo map, however transparency is ignored by default. To enable transparency, set the "Alpha Mode" to either "Mask" or "Blend": - **Opaque**: The alpha channel will be ignored and transparency is disabled. - **Mask**: Any alpha channel values above the alpha cutoff threshold will be treated as full opaque, and any values below it as fully transparent. - **Blend**: The alpha channel values will be treated as smooth blend values. #### Subsurface Scattering [Subsurface scattering](https://en.wikipedia.org/wiki/Subsurface_scattering) can have a big impact on the quality of your render (especially if characters are involved) and is easy to set up. To enable subsurface scattering, simply choose one of the presets (e.g. "Skin 01") from the preset list. Generally you shouldn't have to change the method or factor, but you may have to tweak the "Scatter Color" to match the skin color of your character more closely.Subsurface scattering is not yet implemented for the real-time renderer, which means you will only see its effects when rendering with Cycles.
### Cycles Preview The viewport shows a real-time preview of the model with the current material properties, but in some cases you may want to see a preview of what it will look like when rendering with Cycles as well. To do so, simply click on "Render Mode" to switch to "Raytracing" and click the "Render Preview" button. It may take a few seconds for the render to complete. # Web Browser 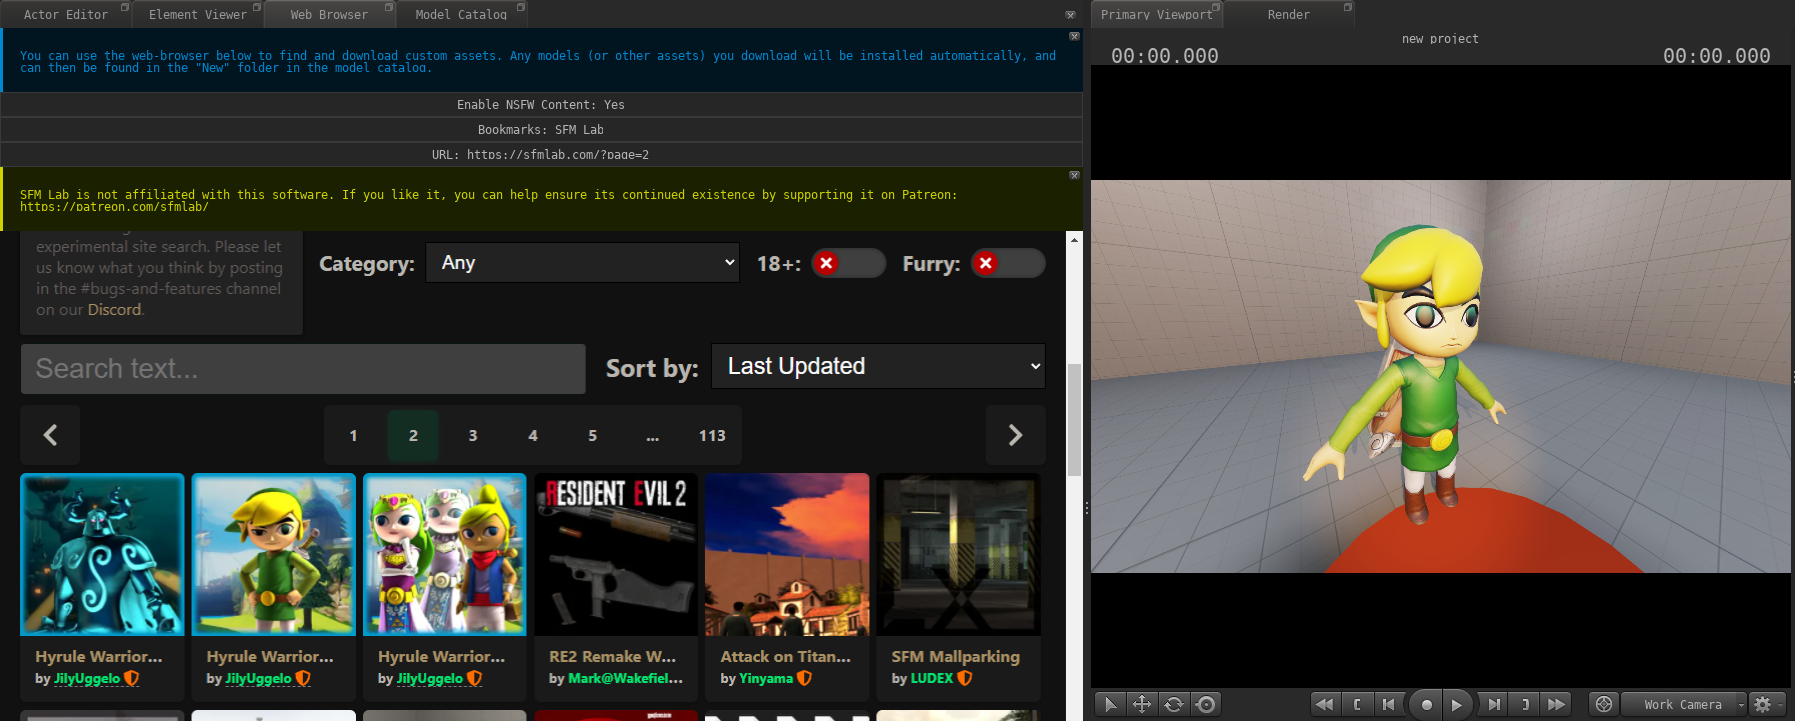 PFM comes with an internal web-browser with bookmarks to various websites with a large amount of free 3D assets. You can open it via `Windows > Web Browser` in the menu bar. Downloading any files through this browser will automatically trigger Pragma's import system and Pragma should be able to detect and import any compatible assets automatically. Once the assets have been fully downloaded and imported, you should be able to find them in the respective explorer window (e.g. the [model catalog](https://wiki.pragma-engine.com/books/pragma-filmmaker/page/model-catalog)). This should also work for websites not listed in the default bookmarks. # Particle EditorThis article is a work-in-progress. 
## Creating a Particle System To create a new particle system, open the particle explorer by selecting `Windows > Particle Catalog` in the menu bar. If you want to add a particle system to an existing particle system file/collection, double-click the .pptsys-file. If you want to create a new particle system file, right-click the empty space between two files in the explorer and select `Add Particle Collection` from the menu bar, then assign a name and press enter. Next, right-click the empty space again, choose `Add Particle System`. Assign a name for the system and press enter. You can now double-click the particle system to open it in the particle system editor. ### Adding Components To add a new initializer/operator/renderer to a particle system, simply right-click the respective item (e.g. "Initializers") on the left-hand side of the particle editor and select the component to add. You can then expand the component in the editor and select one of its properties to change its value. Don't forget to `Save` after you have made some changes, otherwise the changes will be lost when Pragma is closed. ### Adding Child Systems A particle system can also have child systems (which may also have children), which will be automatically created with the parent. To add a child-system, right click the `children` item in the editor and enter the name of the child particle system. Make sure the name matches that of an existing system. You can directly edit the properties of a child system by double-clicking it. The viewport will still show the entire particle system, but the properties on the left-hand side of the editor will only affect the child. Once you're done editing the child, you can double click the `Go to parent (Make sure to press `Save` when you're done, to ensure your changes aren't lost!
UDM data is represented as a simple tree-structure with key-value pairs. The key is always a name (`string`) and is displayed in the `Tree` column. Every key has a corresponding value, which can be an `element`, `array` or concrete data `value` and is displayed in the `Data` column: [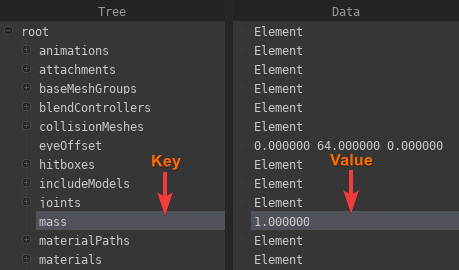](https://wiki.pragma-engine.com/uploads/images/gallery/2022-10/pragma-2022-10-31-18-27-54.png) In the example above the key `mass` has the value `1.0` (float) assigned to it. You can double-click a `value` to change it. An `element` represents a node in the tree and can have children, which also can have children, etc. You can expand or collapse the children of an `element` by clicking the +/- icon next to it: [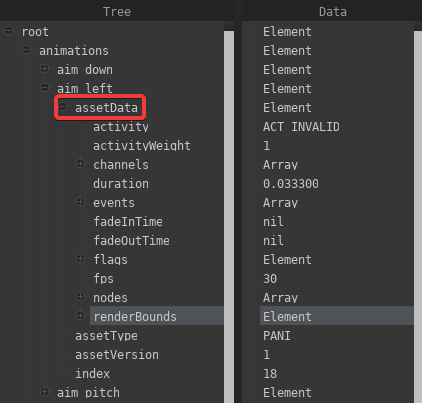](https://wiki.pragma-engine.com/uploads/images/gallery/2022-10/pragma-2022-10-31-18-38-10.png) An `array` is simply a list of concrete `values` (e.g. an array of `vec3`) or `elements`. You can remove properties by right-clicking them and choosing `Remove`. To add a new property, right-click an element and choose `Add Property`, then select the type of the value. You can also select `element` to create a child-element, or `Add Array` to create an `array` of values/elements. After making your selection, you will have to enter a key-name and press enter. If the tree is too large to work with effectively, you can right-click an `element` and choose `Make Root`, which will re-arrange the tree view to only display that `element` and its children. You can press the [](https://wiki.pragma-engine.com/uploads/images/gallery/2022-10/pragma-2022-10-31-18-46-57.png)-icon to get back to the original root.If you are editing an asset file (like a model), the changes may not actually apply until Pragma has been reloaded. For editing materials, it is usually better to use the [material editor](https://wiki.pragma-engine.com/books/pragma-filmmaker/page/material-editor).
You can also use the UDM editor to edit properties of a PFM project which may not be accessible otherwise (handle with care!): [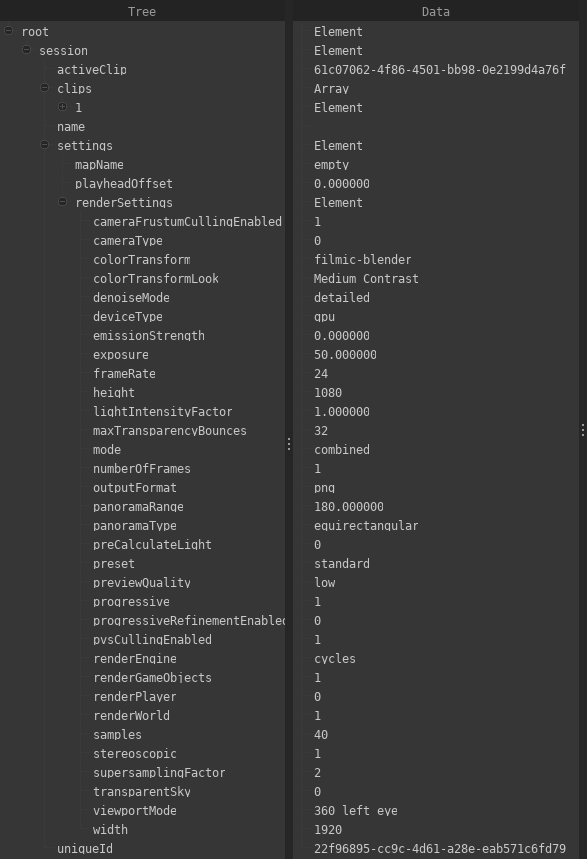](https://wiki.pragma-engine.com/uploads/images/gallery/2022-10/pragma-2022-10-31-18-55-28.png) # Rendering How to render your project and how to use specific rendering effects (motion blur, fog, etc.). # Rendering To render your scene, switch to the "Render" tab above the viewport and you should see a window similar to this one (but with a black viewport): [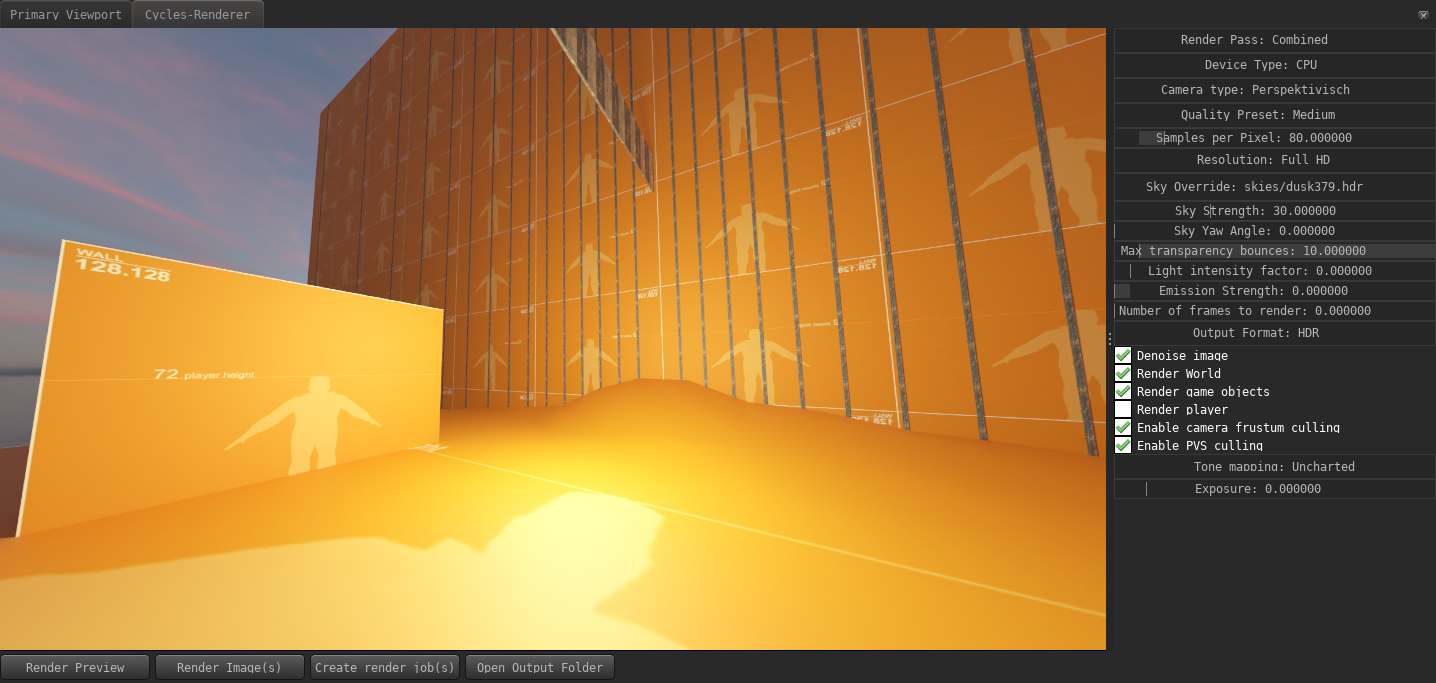](https://wiki.pragma-engine.com/uploads/images/gallery/2020-08/pragma_2020-08-16_11-55-04.png) Here you can choose between three renderers: - [Cycles](https://www.cycles-renderer.org/): The same renderer as used by Blender to create highly realistic images. - [LuxCoreRender](https://luxcorerender.org/): Another path-tracing renderer (like Cycles) - Pragma: Pragma's internal renderer. Requires a bit of [setup](https://wiki.pragma-engine.com/books/pragma-filmmaker/page/rendering-animations) for good looking results. Which renderer you should choose depends on your goal and hardware setup. If you're planning on creating a poster or single-frame images, Cycles or LuxCoreRender would be the best choice to get the highest possible quality. For animations, Pragma is the recommended renderer. You *can* use Cycles or LuxCoreRender for animations, however you can expect many hours or render time, even for short animations and with modern hardware. If you want to get a quick preview render, click the "Render Preview" button. This will render an image with a very low sample count and low resolution, which will give you a rough idea of what the final render will look like. To render your final image(s), press the "Render Image(s)" button.When rendering an image for a new project or a new map for the first time, Pragma may appear frozen for a few minutes, this is because some additional asset conversions are required for the Cycles/LuxCoreRender renderers, and some shaders may have to be recompiled. Subsequent renders should not take as long.
The render options to the right can be used to change the resolution of your render, sample count, number of frames, etc. You can leave most of these options on their defaults in most cases, but here are some of the more important options: - **Render Engine**: Which render engine to use. You can choose between "Cycles X", "LuxCoreRender" and "Pragma". - **Device Type**: You can render with either your CPU or your GPU. This option only affects rendering speed, the end-result is the same. If you have a modern GPU, you may want to consider switching to GPU rendering. - **Samples per Pixel**: The higher the sample count, the higher quality your render will be, at the cost of rendering time. If you notice weird discolorations in your final render, or if you're using advanced render features (like subsurface scattering), you'll likely have to increase this value to get good results. - **Resolution**: The resolution of the render. You can choose between the presets, or hold the alt-key and click into the field to enter manual values (e.g. "1000x1200"). Higher resolutions will result in longer rendering times. - **Max transparency bounces**: This field is usually not important unless you have a lot of overlapping transparent objects in your scene. If you notice black spots around transparent objects, try increasing this value. - **Light intensity factor**: Controls the global light intensity of the scene (excluding lighting caused by the sky). - **Number of frames to render**: If you intend to render an image sequence, set this value to the number of frames you wish to render. - **Output Format**: The image format that the frames will be saved as once rendering is complete. If set to HDR, no tone-mapping will be applied and the image will be saved with the original 16-bit colors. - **Enable camera frustum culling**: If enabled, objects that are outside of the visible area of the camera are not included in the render. This can improve rendering times, but may also cause incorrect lighting in some scenes (especially indoor scenes). - **Tone mapping**: The tone-mapping algorithm to use to transform the HDR colors to sRGB space. Some tone-mappers have additional parameters to tweak the result. Once rendering is complete, the image will automatically get saved to your harddrive. You can press the "Open Output Folder" to navigate to it in the system explorer.When rendering a large sequence of images or images with a large sample count / high resolution with Cycles X or LuxCoreRender, it is recommended to use the [external render tool](https://wiki.pragma-engine.com/books/pragma-filmmaker/page/external-render-tool) instead. Please see that section for details.
# Depth of FieldDepth of Field is currently only available for the Pragma renderer.
[](https://wiki.pragma-engine.com/uploads/images/gallery/2022-07/dof-example.png) To add a depth of field effect to your camera, expand the camera actor in the actor editor, right click "Components" and add the `optical_camera` component: [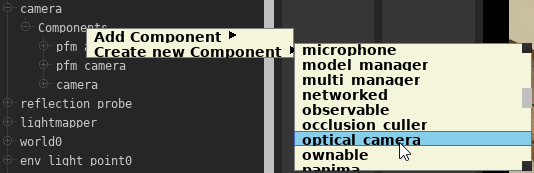](https://wiki.pragma-engine.com/uploads/images/gallery/2022-07/pragma-2022-07-15-20-46-49.png) Now select the "optical\_component" from the component list, and you will see a number of DoF options appearing on the right: [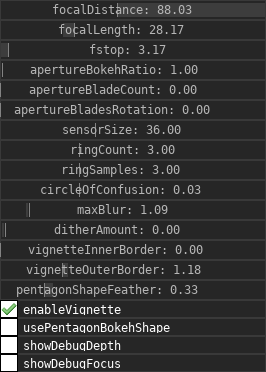](https://wiki.pragma-engine.com/uploads/images/gallery/2022-07/pragma-2022-07-16-14-44-08.png) Make sure to switch from the work camera to the scene camera if you want to make changes to the DoF settings, otherwise you will not see what changes. Additionally, whenever you make changes to the DoF settings, you should enable the "showDebugFocus" option. This will enable a helper overlay, which will make it easier to define the DoF area: [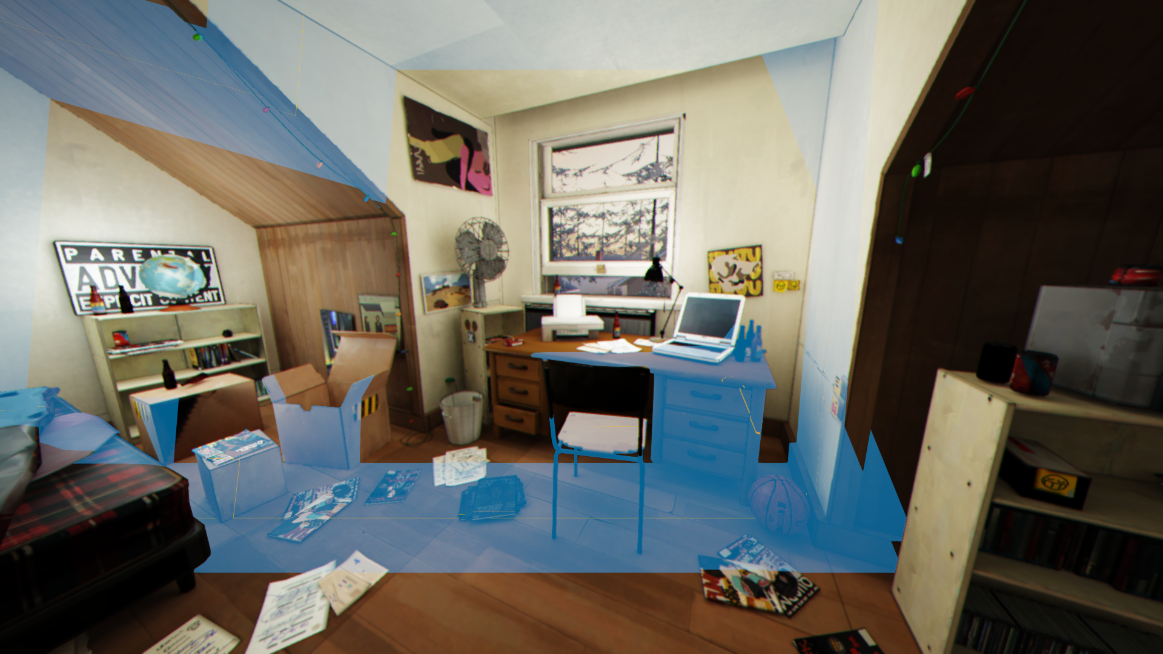](https://wiki.pragma-engine.com/uploads/images/gallery/2022-07/pragma-2022-07-16-14-56-38.png) The blue area represents the focal range and the yellow line the focus point. These can be adjusted with the "focalDistance", "focalLength" and "fstop" properties. Make sure to disable this option when you're done. Here's a list of some of the available properties: - **focalDistance**: The distance from the camera to the center of the focal area in game units. - **focalLength**: The length of the focal area in game units. - **fstop**: Defines the amount of blurring. - **ringSamples**: Quality of the blur effect. - **circleOfConfusion**: Circle of confusion in mm. - **maxBlur**: Intensity of the blur. Higher values will require a higher number of ringSamples as well. - **ditherAmount**: Adds random noise to the effect. - **enableVignette**: Adds a camera vignette effect near the borders. - **vignetteInnerBorder**: Controls the start border distance for the vignette effect. - **vignetteOuterrBorder**: Controls the end border distance for the vignette effect. - **usePentagonBokehShape**: Changes the bokeh to use a pentagon shape. - **pentagonShapeFeather**: Pentagon shape feather. - **showDebugFocus**: Toggles the helper overlay. # Motion BlurMotion blur is currently only available for the [Pragma renderer](https://wiki.pragma-engine.com/books/pragma-filmmaker/page/pragma-renderer).
PFM supports both per-object and camera motion blur. Especially on lower frame rates (<=30 FPS), adding motion blur to the scene can be very effective. The setup is very simple as well. Simply locate the camera actor in the actor editor, expand it, right click `Components` and add the `pfm_motion_blur` component: [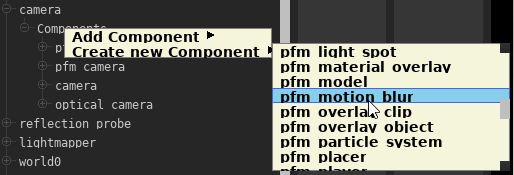](https://wiki.pragma-engine.com/uploads/images/gallery/2022-07/pragma-2022-07-16-16-24-04.png) That's all you have to do to enable motion blur. There are a few things to keep in mind, however: - Motion Blur currently only works properly in the viewport if you play back the animation frame by frame (by using [](https://wiki.pragma-engine.com/uploads/images/gallery/2022-08/pragma-2022-08-03-15-59-38.png)), and only if you go through the frames forward and sequentially. If you randomly jump somewhere in the timeline, you'll likely notice a very warped effect until you step to the next frame. Using the [](https://wiki.pragma-engine.com/uploads/images/gallery/2022-08/pragma-2022-08-03-16-04-30.png)-button to play back the animation will also not work. You don't have to worry about this for rendering, however. Simply render your image sequence like you would normally. - The very first frame of your animation will never have motion blur, because motion is determined by comparing the actor poses of the current frame with the previous frame (and the first frame has no previous frame, therefore there is no motion). If you want your animation to start with motion blur in the first frame, you'll have to take this into account by increasing the length of your animation by one frame at the start, which you can then discard when rendering is complete. Camera motion blur works in the same way, all you have to do is animate the camera position and/or rotation and the blur will appear automatically. ### Motion Blur in Posters To use motion blur for a poster, you need to have at least two frames, with moving actors or actor poses. When rendering, start at the first frame, and set the `Number of frames to render` in the `Render` window to `2`. The second frame will have the proper motion blur effect: [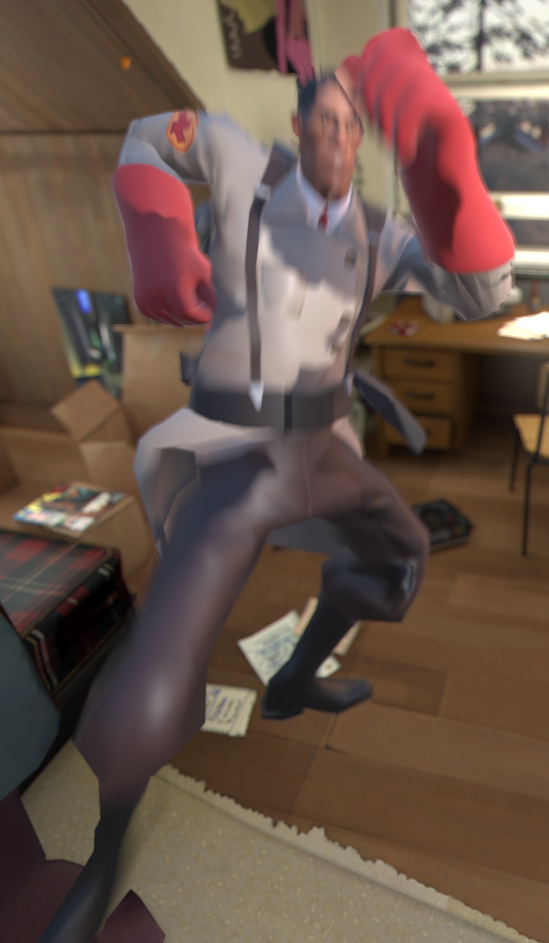](https://wiki.pragma-engine.com/uploads/images/gallery/2022-08/medic-motion-blur2.png) # FogFog is currently only available for the Pragma renderer. To get a similar effect with Cycles/LuxCoreRender, see [Volumetric Lighting](https://wiki.pragma-engine.com/books/pragma-filmmaker/page/volumetric-lighting).
[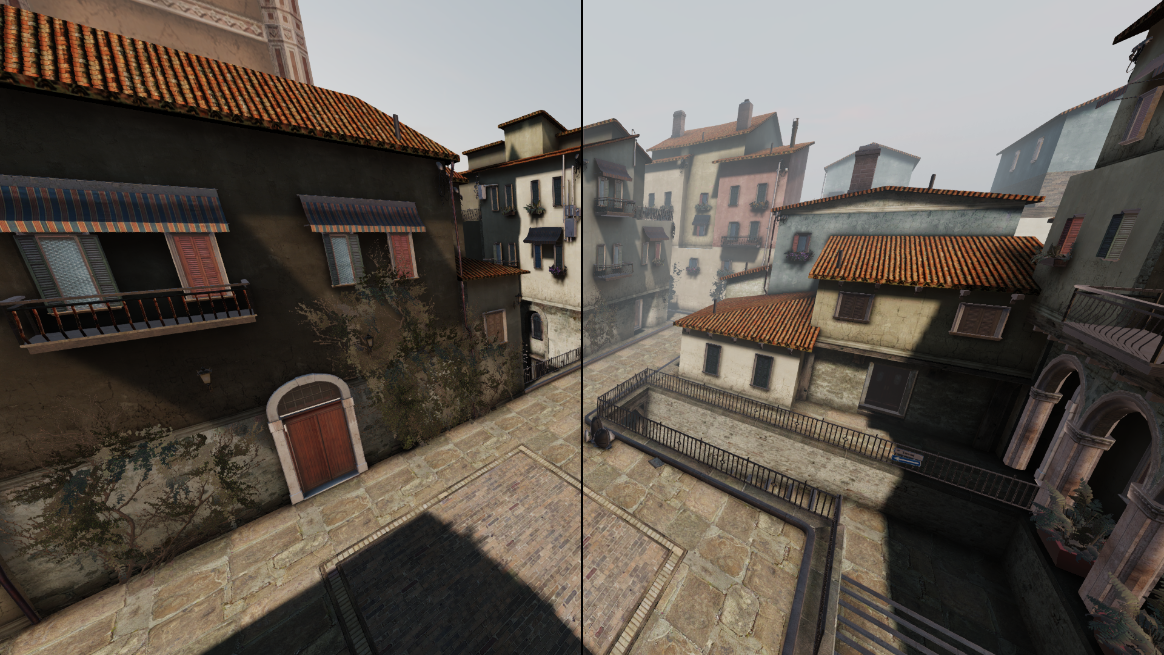](https://wiki.pragma-engine.com/uploads/images/gallery/2022-07/fog-comparison.png) To add fog to your scene, click the [](https://wiki.pragma-engine.com/uploads/images/gallery/2022-07/pragma-2022-07-17-12-59-15.png)-button in the actor editor and select `New fog controller`. If the option is not available, you probably already have a fog controller actor in your scene (only one is allowed). [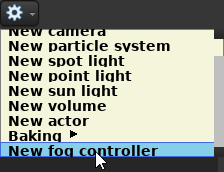](https://wiki.pragma-engine.com/uploads/images/gallery/2022-07/pragma-2022-07-23-11-08-24.png) Now select the `fog_controller` from the component list of the new actor, and you will see a number of fog options appearing on the right: - **start**: Start distance of the fog in game units, only has an effect if the fog type is `Linear`. - **end**: End distance of the fog in game units, only has an effect if the fog type is `Linear`. - **density**: How dense the fog should be. The meaning of the value is dependent on the fog type. - **type**: The type of fog. Exponential fog creates more realistic results.When using the exponential fog, the `density` value should be **very** low (< 0.01). The default range of the slider is significantly higher than that, so you may want to remap the range by right-clicking the property and choosing `Remap Slider Range`: [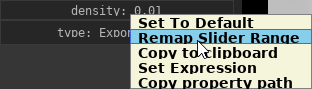](https://wiki.pragma-engine.com/uploads/images/gallery/2022-07/pragma-2022-07-22-10-54-30.png)[ 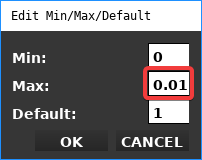](https://wiki.pragma-engine.com/uploads/images/gallery/2022-07/pragma-2022-07-22-10-55-49.png)
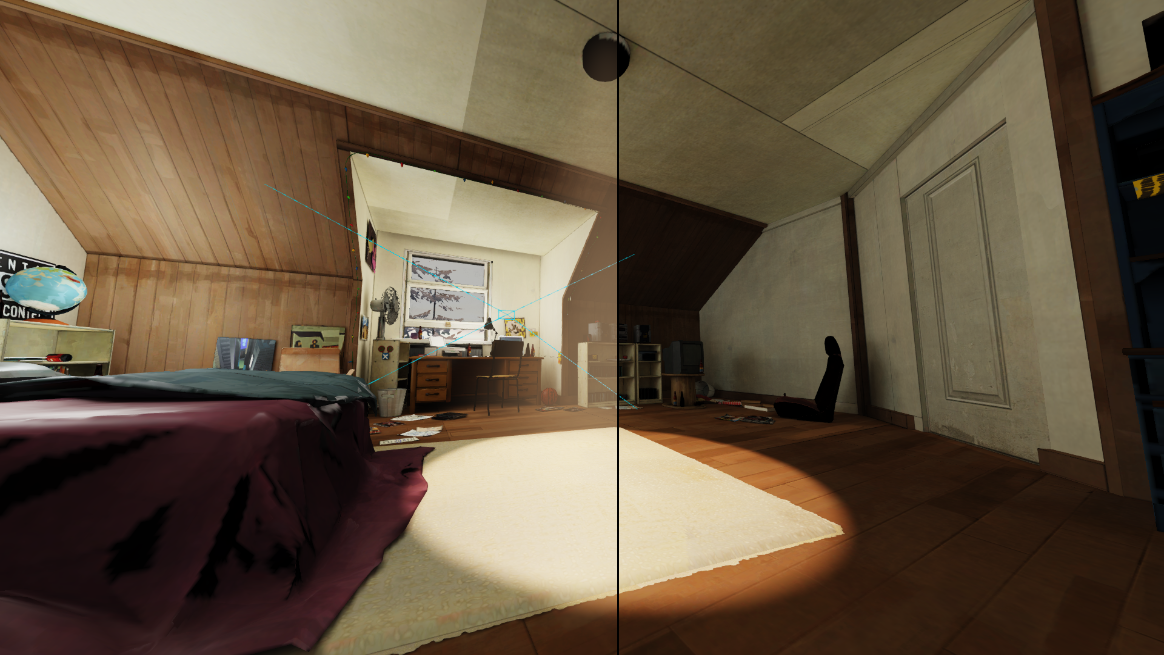
The fog color can be changed via the `color` component of the same actor. # Volumetric Lighting [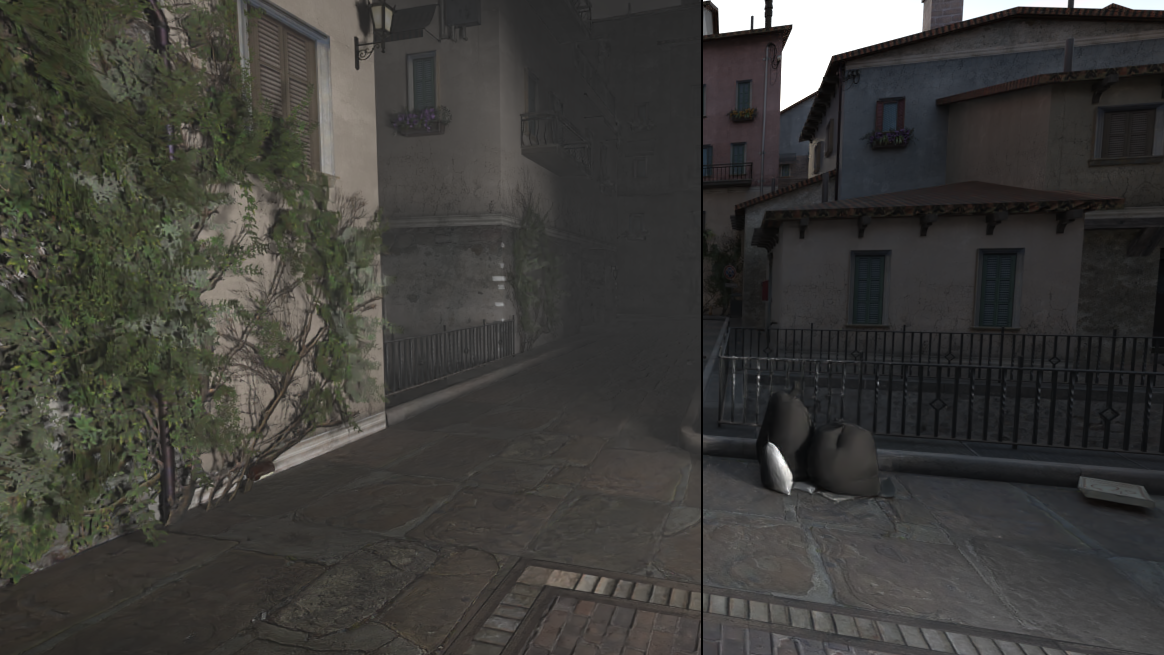](https://wiki.pragma-engine.com/uploads/images/gallery/2022-07/volumetric-example.png) Volumetric lighting can be used to create fog, light beams, dust in the air and similar effects. In PFM there are several different volumetric effects available depending on the renderer you're using. ### Volumetric Spot-LightsVolumetric spot-lights are currently only supported for the [Pragma renderer](https://wiki.pragma-engine.com/books/pragma-filmmaker/page/pragma-renderer)!
[](https://wiki.pragma-engine.com/uploads/images/gallery/2022-07/volumetric-spotlight.png) You can add a volumetric effect to a spot-light source to create a simple, visible light beam. To add a volumetric effect to a spot-light source, simply right-click the `Components` element of the spot-light actor in the actor editor and select `Create new Component > light_spot_volume`. The intensity of the volumetric effect depends on the light's intensity, but can also modified with the `intensity` property of the `light_spot_volume` component. ### General Volumetric LightingGeneral volumes are currently not supported for the Pragma renderer.
Adding a volume to your scene will **significantly** increase the number of samples required for the scene, increasing render times. It is therefore not recommended for animations.
When using the LuxCoreRender renderer, the volume will affect the entire scene globally, regardless of the volume bounds.
To achieve a volumetric affect such as the one from the top-most image, you can add a new `Volume` actor to your scene via the actor editor. The volume is a cube-shared area, which encompasses the entire scene by default. All lighting within the bounds of the cube will be affected. Configuration options are available in the `pfm_volumetric` component of the actor: [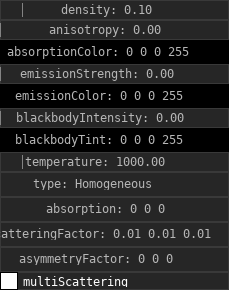](https://wiki.pragma-engine.com/uploads/images/gallery/2022-07/pragma-2022-07-28-20-39-03.png) Please note that some of the options only have an effect for certain renderers. You can also change the bounds of the volume if you only wish the volumetric effect to apply to a certain area of the scene. To do so, select the `pfm_cuboid_bounds` component of the volume actor and enable the `showDebugBounds` property to visualize the bounds of the volume. This is merely a visual aid, so make sure to disable the property when you're done changing the bounds. To change the bounds, select the `minBounds` and `maxBounds` properties respectively and move them around using the move transform tool in the viewport. [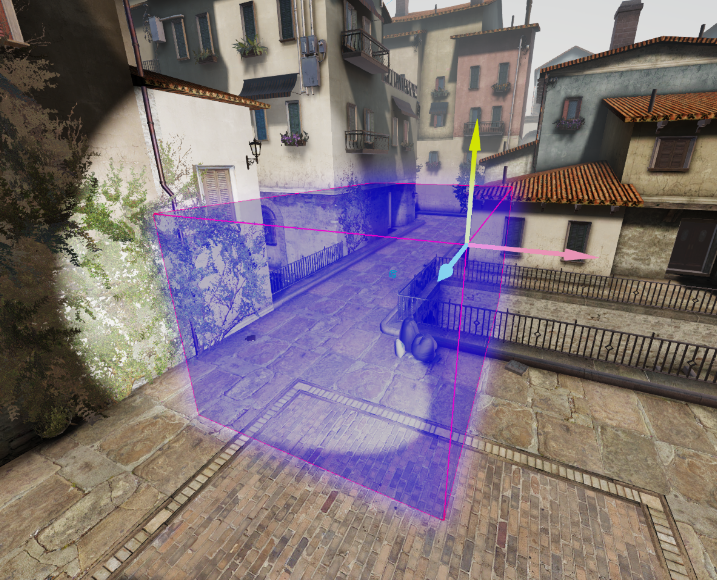](https://wiki.pragma-engine.com/uploads/images/gallery/2022-07/pragma-2022-07-28-21-13-16.png) # Virtual Reality PFM allows you to easily render image sequences for VR videos: (Click and drag your left mouse button in the video to look around the scene.)Since Pragma can only render image sequences, you will still need a VR-capable video editing software (like Adobe Premiere 2019) to create the final video. There is also free software available online to do this, but this tutorial only describes the approach for Adobe Premiere.
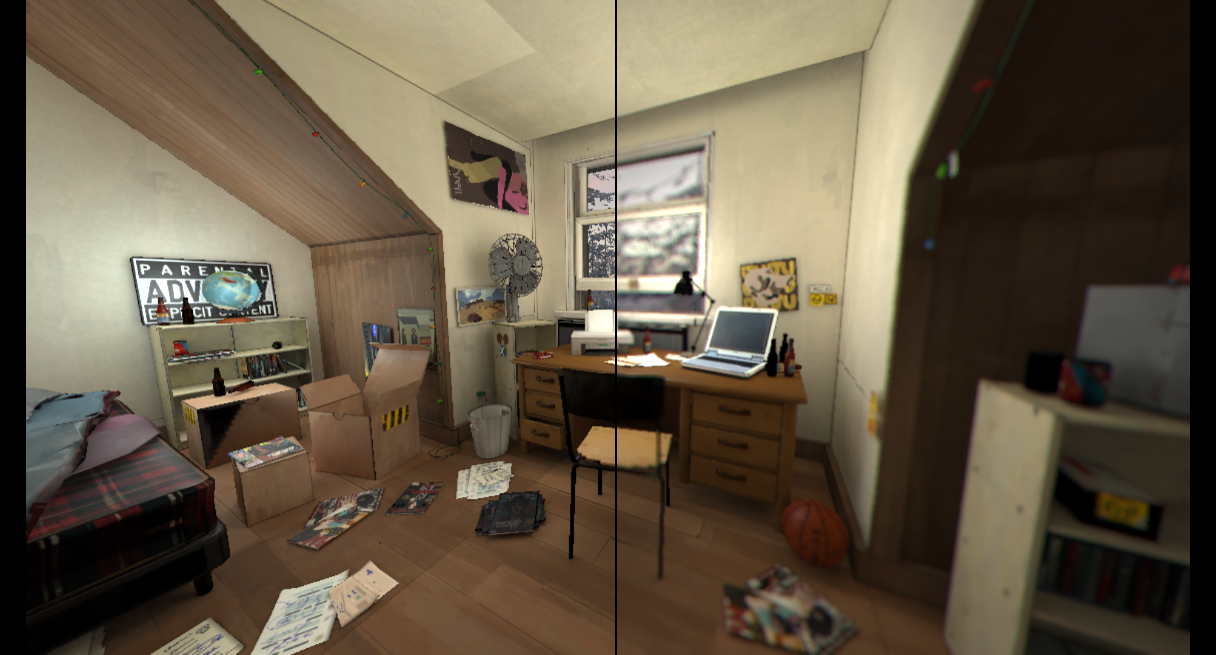
### Setup To render images for VR, go to the render tab in PFM and change the preset to "VR": [](https://wiki.pragma-engine.com/uploads/images/gallery/2022-07/pragma-2022-07-16-16-57-49.png) If you render an image now, it will render a stereoscopic 360° equirectangular image, which can be used for VR videos: [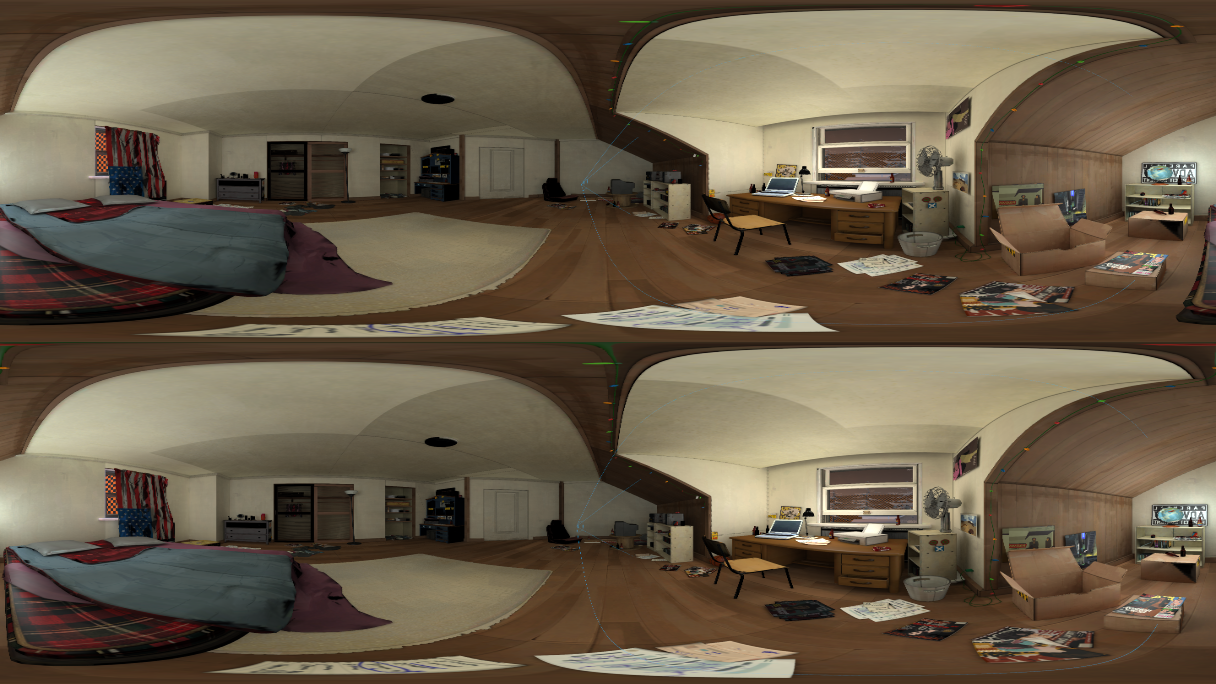](https://wiki.pragma-engine.com/uploads/images/gallery/2022-07/pragma-2022-07-16-17-28-43.png) The scene has to be rendered from two perspectives – once for the left eye and once for the right eye, which is why it appears twice in the rendered image. You *can* change the mode to monoscopic to get a single image from the camera perspective, however this will make depth perception in the final video impossible and is therefore only recommended for non-VR videos. In some cases you may also want to restrict the scene to 180°: [](https://wiki.pragma-engine.com/uploads/images/gallery/2022-07/pragma-2022-07-16-17-34-53.png) This effectively doubles the available vertical resolution (therefore improving the overall quality), but only half of the scene will be visible in the video: [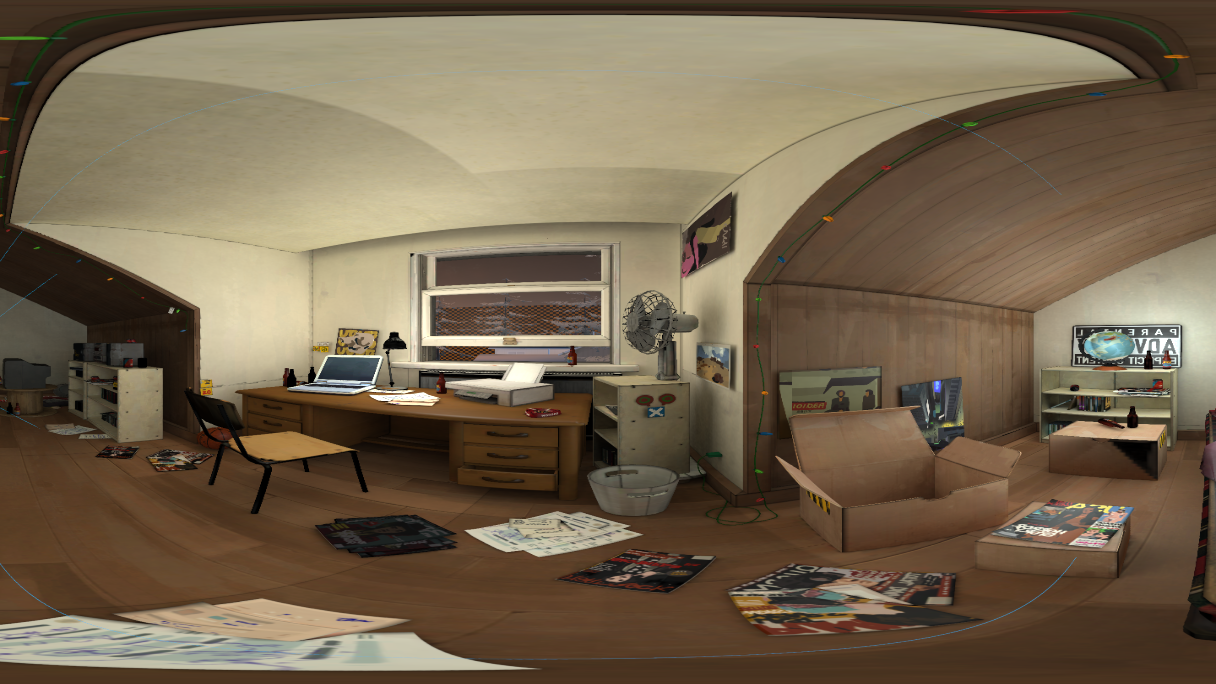](https://wiki.pragma-engine.com/uploads/images/gallery/2022-07/pragma-2022-07-16-17-34-00.png)Rendering VR / 360° videos requires significantly more time and rendering resources compared to regular images. For this reason it is highly recommended to use the **Pragma renderer** for these types of videos. You *can* use Cycles X or LuxCoreRender as well, but this requires top-of-the-line, modern hardware to get even reasonable render times.
Once the image has been rendered, you can change the viewport mode to inspect it: [](https://wiki.pragma-engine.com/uploads/images/gallery/2022-07/pragma-2022-07-16-17-41-57.png) If the image is stereoscopic, you can toggle between a preview for the left eye and the right eye. You can click (and hold) into the image with the left mouse button and move the mouse around to look around the rendered scene for each eye. The third mode is "flat", which displays the actual image as is. #### Camera Orientation When rendering images of this type, make sure that both the pitch and roll angle of your camera are 0 (or more specifically, make sure the orientation is horizontal to the ground), otherwise the perspective in the rendered image will look very unnatural. ### Adobe Premiere Once you've rendered the image sequence for your VR video, import the images into a new Adobe Premiere project like you would for regular videos. Then, go to `Sequence > Sequence Settings` in the menu. At the bottom of the dialog box, you should find the following options: [](https://wiki.pragma-engine.com/uploads/images/gallery/2022-07/adobe-premiere-pro-2022-07-16-17-51-46.png) Make sure `Projection` is set to `Equirectangular` and `Layout` to `Stereoscopic - Over/Under`. `Vertical` should always be set to `180°`, `Horizontal Captured View` should be set to `180°` or `360°`, depending on your render settings in Pragma. If you've set it up correctly, you should be able to right-click the image in the viewport and choose `VR Video > Enable`. You should now be able to look around the scene by clicking and dragging with your left mouse button. If you render the video now, it should automatically create a VR video with the correct settings. # HDRI Skies If you want to use a sky in your scene, you can do so by using a HDRI sky texture. PFM already ships with a few different HDRI skies, but you can also find plenty for free online, such as on [https://hdri-skies.com/](https://hdri-skies.com/) or [https://hdrihaven.com](https://hdrihaven.com). Custom HDRIs should be extracted to `Pragma/addons/filmmaker/materials/skies/`. To use a HDRI sky, all you have to do is add a sky actor to your scene. Click the [](https://wiki.pragma-engine.com/uploads/images/gallery/2022-07/pragma-2022-07-17-12-59-15.png)-button in the actor editor and select `New sky`. If the option is not available, you probably already have a sky actor in your scene (only one is allowed). You can change the sky texture by clicking the `pfm_sky` component of the sky actor and changing the `skyTexture` property. The choice of HDRI texture can have a significant effect on the lighting conditions in your scene when rendering with one of the raytracing renderers. The lighting influence intensity of the sky is controlled through the `strength` property.HDRI skies *can* be used with the Pragma renderer as well, but in this case they currently only work if the map has a skybox.
##### Sky Orientation The position of the sky does not matter, but you can change the rotation of the sky with the [](https://wiki.pragma-engine.com/uploads/images/gallery/2022-07/pragma-2022-07-17-13-10-14.png)-tool. This property can also be animated, which you can use to give the impression of moving clouds. # Pragma Renderer Please see the [Rendering Animations](https://wiki.pragma-engine.com/books/pragma-filmmaker/page/rendering-animations) workflow for information on how to use the Pragma renderer. # Live Preview If you're planning on using Cycles X or LuxCoreRender for rendering, you can enable the live raytracing mode in the viewport window to get an immediate render preview while making changes to the scene: [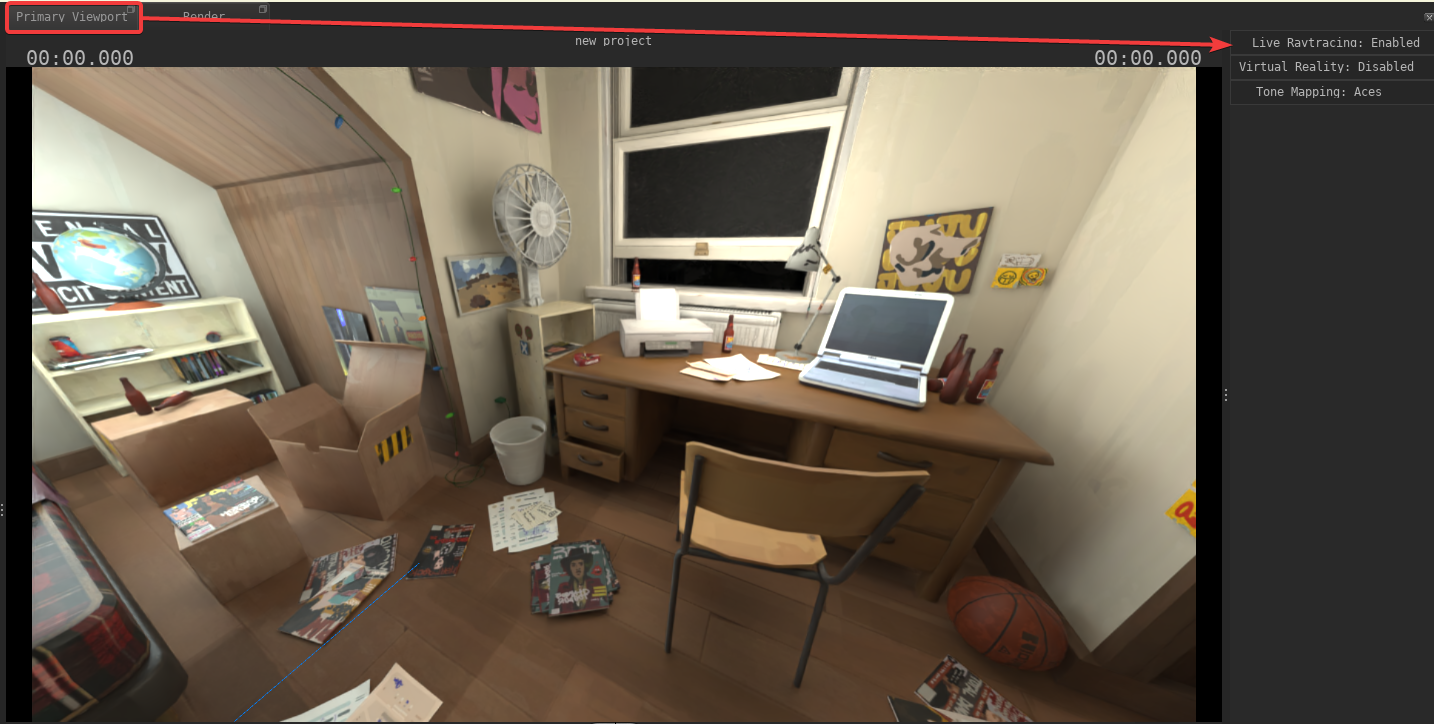](https://wiki.pragma-engine.com/uploads/images/gallery/2022-07/pragma-2022-07-15-20-24-20.png) This mode will use the same render engine as specified in the "Render" tab. Not all scene changes are supported yet, but you can move actors and edit light sources while in this mode. # Animations Pragma currently only supports rendering image sequences, which means you still need a video editing program to merge the individual frames into a video. To render an image sequence in Pragma, all you have to do is increase the `Number of frames` slider in the `Render` tab: [](https://wiki.pragma-engine.com/uploads/images/gallery/2022-07/pragma-2022-07-17-12-15-40.png) If you want to render all of the frames of the current clip/session, you can just right-click on the slider and choose `To end of clip`/`To end of session`. If you now click on `Render Image(s)`, all of the frames will be rendered one after another. You can click `Open Output Folder` to open the image location in the explorer.The `Number of frames` session does *not* affect preview renders. The `Render Preview` button will always only render a single frame, and it will also not save the rendered image to the disk.
Pragma does not check if you have enough disk space available for all of the images, so make sure there is enough space before to start the render.
# Lighting PFM supports four light source types: - Sun Lights (aka directional light or environmental light) - Point Lights (aka omni light) - Spot Lights - HDRI lighting To create a light source, open the actor editor and click the gear icon, then select "New spot light", "New point light" or "New sun light" respectively. The light source will appear in front of the camera, so make sure you're not standing right in front of a wall or an object, otherwise the light may appear behind it.When creating a light source (or any other actor), make sure a film clip is selected in the timeline window first! The light source will only be valid for that particular film clip.
To change the properties of the light source, select it in the actor editor. The available properties depend on the light source type and will appear in the righthand window of the actor editor.PFM uses Pragma's renderer for rendering your scene in real-time in the viewport, however the final render is processed using the [Cycles path-tracing renderer](https://www.cycles-renderer.org/). Due to the different rendering method between the two, the lighting in your scene may look quite a bit different (especially with outdoor scenes). For this reason it's recommended to render a preview image of your scene from time to time to ensure the lighting in the final render matches your expectations.
### Point Light Point light sources are omnidirectional lights, which means they emit the same amount of light in all directions from a point in space. #### Intensity The intensity of the light source in Lumen or Candela (depending on the specified unit type). #### Intensity Unit The intensity unit field specifies the base unit that the intensity value represents, which can be either Lumen or Candela. If you're unsure which value to choose, you can just use the Lumen intensity value printed on the side of most light bulb packages. #### Radius The maximum radius of the light source in meters.This property is currently ignored when rendering with Cycles!
### Spot Light Spot lights emit light as a cone in a particular direction. #### Intensity The intensity of the light source in Lumen or Candela (depending on the specified unit type).If you're specifying the light intensity for a spot light in Lumen, beware that the perceived light intensity will depend on the outer cone angle of the light source, i.e. a smaller cone angle will create a brighter light. If you want to have consistent light intensities regardless of the angle, use Candela instead!
#### Intensity Unit The intensity unit field specifies the base unit that the intensity value represents, which can be either Lumen or Candela. If you're unsure which value to choose, you can just use the Lumen intensity value printed on the side of most light bulb packages. #### Radius The maximum radius of the light source in meters.This property is currently ignored when rendering with Cycles!
#### Outer Cone Angle The angle (in degrees) of the cone in which light should be emitted. The angle mustn't exceed 180 degrees. #### Inner Cone Angle The difference between the outer and inner cone angles determines the smoothness towards the edges of the cone. The smaller the inner cone (relative to the outer cone), the smoother the light falloff will appear. This value should always be lower than the outer cone angle. ### Sun Light A sun light source does not have an origin in space and emits the same light everywhere from the same direction. #### Intensity Contrary to point and spot lights, the intensity of a sun light source is measured in Lux (Lumen per square meter). This means that the value doesn't actually represent the amount of light emitted by the light source, but rather the amount of light **received** by a surface that is being lit by this light source. ### HDRI Lighting HDRI lighting is special in that it's not a conventional light source, but rather based on a HDR panorama image. This type of lighting can have a substantial effect on your scene, but only works for outdoor scenes and you can only specify one HDRI image for your entire scene.HDRI Lighting currently only works when rendering with Cycles and has no visible effect in PFM's viewport.
To specify a HDRI image, open the Cycles render settings and click the "Sky Override" field. You can then press "..." to select your HDRI image file. Pragma already ships with several HDRI skies you can choose from, but you can also get additional skies from websites like [https://hdri-skies.com/](https://hdri-skies.com/) or [https://hdrihaven.com](https://hdrihaven.com). # Decals [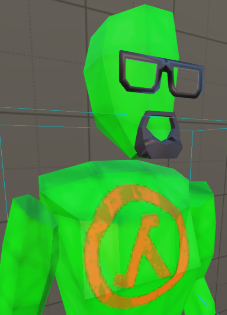](https://wiki.pragma-engine.com/uploads/images/gallery/2022-08/pragma-2022-08-27-16-34-24.png) # Color Correction This is a stub # Animating \[WIP\] Animating and Animating Techniques (such as retargeting) # Basics # Inverse Kinematics To be able to animate using inverse kinematics, you have to set it up first. Luckily doing so is fairly straight-forward: 1. Create an [articulated actor](https://wiki.pragma-engine.com/books/pragma-filmmaker/page/actor-editor#bkmrk-articulated-actors) in your scene 2. Expand the bone list `actor > Components > animated > bone` in the actor editor [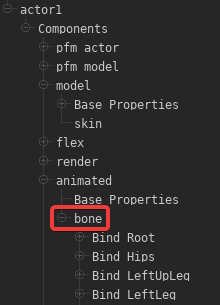](https://wiki.pragma-engine.com/uploads/images/gallery/2022-07/pragma-2022-07-24-15-07-17.png) 3. Right-click the bone for which you want to add an IK chain. This bone will be the effector. Now choose `Add IK Control >The IK configuration data is model-dependent and project-independent. If you use the model of the actor that you've added a IK chain for in another project (or the same one), the `pfm_ik` component of the new actor should already list all of the IK chains you have created for the model previously, i.e. you only have to create them once per model.
The IK system currently does **not** support limits. This means that, for instance, an arm can bend in ways that wouldn't be possible in real life.
# Expressions and DriversThis article refers to PFM v0.4.3 and newer and may not be representative of older versions.
### Math Expressions Any animatable actor property (color, radius, position, etc.) can be animated with a **math expression** (Similar to SFM's [expression operators](https://developer.valvesoftware.com/wiki/SFM/Expression_Operator)). The implementation is based on the [high-performance exprtk library](http://www.partow.net/programming/exprtk/), which includes support for: - Logical operators (and/or/not/etc.) - Conditions (if/ternary/etc.) - Loops (for/while/etc.) - Vectors ##### Examples As a basic example, let's say you want to animate the position of your actor, so you move it to \[0,30,0\] at timestamp 0, \[0,50,20\] at timestamp 1 and \[30,0,-20\] at timestamp 2. You can then apply the math expression `value *2` to the property, which will double the values, meaning your actor will move from \[0,60,0\] to \[0,100,40\] and then to \[60,0,-40\] instead. Here are some other basic examples: - `var newValue[3] := {0,value[1],0}; return [newValue];`: Returns \[0,value.y,0\], which means the actor will only move on the y-axis. - `var newValue[3] := {time *100,0,0}; return [newValue];`: The channel value will be ignored, and the actor will move on the x-axis depending on how much time has passed since the start of the animation. - `var f := time /duration; var newValue[3] := {sin(f *pi *2) *100,0,cos(f *pi *2) *100}; return [newValue];` The channel value will be ignored, and the actor will move in a circular motion depending on the time passed. ##### Inputs These are the variables available for use with math expressions: - **value**: The current value - **time**: The current time in seconds - **timeIndex**: The index into the `times` array of the channel for the current timestamp. - **startOffset**: The channel's start offset in seconds. - **timescale**: The channel's time scale. - **duration**: The duration of the channel (i.e. max time value in the `times` array). **Constants:** - pi - epsilon - inf ##### Base Functions - All built-in [exprtk functions](http://www.partow.net/programming/exprtk/) - `float noise(float v1,float v2,float v3)`: Perlin noise. - `float[X] value_at(float time)`: Returns the value at the specified timestamp. The return value is either `float`, `float[3`\] or `float[4]`, depending on the channel value type. - `float sqr(float v)`: returns v \*v - `float ramp(float x,float a,float b)`: returns (a == b) ? a : (x -a) /(b -a) - `float cramp(float v1,float v2,float v3)`: returns clamp(ramp(v1,v2,v3),0,1) - `float lerp(float x,float a,float b)`: returns a +(b -a) \*x - `float clerp(float 1,float v2,float v3)`: returns clamp(lerp(v1,v2,v3),v2,v3) - `float elerp(float v1,float v2,float v3)`: returns ramp(3 \*v1 \*v1 -2 \*v1 \*v1 \*v1,v2,v3) - `float rescale(float x,float xa,float xb,float ya,float yb)`: returns lerp(ramp(x,xa,xb),ya,yb) - `float crescale(float v1,float v2,float v3,float v4,float v5)`: returns clamp(rescale(v1,v2,v3,v4,v5),v4,v5) - `print(...)`: For debugging purposes, prints the specified arguments to the console. ##### Quaternion Functions - `q_from_axis_angle(float[3] axis,float angle,float[4] out)` - `q_forward(float[4] quat,float[3] out)` - `q_right(float[4] quat,float[3] out)` - `q_up(float[4] quat,float[3] out)` - `q_slerp(float[4] q0,float[4] q1,float factor,float[4] out)` - `q_lerp(float[4] q0,float[4] q1,float factor,float[4] out)` - `q_dot(float[4] q0,float[4] q1)` - `q_mul(float[4] q0,float[4] q1,float[4] out)` - `q_inverse(float[4] quatInOut)` - `float q_length(float[4] quat)`Contrary to SFM's expression operators, PFM's math expressions **cannot** reference anything outside of the animation channel for the property it's assigned to. To create dependencies between properties, you need to use [animation drivers](https://wiki.pragma-engine.com/books/pragma-filmmaker/page/expressions-and-drivers#bkmrk-animation-drivers) instead.
### Animation Drivers Animation drivers are similar to math expressions, with a few key differences: - Lua expression instead of a math expression - Can be used to create dependencies between arbitrary properties (this is their primary purpose) - Similar to [Blender's driver system](https://docs.blender.org/manual/en/latest/animation/drivers/introduction.html) - Slower to compute than math expressions, use sparingly Since animation drivers are Lua-based, that means you have the entire [Lua API](https://wiki.pragma-engine.com/books/lua-api/page/introduction) available, making them much more powerful tools compared to math expressions. Their purpose is to animate a property programmatically with dependencies to other properties. To do so, animation drivers can have input variables, which can be references to actors, [components](https://wiki.pragma-engine.com/books/pragma-filmmaker/page/actors-and-components#bkmrk-components "Actors and Components") or component properties. ##### ExamplesAnimation drivers cannot be created through PFM yet, so the following are Lua-based examples. These may seem a little daunting, but once the system is integrated into the interface, drivers will be much easier to use.
- Changing the color of a light source depending on its distance to an actor (red = actor is close, green = actor is far away): ```Lua local actorId = "327b5bb8-74ae-400e-bbf7-61a2ad2020d3" -- Id of the actor for whom we check the distance local expr = [[ local dist = trLight:GetDistance(trActor) return Color.Red:Lerp(Color.Lime,math.clamp((dist -120) /150.0,0.0,1.0)):ToVector() ]] lightSource:AddDriver( ents.COMPONENT_COLOR,"color", game.ValueDriverDescriptor(expr,{ -- 'trActor' variable referencing the transform component of the actor ["trActor"] = "pragma:game/entity/ec/transform?entity_uuid=" .. actorId, -- 'trLight' variable referencing the transform component of the light ["trLight"] = "pragma:game/entity/ec/transform" }) ) ``` [](https://wiki.pragma-engine.com/uploads/images/gallery/2021-09/pfm-animation-driver-1.gif) - Making an actor always face the camera: ```Lua local camId = "6f964743-faa6-4b2b-b781-41a258e2f7d1" -- Id of the camera actor local expr = [[ local angToCamera = self:GetAngles(trCam) return EulerAngles(0,angToCamera.y,0) ]] actor:AddDriver( ents.COMPONENT_TRANSFORM,"angles", game.ValueDriverDescriptor(expr,{ -- 'trCam' variable referencing the transform component of the camera actor ["trCam"] = "pragma:game/entity/ec/transform?entity_uuid=" .. camId }) ) ``` [](https://wiki.pragma-engine.com/uploads/images/gallery/2021-09/pfm-animation-driver-2.gif) # Retargeting # Workflows Commonly used workflows, such as how to import SFM sessions. # SFM to PFM Workflow This workflow describes the general approach if you want to import a SFM project into Pragma and render it. There are a few things to take into consideration: - SFM and PFM are not entirely compatible, which means that importing a SFM project into Pragma will likely result in some differences (e.g. in terms of lighting) and will require some manual adjustments. - Try to avoid large, complex projects and/or maps. Smaller projects on smaller maps (or scene builds) tend to work better. - The Meet-the-Team sessions that are shipped with SFM are not supported, as they are based on older versions of the SFM project file format. They may partially work, or not at all. - Fake PBR models are **not** compatible with PFM, because they abuse the specific rendering methods that SFM uses. If you don't know what fake PBR is, it will most likely not be a problem. Now that that's out of the way, there are two things have to take care of before you can import your SFM session into PFM: ### Geting your SFM Project ready #### Detach IK Rigs PFM does not support SFM IK rigs. If your animation uses any IK rigs, you have to follow these steps in SFM first: 1.) Make sure all transforms for all actors are unlocked: [](https://wiki.pragma-engine.com/uploads/images/gallery/2020-10/sfm_2020-10-17_07-51-17.png) 2.) Detach all rigs from all actors that have one: 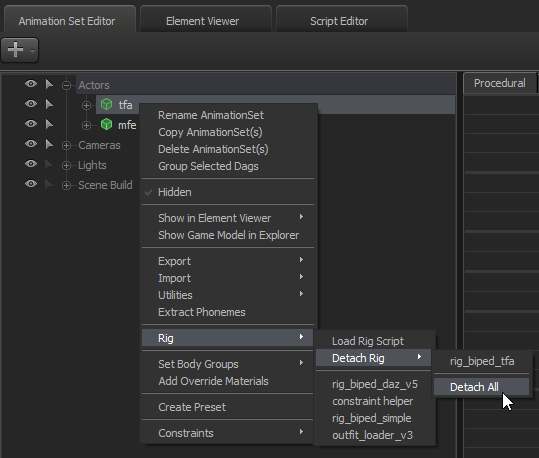 3.) Save the session. #### Set up Mount location If your SFM projects are located in one of the default SFM locations (e.g. `common/SourceFilmmaker/game/usermod/elements/sessions`), then PFM should be able to find them by default. However, if they are under a custom location (e.g. `SourceFilmmaker/game/ninja12r`), you will have to do the following to allow Pragma/PFM to find them: 1. Open `Pragma/cfg/mounted_games.udm` in a text editor 2. Find the following entry: ``` "sfm" { $bool enabled 1 $string localization_name "mount_game_sfm" $int32 priority 950 "steam" { $uint32 app_id 1840 $array game_paths [string][ "common/SourceFilmmaker/game/usermod/", "common/SourceFilmmaker/game/workshop/", "common/SourceFilmmaker/game/tf_movies/", "common/SourceFilmmaker/game/tf/", "common/SourceFilmmaker/game/hl2/", "common/SourceFilmmaker/game/left4dead2_movies/", "common/SourceFilmmaker/game/platform/", "common/SourceFilmmaker/game/portal2/" ] $bool mount_workshop 1 } "engine" { $string name "source_engine" } } ``` 3. Add the custom location to the `game_paths` list. For instance, if your project files are located in `common/SourceFilmmaker/game/ninja12r/elements/sessions/`, then the path you should add is "common/SourceFilmmaker/game/ninja12r/": [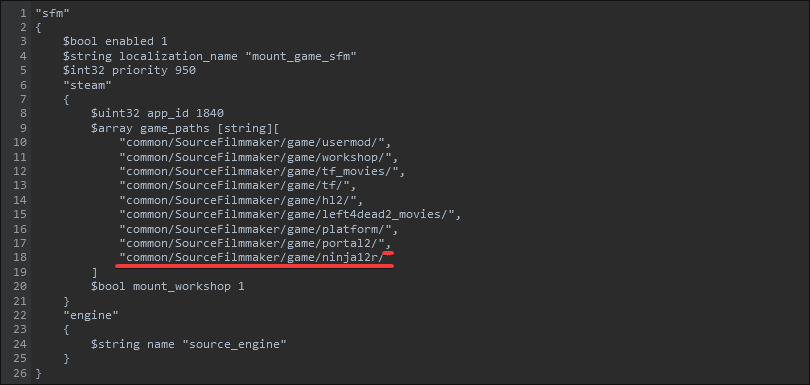](https://wiki.pragma-engine.com/uploads/images/gallery/2022-08/firefox-2022-08-03-18-48-36.png) Make sure to add the ',' for the previous entry as well, as shown in the screenshot above. 4. Save the file and close it. ### Importing the SFM Session Once you've completed the previous steps, you're ready to start Pragma. Double click `pragma.exe` and click `New Game`. Here you will have to select the map that was used for the SFM session, as well as `Filmmaker` for the `Game Mode`. Now click `Start Game`. If this is your first time loading the map, the map and its assets will have to be converted to Pragma's formats first, which may take several minutes or more, depending on the map's size and complexity. Once the map has been loaded, you should be greeted by the PFM interface. You can now import the SFM project from the menu bar via `File > Import > SFM Project`. Once again, this may require a lot of asset conversions and may take a while. While it is loading PFM will appear frozen. Eventually you should be able to see your scene pop up in the viewport. The next step depends on what you're trying to accomplish. If you want to get straight into rendering, you can check out some of the rendering workflow tutorials: - [Rendering Posters](https://wiki.pragma-engine.com/books/pragma-filmmaker/page/rendering-posters) - [Rendering Animations](https://wiki.pragma-engine.com/books/pragma-filmmaker/page/rendering-animations) - [Rendering for Virtual Reality](https://wiki.pragma-engine.com/books/pragma-filmmaker/page/rendering-for-virtual-reality) Regardless of your goal, it is also recommended that you familiarize yourself with the [user interface](https://wiki.pragma-engine.com/books/pragma-filmmaker/chapter/user-interface), as well as read up on some of the [rendering tutorials](https://wiki.pragma-engine.com/books/pragma-filmmaker/chapter/rendering). Please don't hesitate to ask questions on the [Discord server](https://discord.gg/Ck5BcCz) if you're having trouble! You can find an overview of all available chapters about PFM [here](https://wiki.pragma-engine.com/books/pragma-filmmaker). # Rendering AnimationsThis workflow assumes that you have already set up a project ready for rendering, and that you have read the article about the [rendering window](https://wiki.pragma-engine.com/books/pragma-filmmaker/page/rendering).
For rendering animations, it is recommended that you use the [Pragma renderer](https://wiki.pragma-engine.com/books/pragma-filmmaker/page/pragma-renderer). Using a raytracing renderer like Cycles X is possible, but even with top-of-the-line hardware it can take days, weeks or even months to render a full animation. Additionally, some rendering effects (like Motion Blur) are currently only supported for the Pragma renderer. This workflow assumes that you're going to use the Pragma renderer, and describes the recommended steps. Setting up a reflection probe and lightmap baking in particular are essential to get good-looking results. ## Lightmaps [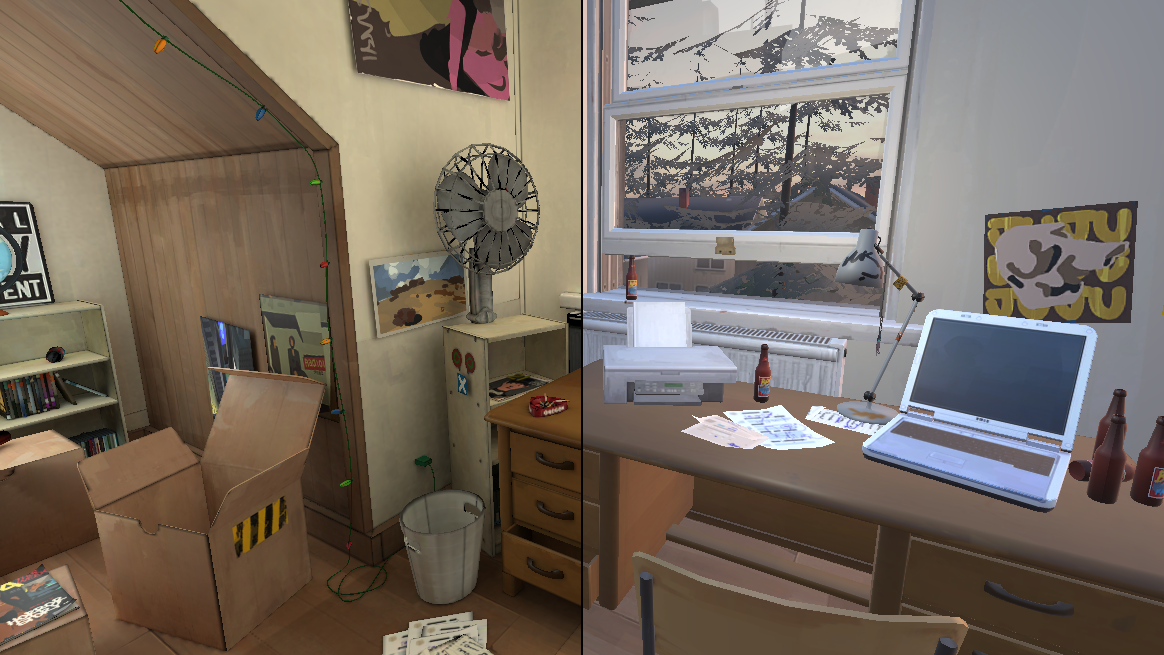](https://wiki.pragma-engine.com/uploads/images/gallery/2022-07/lightmap-comparison.png) (Left = With Lightmaps, Right = Without Lightmaps) Lightmaps are **the most important step** to improving the rendering quality of your scene. Lightmap baking is a way of pre-calculating lighting information for your scene before the actual render. If your scene only consists of dynamic actors (i.e. actors that are moving or animated), you can skip this step, but if you have **any** static actors at all, it is highly recommended that you take the time to set up lightmap baking.Lightmap baking is a one-time process (once per scene/project), however this process can also take some time. To get high-quality lightmaps, several hours of rendering time may be required, depending on your GPU and your desired lightmap quality. However, once the lightmaps have been baked, rendering the actual animation will be very fast (and still significantly faster than using a raytracing renderer overall).
Here is another example of a scene in Pragma with pre-baked lighting: ### Setup #### MapIf your project is a pure scene build and does not use a map as a base, you can skip this step.
Lightmap baking only works with scene builds. If you're using a map that isn't completely empty (i.e. has visible geometry), you will have to convert it to a scene build first. To do so, simply select `Tools > Convert Map to Actors` from the menu bar. This will convert the map and its props to actors in your project. Please note that since the map is now part of the project itself, you should **not** load the map anymore the next time you want to use the project. Instead, load an `empty` map instead. #### Static ActorsThis step is only required if you have static props in your scene that don't have the `light_map_receiver` component.
First of all you have to specify which actors should be included in the baked lightmaps. This should be all static props (and **only** the static props) in your scene. To do so, simply add the `light_map_receiver` component to those actors: [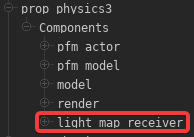](https://wiki.pragma-engine.com/uploads/images/gallery/2022-07/pragma-2022-07-30-10-19-24.png) Depending on how the actor was created, the component may already be there and you can skip this step entirely. If the component doesn't exist, you can [add it manually](https://wiki.pragma-engine.com/books/pragma-filmmaker/page/actor-editor#bkmrk-%C2%A0-0). Only actors with this component will considered. Do **not** add this component to any actors that move around in the scene or that are otherwise visibly animated (e.g. with skeletal or facial animations). #### Light Sources To bake lightmaps, you will have to place some light-sources first. However, not just any light-sources will do, so please make sure to closely follow the next steps. First, go to the `Render` window and make sure the `Render Engine` is set to `Cycles X`. Then, go to the `Primary Viewport` window, and enable `Live Raytracing` on the right-hand side. PFM may appear frozen for a few seconds or more. What you're seeing in the viewport now is an approximation of what it will look later once the lightmaps have been baked. Now you can place some light-sources in the actor editor and change their properties until you're satisfied with how the scene looks.Make sure to click the `light` component of each light-source and enable the `baked` property! Also do **not** check the `castShadows` property for these light sources. Baked light sources always cast shadows and enabling this property would put a significant strain on your GPU resources for no reason.
You can place as many light-sources as you like, but **do not** animate them in any way. Any baked light-sources will also **only affect static actors**, for dynamic actors you will have to place some additional non-baked light-sources later on. Once you're done, you can disable `Live Raytracing` mode. The baked light-sources should not be visible anymore, but they will re-appear once the lightmaps have been baked. ### Baking Make sure to place a `Lightmapper` actor in your scene (if there isn't one already): [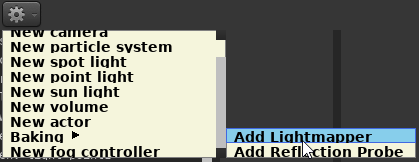](https://wiki.pragma-engine.com/uploads/images/gallery/2022-07/pragma-2022-07-30-10-24-33.png) Select the `pfm_baked_lighting` component of the lightmapper actor in the actor editor. On the right-hand side, you should see options like these: [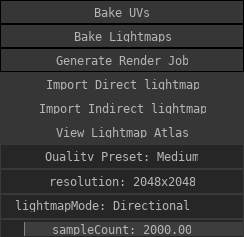](https://wiki.pragma-engine.com/uploads/images/gallery/2022-08/pragma-2022-08-28-15-46-34.png) You don't need to worry about most of these. Set the `Quality Preset` to either `Low` or `Medium`. On these settings the baking will be significantly faster than on the `Production` settings, but you will likely see a lot of blurry shadows and odd artifacts. Once you're satisfied with the lighting conditions, and you're ready for the final render, you can bake the lightmaps with one of the `Production` settings, but until then you should stick to `Low/Medium`.The larger your scene is, the higher the resolution will need to be to avoid blurry shadows, but that comes at the cost of significantly increased baking times. For smaller scenes `Production 4K` should be sufficient. There are also ways to optimize the usage of the lightmaps to improve their quality, which are described further below.
The final step is to actually initiate the baking process. To do so, simply click the `Bake lightmaps` button. Please note that this can take a significant amount of time (i.e. several hours, depending on the scene complexity, quality preset and your GPU). If you don't want to keep PFM/Pragma running the entire time, you can also use the [external render tool](https://wiki.pragma-engine.com/books/pragma-filmmaker/page/rendering-animations#bkmrk-external-baking). Once the baking is complete, a window such as this will appear: [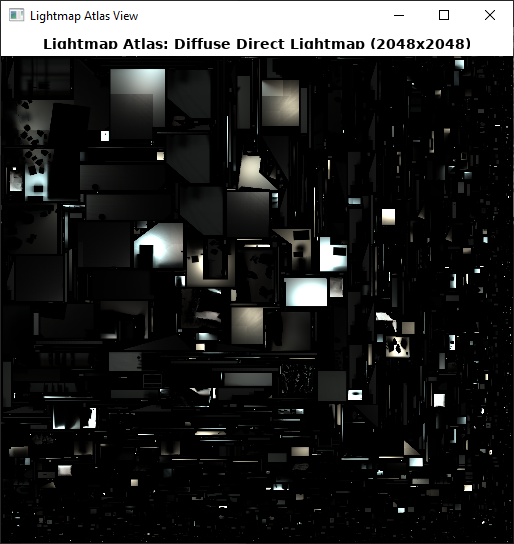](https://wiki.pragma-engine.com/uploads/images/gallery/2022-07/pragma-2022-07-30-12-22-42.png) This means the baking was successful. Close the window and make sure to save the project, or the lightmap data will be lost. If you move around in the viewport, you should see the updated lighting right away. If you make any changes to the scene in the future, such as moving, deleting or adding new static actors, you will have to bake the lighting again. #### External Baking Baking can take a very long time and you may want to do other things in the meantime and not keep PFM running throughout. Fortunately there is a very simple solution to do just that: Instead of clicking the `Bake Lightmaps` button, click `Generate Render Job`. This should open the "Lightmap Atlas View" window, which you can close right away, as well as an explorer window with a directory containing a "render.bat" file. To make the lightmaps, you can now close PFM/Pragma and double click the .bat-file. This will still take a while, but allow you to do other things in the background. Once rendering has been completed, two files with the endings "\_direct.dds" and "\_indirect.dds" should have been created. These will now have to be imported into PFM. To do so, simply open your project again, and select the `pfm_baked_lighting` component. Now press `Import Direct lightmap` button, navigate to "render/lightmaps/" and select the file ending with "\_direct.dds". Then do the same with `Import Indirect lightmap` and the file ending with "\_indirect.dds". Save the project. You should be able to see the effect in the viewport right away. ## Reflection Probe A reflection probe contains a cubemap image of the scene, which contains lighting information used by reflective objects. Without a reflection probe, reflective objects will look unnatural. Reflection probes also use static lighting, so you should make sure to set up lightmap baking first, or at the very least place some [baked light sources](https://wiki.pragma-engine.com/books/pragma-filmmaker/page/rendering-animations#bkmrk-lighting). Beyond that, luckily setting up a reflection probe is very simple. You can create a new reflection probe via the [actor editor](https://wiki.pragma-engine.com/books/pragma-filmmaker/page/actor-editor): [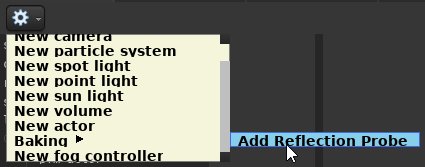](https://wiki.pragma-engine.com/uploads/images/gallery/2022-08/pragma-2022-08-09-17-04-33.png) In most cases one reflection probe will suffice. During rendering, whichever probe is closest to the camera will be used, and all others will be ignored. ### Placement Reflection probes are not visible in the viewport, but you can see its location by selecting it in the actor editor, and entering move mode by pressing the [](https://wiki.pragma-engine.com/uploads/images/gallery/2022-07/pragma-2022-07-16-20-26-30.png) button: [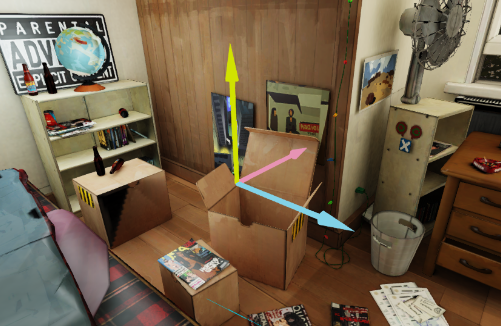](https://wiki.pragma-engine.com/uploads/images/gallery/2022-07/pragma-2022-07-16-20-27-34.png) Move the probe somewhere near the center of your scene, but not too far from the camera. Make sure the probe is **not obstructed by any objects** and **not too close to any walls** and that most of your scene is visible from the reflection probe's position. The rotation of the probe does not matter. Once your probe is in place, you're ready to bake it: ### Baking To bake a reflection probe select the `reflection_probe` component from the component list, and press the `Bake reflection probe` button: [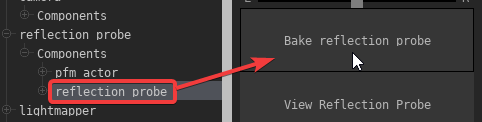](https://wiki.pragma-engine.com/uploads/images/gallery/2022-07/pragma-2022-07-16-20-32-15.png) The baking process may take a minute or more, you'll see a progress bar at the button which indicates how far along the baking is. You can also hover over the button to see the progress in percent. Once baking is complete, a window like this should pop up: [](https://wiki.pragma-engine.com/uploads/images/gallery/2022-07/pragma-2022-07-16-20-33-57.png) You can rotate the view of the image by clicking and dragging. All of the static actors in your scene should be visible. If something is obstructing the view, you may want to move the probe somewhere else. The image will probably look very blurry, but that's okay. You can now close this window and **save the project**. The effect of the probe may not be immediately noticeable, but it can subtly improve the overall quality of the scene a fair bit, especially if you have very reflective objects in the scene.The reflection probe will have to be re-baked if you move any of the static actors, add any new static actors to the scene or move the probe itself. For this reason it's best to do it right before you're about to do the final render of your scene.
### Example Here is an example video on how to set up a reflection probe. The purpose of the golden cube is to highlight the effect that the probe has on the scene (and on reflective/metallic objects in particular): ### Advanced These steps are optional, but can increase the quality of the lightmaps if applied correctly. #### Excluding invisible Actors The quality of the baked lightmaps is highly dependent on the overall size of the scene and the actors within it. If you have any large actors in your scene that don't need lightmaps (e.g. a large building not visible through the camera, or a skydome covering the entire scene), you should **remove the `light_map_receiver` component**. Only actors that can be seen through the camera, and that actually require lighting should have the component. You can click a particular area in the lightmap atlas view to find out which object occupies it, or you can select a specific actor from the "Actor:" drop-down menu to see which areas it occupies: [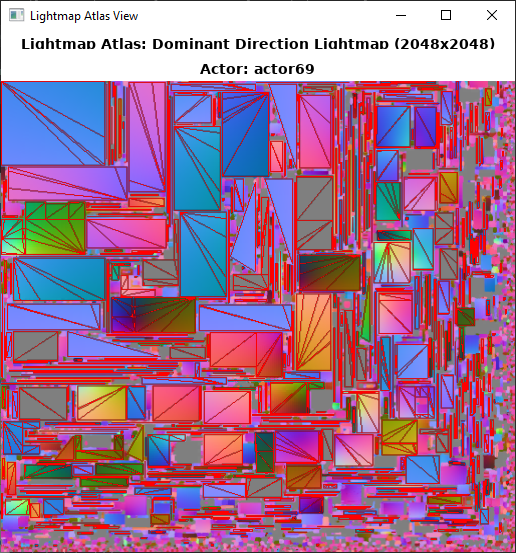](https://wiki.pragma-engine.com/uploads/images/gallery/2022-08/pragma-2022-08-28-20-44-06.png) Actors that cover a large area in the lightmap atlas will decrease the overall quality. If possible actors like this should be removed from the lightmap baking (by removing the `light_map_receiver` component), or the area bounds should be decreased to cover fewer meshes of such actors. #### Lightmap Area Bounds You can also change the lightmap area bounds, which will make it so only actors within the cuboid bounds will be considered for baking. All actors (and meshes) outside of this area will be ignored, even if they have the `light_map_receiver` component: [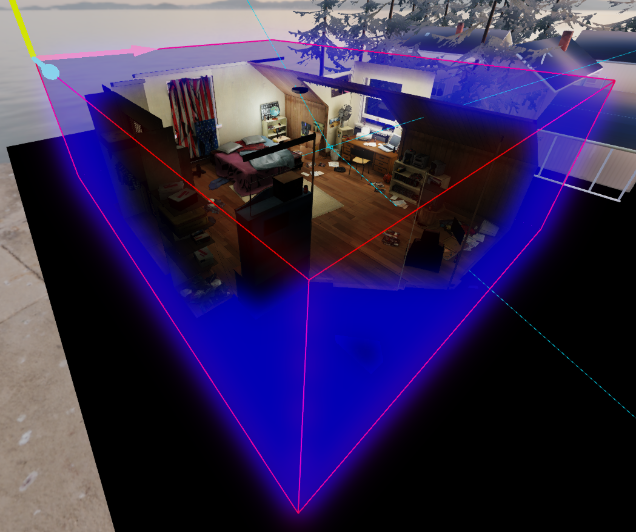](https://wiki.pragma-engine.com/uploads/images/gallery/2022-07/pragma-2022-07-30-12-03-52.png) The smaller the area, the higher quality the lightmaps will be, which means the area should fit around the visible scene as tightly as possible. This is especially important if your scene is part of a large map, but only covers a small portion of it. To define the bounds, right-click the `Components`-entry of the lightmapper actor, and add the `pfm_cuboid_bounds` component (if it's not there already): [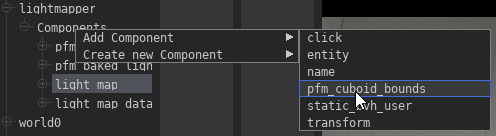](https://wiki.pragma-engine.com/uploads/images/gallery/2022-08/pragma-2022-08-28-16-38-04.png) Select the new component and make sure the `showDebugBounds` property is checked to enable the blue cube visualization of the bounds. Since the bounds are initially `0 0 0`, you will not see anything right away. Next, select the `minBounds` property and select the `Move`-Tool ([](https://wiki.pragma-engine.com/uploads/images/gallery/2022-07/pragma-2022-07-17-13-34-43.png)) tool in the viewport window. Move the arrows in the widget to one corner of the scene: [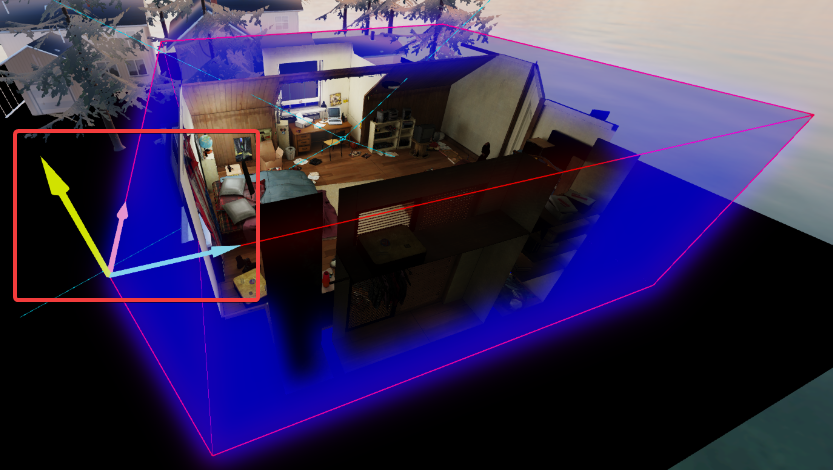](https://wiki.pragma-engine.com/uploads/images/gallery/2022-07/pragma-2022-07-30-12-12-02.png) Then do the same with `maxBounds` and move the arrows to the opposite corner of the scene. You should see a cube forming around it. Once the scene is encompassed, you can uncheck the `showDebugBounds` property. The next time you bake the lightmaps, objects outside of this area will be excluded from baking. ## Ambient OcclusionThis section is still a work-in-progress.
[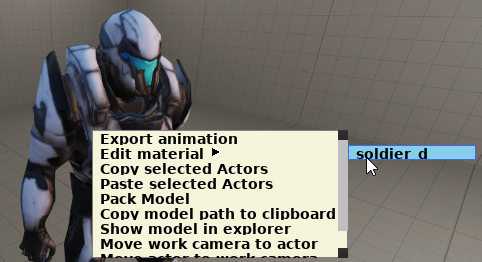](https://wiki.pragma-engine.com/uploads/images/gallery/2022-07/pragma-2022-07-30-12-48-28.png) [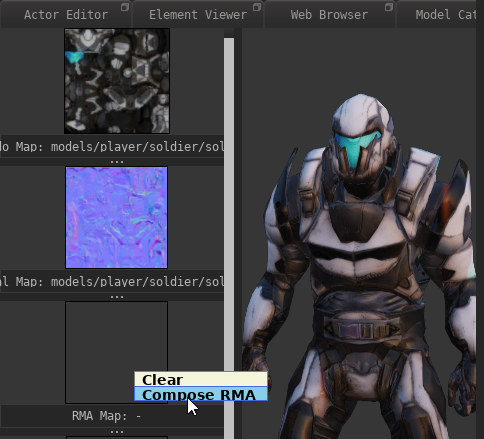](https://wiki.pragma-engine.com/uploads/images/gallery/2022-07/pragma-2022-07-30-12-49-46.png) [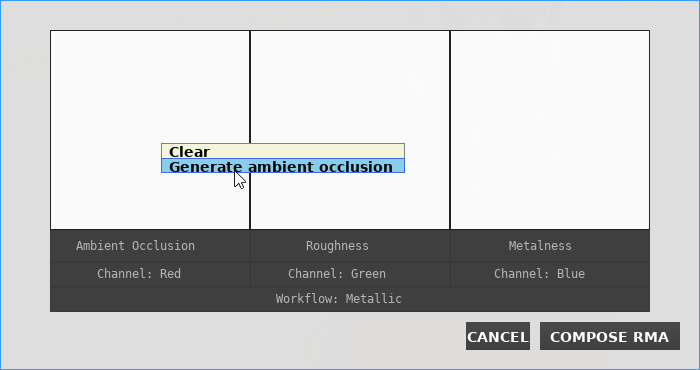](https://wiki.pragma-engine.com/uploads/images/gallery/2022-07/pragma-2022-07-30-12-50-15.png) [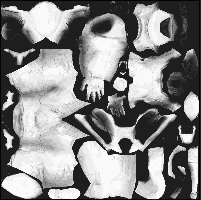](https://wiki.pragma-engine.com/uploads/images/gallery/2022-07/pragma-2022-07-30-12-50-45.png) ## Shadowed Light Sources By default all light sources you place in PFM do not cast shadows so save on rendering resources. To enable shadow casting for a light source, simply select the `light` component of the light source actor in the actor editor and check the `castShadows` property. If the shadows don't become visible right away, try moving the light source slightly.Shadowed Light Sources are **very** expensive in terms of GPU resources, so use them sparingly. This applies to point and directional light sources especially, try to avoid using them if possible and stick to shadowed spot-lights, otherwise you may run out of available VRAM very quickly.
### Recommended Effects #### Motion Blur If your animation is set up for 30 FPS or less, enabling Motion Blur is highly recommended. At higher resolutions it may not be as effective, but should still be considered, as the setup is very simple. Check out [this article](https://wiki.pragma-engine.com/books/pragma-filmmaker/page/motion-blur) for more information on how to enable Motion Blur. #### Fog Check out [this article](https://wiki.pragma-engine.com/books/pragma-filmmaker/page/fog) on information on how to enable fog. #### Spot-light beams Spot-light sources support a basic volumetric effect. See [this article](https://wiki.pragma-engine.com/books/pragma-filmmaker/page/volumetric-lighting#bkmrk-volumetric-spot-ligh) for information on how to enable it. # Rendering PostersThis article is a work-in-progress! Please check back another time.
This workflow assumes that you have already set up a project ready for rendering, and that you have read the article about the [rendering window](https://wiki.pragma-engine.com/books/pragma-filmmaker/page/rendering).
For rendering posters, it is recommended that you use either the `Cycles X` renderer or the `LuxCoreRender` renderer for the best possible quality. Here are some recommended: #### HDRI Sky If your scene is outdoors, you need to set up a HDRI sky. You can find out more information on how to do so [here](https://wiki.pragma-engine.com/books/pragma-filmmaker/page/hdri-skies). #### Material Settings All renderers in PFM are based on **P**hysically **B**ased **R**endering (PBR). Changing the material properties (such as metalness, roughness, wetness and subsurface scattering) of the materials in your scene can greatly improve the way it looks. You can find more information about it [here](https://wiki.pragma-engine.com/books/pragma-filmmaker/page/material-editor). #### Volumetric Lighting Volumetric lighting can be used to create effects like fog or light beams. Find out more about it [here](https://wiki.pragma-engine.com/books/pragma-filmmaker/page/volumetric-lighting). #### Live Render Preview Activating live render mode can give you a real-time preview of your scene, while allowing you to move around. #### Renderer Settings # Rendering for Virtual Reality Please see [this article](https://wiki.pragma-engine.com/books/pragma-filmmaker/page/virtual-reality) for information on how to render for Virtual Reality devices. # Custom Assets How to use custom content in Pragma/PFM. # Downloading and Importing AssetsThis article refers to PFM v0.4.3 and newer and may not be representative of older versions.
Pragma supports most common model and texture formats. You can find a list of all supported asset formats [here](https://wiki.pragma-engine.com/books/pragma-engine/page/asset-types). Depending on the asset and the asset format, the import process may take several seconds or minutes, during which Pragma may appear frozen. ### Source Engine Assets Pragma is capable of detecting most Source Engine games installed on your system (assuming they are installed via Steam), and can import assets from those games, as well as some workshops, automatically. In this case you should be able to immediately find the assets in PFM's model/material catalog without having to do anything. For uncommon Source Engine games, you may have to add them to the [mount list](https://wiki.pragma-engine.com/books/pragma-engine/page/game-mounting) manually for Pragma to be able to detect them. Source Engine assets that have been detected, but not yet imported, are indicated by the following icon in the model/material catalog: [](https://wiki.pragma-engine.com/uploads/images/gallery/2022-01/pragma-2022-01-22-15-27-07.png) If you want to install Source Engine assets manually, see [this section](https://wiki.pragma-engine.com/books/pragma-filmmaker/page/downloading-and-importing-assets#bkmrk-manual-installation) for more information. ### Web-Browser The easiest way to install custom assets is via the integrated Web Browser. Click [here](https://wiki.pragma-engine.com/books/pragma-filmmaker/page/web-browser) to find out more. ### Manual Installation There are two ways of installing assets manually: #### Model Explorer [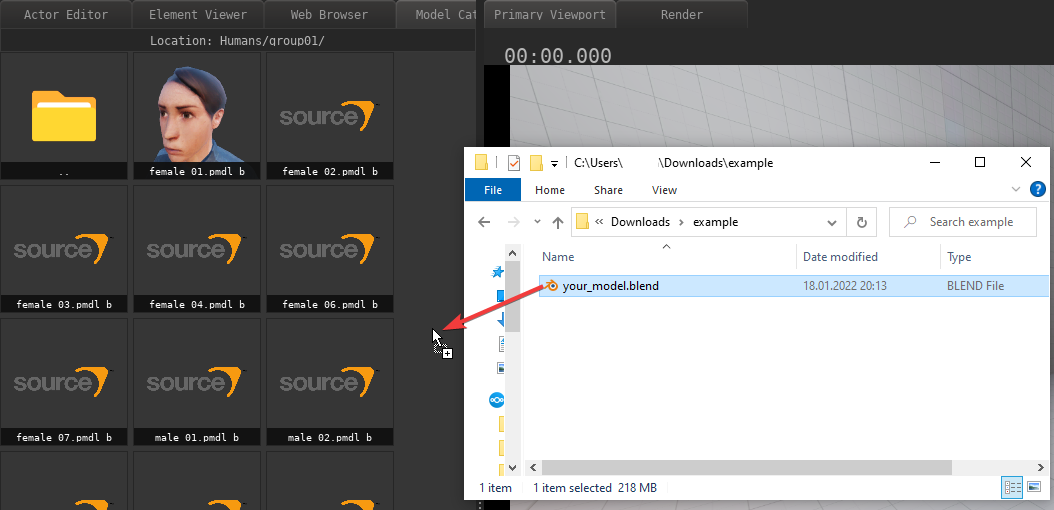](https://wiki.pragma-engine.com/uploads/images/gallery/2022-01/pragma-2022-01-22-15-30-28.png) If you have a single-file asset (e.g. a "\*.blend"-file), or a compressed archive (e.g. zip), you can simply drag-and-drop it into PFM's model explorer, and Pragma should be able to detect and import the assets automatically. #### Direct Copy [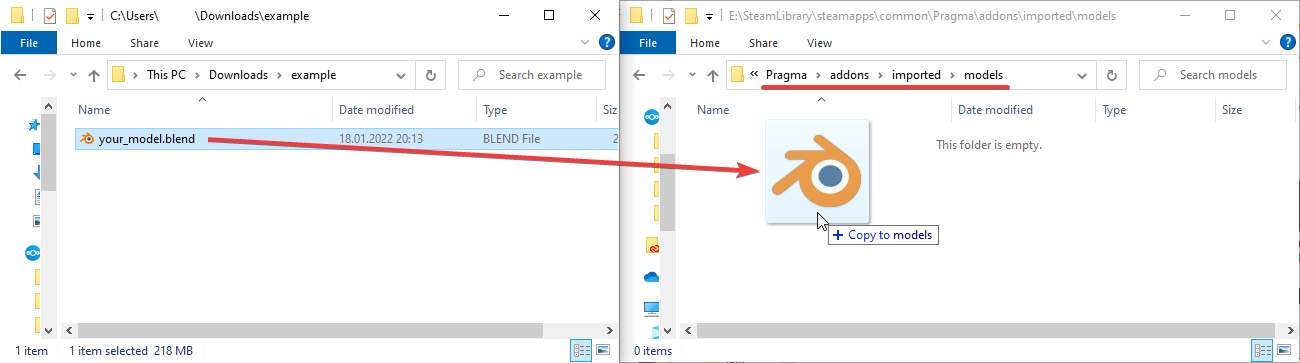](https://wiki.pragma-engine.com/uploads/images/gallery/2022-01/explorer-2022-01-22-15-36-33.png) Another way of importing assets is to just copy the asset files to a location where Pragma can find them. The recommended location for that is in "Pragma/addons/imported/" (create the directory if it doesn't already exist). Depending on the type of asset, you will have to create some additional sub-directories: - **Models** should be copied to "Pragma/addons/imported/models" - **Materials** and **textures** should be copied to "Pragma/addons/imported/materials" - **Sound-files** should be copied to "Pragma/addons/imported/sounds"If you're trying to import a model with one of the following formats, and the model textures are **not** embedded, you will have to copy both the model-file **and** the textures to "Pragma/addons/imported/models": glTF, glb, nif, blend, fbx, dae, x3d, obj, abc, usd
Pragma will convert the assets to native formats whenever they're used for the first time. Please note that if you install assets this way, you may have to restart Pragma in order for it to be able to detect them. # Retargeting # Advanced # Actors and ComponentsThis article refers to PFM v0.4.3 and newer and may not be representative of older versions.
[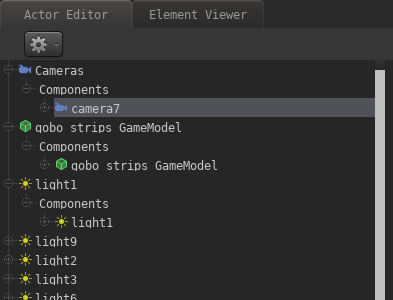](https://wiki.pragma-engine.com/uploads/images/gallery/2021-09/pfm-actor-editor.png)Actors in PFM are entities (i.e. game objects) that are part of your animation, **not** including map entities or other entities that exist independently of your project. An actor can be anything from a camera to a light source, prop or particle system. An **articulated** actor is an actor with a skeletal rig or morph targets (i.e. flexes/flex controllers). In the PFM interface you can find a list of all actors in the currently selected film clip in the "Actor Editor" window. ### Creating an actor To create a new actor, click the gear icon at the top of the actor editor: [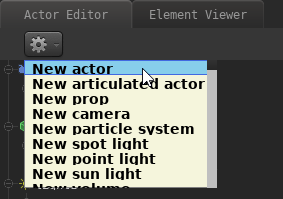](https://wiki.pragma-engine.com/uploads/images/gallery/2021-09/pragma-2021-09-23-16-35-56.png) Choosing "New Actor" will create an empty actor without any components, the other options will automatically add the required components for the chosen option. Components are explained in the following section: ### Components Contrary to SFM, there are **no** concrete actor **types** in PFM. Instead, every actor has a list of **components** associated with it which define the behavior/function of that actor. For instance, if you create a camera in SFM, that actor **is** a camera entity. If you create a camera in PFM, that actor is an entity **with a camera component**. The key difference is that components in PFM can be freely added or removed to/from an actor. Example: You create an actor X and add a camera component to it, which turns that actor into a camera. If you add another component to actor X, for instance a light source component, then actor X is **both** a camera and a light source at the same time. If you then remove the camera component from the actor, it ceases to be a camera, but remains to be a light source (This should ring a bell if you're familiar with [entity-component-systems](https://en.wikipedia.org/wiki/Entity_component_system).). This allows you to flexibly change or enhance the behavior of an actor. Some other examples: - You can add a "retarget" component to an actor to change its model to another, even if the new model has different proportions or a different rig, while keeping the animation intact. - You can add a "physics" component to make an actor move in a physically accurate manner (e.g. dropping on the ground). - You can then add a "gravity" component to change the actor's gravity (e.g. make it fall upwards instead). - etc. If you have some programming experience, you can also create **custom components** with Lua, and then add those components to your actors. Custom components can also add new animatable properties. See [here](https://wiki.pragma-engine.com/books/pragma-filmmaker/page/actors-and-components#bkmrk-creating-custom-comp) for details. You can find a list of components an actor has in the "Actor Editor": [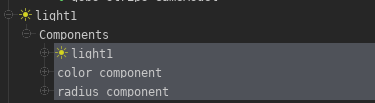](https://wiki.pragma-engine.com/uploads/images/gallery/2021-09/pragma-2021-09-23-15-05-13.png) To avoid cluttering the interface, not all of the actor's components are listed by default. Right-click on "Components" and choose "Add Component" to see which ones of the actor's current components are hidden. By clicking one of the components it will be added to the interface (along with its properties, if it has any). You should only do this if you intend to modify the properties of one of the components. [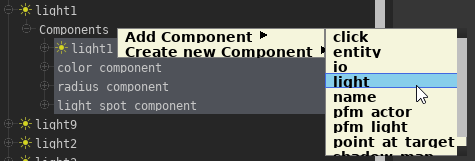](https://wiki.pragma-engine.com/uploads/images/gallery/2021-09/pragma-2021-09-23-16-07-43.png) The option "Create new Component" allows you to add an entirely new component to the actor: [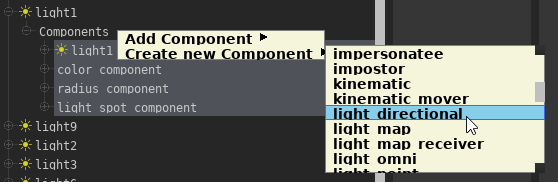](https://wiki.pragma-engine.com/uploads/images/gallery/2021-09/pragma-2021-09-23-16-13-09.png)This list includes **all** components known by the engine, many of which may not be suited for use in PFM!
Custom Lua-based components will also appear in this list automatically. If you select one or more components from the actor component list, you will get a set of properties on the right-hand side of the editor: [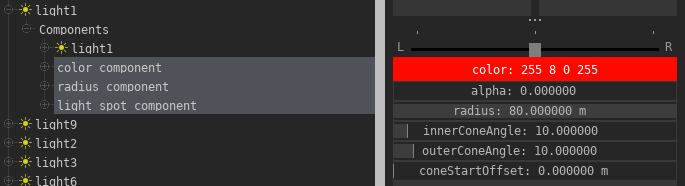](https://wiki.pragma-engine.com/uploads/images/gallery/2021-09/pragma-2021-09-23-16-19-05.png) Most of these properties can be animated (with the exception of strings and a few other types). ### Creating custom components To create a new Lua-based component for use in PFM, follow these steps: 1. Create a new addon in the "addons" directory 2. Within that directory create the path and file "lua/entities/components/<component\_name>/client/client.lua" - "component\_name" has to be lower-case and must not contain any special characters (aside from '\_') or spaces! - If the component is specific to PFM only, you should use the "pfm\_" prefix for the component name. 3. Open the "client.lua" in a text-editor and paste the following contents into it (and make sure to follow the comments): ```Lua -- Replace "CustomComponent" with a name of your choice (make sure it doesn't exist yet) local Component = util.register_class("ents.CustomComponent",BaseEntityComponent) -- Register properties for this component. These will be editable (and animatable) in PFM Component:RegisterMember( "ExampleProperty", -- Property name udm.TYPE_FLOAT, -- Property type 1.0, -- Default value { min = 0.0, -- Min value (hint for the UI) max = 10.0 -- Max value (hint for the UI) } ) function Component:Initialize() BaseEntityComponent.Initialize(self) print("Initializing component of type '" .. self:GetComponentName() .. "'...") -- Do something when this component has been added to an entity/actor end function Component:OnRemove() print("Removing component of type '" .. self:GetComponentName() .. "'...") -- Do some cleanup? end -- Register the component. "component_name" has to match the name of the directory in "entities/components/"! -- "COMPONENT_CUSTOM" should also reflect this name! -- e.g. if your component name is "apple_tree", "COMPONENT_CUSTOM" should be "COMPONENT_APPLE_TREE" ents.COMPONENT_CUSTOM = ents.register_component("component_name",Component) ``` The next time you start PFM, your component should appear in the component list automatically and you can add it to your actors. Below is an example of the `pfm_sky` component, which enables animating the sky orientation and strength when rendering with raytracing: ```Lua util.register_class("ents.PFMSky",BaseEntityComponent) local Component = ents.PFMSky Component:RegisterMember("Strength",udm.TYPE_FLOAT,1.0,{ min = 0.0, max = 10.0 }) Component:RegisterMember("Transparent",udm.TYPE_BOOLEAN,false) Component:RegisterMember("SkyTexture",udm.TYPE_STRING,"",{ specializationType = ents.ComponentInfo.MemberInfo.SPECIALIZATION_TYPE_FILE, metaData = { rootPath = "materials/skies/", basePath = "skies/", extensions = {"hdr"}, stripExtension = true } }) function Component:Initialize() BaseEntityComponent.Initialize(self) self.m_callbacks = {} table.insert(self.m_callbacks,ents.add_component_creation_listener("unirender",function(c) table.insert(self.m_callbacks,c:AddEventCallback(ents.UnirenderComponent.EVENT_INITIALIZE_SCENE,function(scene,renderSettings) scene:SetSkyAngles(self:GetEntity():GetAngles()) scene:SetSkyStrength(self:GetStrength()) local tex = self:GetSkyTexture() if(#tex > 0) then scene:SetSky(tex) end scene:SetSkyTransparent(self:GetTransparent()) end)) end)) end function Component:OnRemove() util.remove(self.m_callbacks) end ents.COMPONENT_PFM_SKY = ents.register_component("pfm_sky",Component) ``` # External Render Tool While it's possible to render images directly in the Filmmaker, it is not recommended for final renders or animations. You can use the external render tool instead, which has the following advantages: - It's much faster than rendering directly in Pragma (since more GPU resources are available if Pragma is not running) - You don't have to keep Pragma running in the background during the render process - You can keep working on projects without affecting the rendering - If Pragma crashes, the render will continue - You can use both your CPU and GPU simultaneously when rendering animations - You can cancel it any time, frames that have already been rendered will not be lost (except for the current one) To use the external rendering tool, follow these instructions: 1. Launch PFM like usual and load your project 2. Switch to the "Render" tab 3. Instead of clicking "Render Image(s)" to render your images, click the "Create render job(s)" button [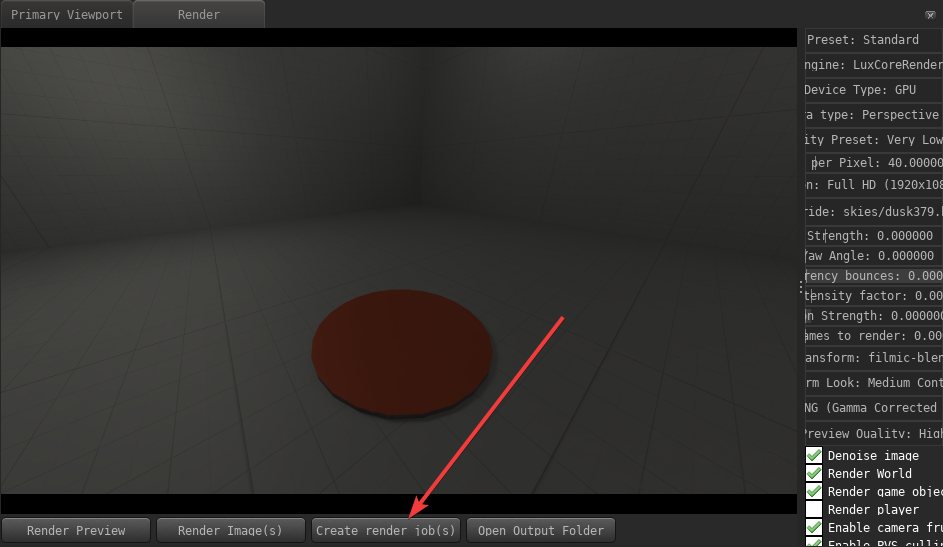](https://wiki.pragma-engine.com/uploads/images/gallery/2021-07/pragma-2021-07-08-09-05-12.png) Once the render jobs have been generated, an explorer window should open with a bunch of ".prt"-files, a "cache" directory (which contain all of the information needed to render your images), as well as a "render.bat". To start the render, simply double-click the .bat-file, which should open a black console window. Pragma is no longer required at this point and can be closed. The images will be rendered one after another and placed in the same directory as the ".prt"-files. Once all images have been rendered you can remove all of the .prt-files, as well as the "cache" directory, as they are no longer required. ### Commands TODO ##### pause ##### resume ##### stop ##### preview ##### suspend ##### export # Material Overrides Material overrides allow you to change the material (or material properties) for an individual actor, without having to change the material itself (which would affect all actors with the same model).Material override properties can currently not be animated.
To add a material override, go to the [actor editor](https://wiki.pragma-engine.com/books/pragma-filmmaker/page/actor-editor) and select the `pfm_model` component of the actor, then click on `Edit materialOverrides`. This will take you to the [UDM Editor](https://wiki.pragma-engine.com/books/pragma-filmmaker/page/udm-editor) window, where you have to set up the following data structure: [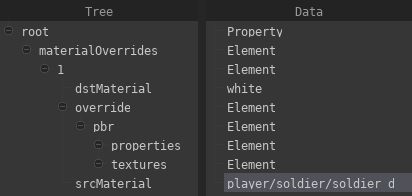](https://wiki.pragma-engine.com/uploads/images/gallery/2022-10/pragma-2022-10-31-17-55-00.png) You can do so manually, or by copying the following code block to your clipboard, right-clicking the `root` item, and selecting `Paste from clipboard`: ``` "pfm_udm_copy" { $array materialOverrides [element;1][ { $string srcMaterial "" $string dstMaterial "" "override" { "pbr" { "properties" { } "textures" { } } } } ] } ``` Now double-click the value for the `srcMaterial` property and enter the path and filename (without extension) of the material you want to override (e.g. enter `player/soldier/soldier_d`, if the material is `materials/player/soldier/soldier_d.pmat`). If you want to override the material with another material, double-click the value for the `dstMaterial` property and enter the path of the replacement material. You can also replace individual material properties and textures manually by adding them to the `properties` and `textures` sections. For instance, if you want to override the `color_factor` property, right-click `properties`, select `Add Property > vec3` and name the property `color_factor`. On the right side you can now double-click the value to edit it: [](https://wiki.pragma-engine.com/uploads/images/gallery/2022-10/pragma-2022-10-31-17-59-27.png) If you want to replace the albedo map, right-click `textures`, select `Add Property > string`, name the property `albedo_map` and input the texture you want to use as a replacement as the value.Make sure to press `Save` to apply the changes you have made, and save the project afterwards.
If you want to add more than one material override, follow these steps: 1. Right-click `materialOverrides` and choose `Add Item`. 2. Right-click the first item in `materialOverrides` and choose `Copy to clipboard`. 3. Right-click the second item in `materialOverrides` and choose `Paste from clipboard`. You can repeat these steps for any number of additional overrides. # Troubleshooting ### PFM crashes since a recent update If you can still get to the main menu, try running "clear\_cache", then restart the Engine. If it still crashes, you can report your problem on the [Discord server](https://discord.gg/Ck5BcCz). ### My SFM project doesn't appear in the project browser If you want to import a SFM project file, make sure to choose "File -> Import..." from the menu bar instead of "File -> Open...". If your project still doesn't appear, and it is located in a custom user directory ("SourceFilmmaker/game/<custom>/..."), you will have to open the "cfg/mounted\_games.txt" file, locate the "sfm" entry and add the custom user path to the "game\_paths" section. ### The animations from my SFM project don't play correctly PFM does currently not support IK rigs. If your SFM project uses IK rigs, you will have to detach them in SFM before loading it in PFM for the time being:  ### PFM freezes when loading a project Importing a project for the first time can take several minutes or more, during which Pragma may appear frozen. This is normal and should only be the case the first time you load the project. ### I can't move in the viewport To move in the viewport, make sure the "Work Camera" is selected instead of the scene camera. Then right click into the viewport**, hold** the right mouse button down and move with WASD and the mouse. ### I get a black viewport after opening a project Make sure you've loaded the right map **before** loading the project, PFM is currently not able to switch to the project's map automatically. ### I get visual artifacts on a model in the viewport / when rendering with Cycles [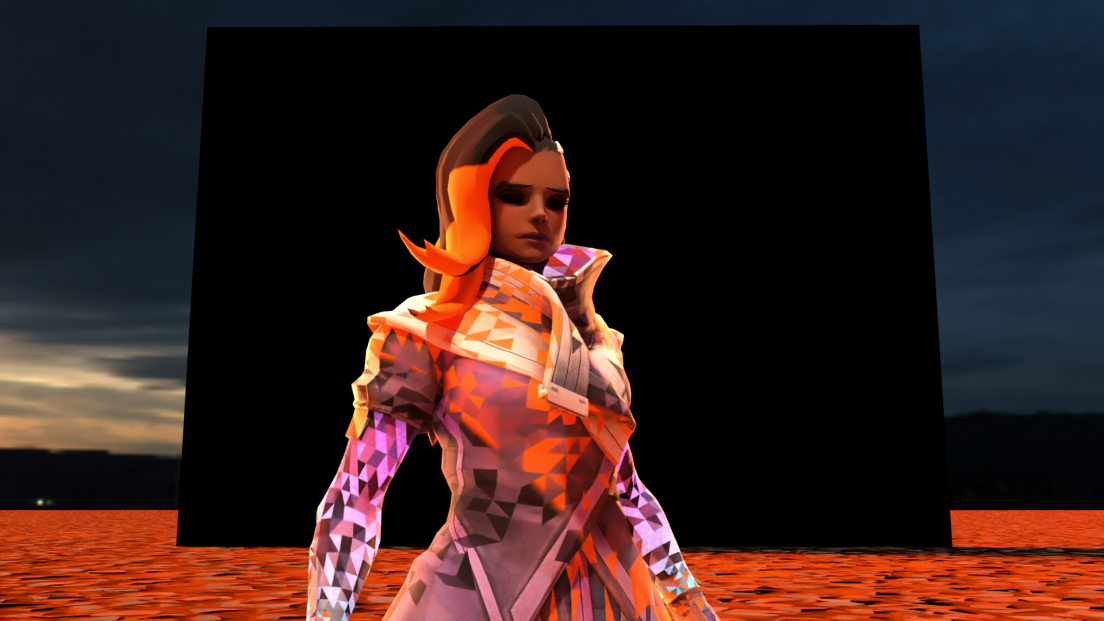](https://wiki.pragma-engine.com/uploads/images/gallery/2020-08/fake_pbr_artifacts.png) If you get artifacts like the ones above, it means your model is most likely using a method called "fake PBR". This is used in some models to create a PBR-like effect in Source (which doesn't support actual PBR), but is incompatible with Pragma and Cycles.