
Material Overrides
Material overrides allow you to change the material (or material properties) for an individual actor, without having to change the material itself (which would affect all actors with the same model).
Material override properties can currently not be animated.
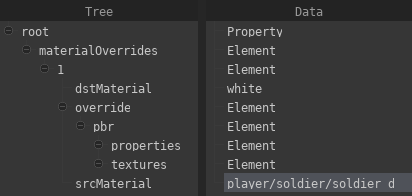
To add a material override, go to the actor editor and select the pfm_model component of the actor, then click on Edit materialOverrides. This will take you to the UDM Editor window, where you will have to set up the following structure:
To do so, follow these steps:
- Right-click
rootand chooseAdd Property > Add Array > element, name itmaterialOverrides. - Right-click
materialOverridesand chooseAdd Itemfor every material you want to override. - Right-click the ID for the material override and choose
Add Property > string, name itsrcMaterial. - Double-click the empty field in the
Datacolumn to the right of thesrcMaterialproperty and enter the path and filename (without extension) of the material you want to override (e.g. enterplayer/soldier/soldier_d, if the material ismaterials/player/soldier/soldier_d.pmat). - Right-click the ID for the material override and choose
Add Property > string, name itdstMaterial. - Like in step 4., enter the material that you wish to replace
srcMaterialwith. If you only want to replace specific properties ofsrcMaterial, you can leavedstMaterialempty. - Right-click the ID for the material override and choose
Add Property > element, name itoverride. - Right-click
overrideand chooseAdd Property > element, name itpbr. - Right-click
pbrand chooseAdd Property > element, name itproperties. - Right-click
pbragain and chooseAdd Property > element, name ittextures.
You can now fill properties with the material properties you want to replace and textures for the textures accordingly. For instance, if you want to override the color_factor property, right-click properties, select Add Property > vec3 and name the property color_factor. On the right side you can now double-click the value to edit it:

If you want to replace the albedo map, right-click textures, select Add Property > string, name the property albedo_map and input the texture you want to use as a replacement as the value.
Make sure to press Save to apply the changes you have made, and save the project afterwards.