
Actor Editor
The actor editor window is where you can add new actors to your scene, or change actor properties. An actor can be anything from a light source to a prop or the sky. The actors are all displayed in a tree-structure on the left-hand side of the actor editor:
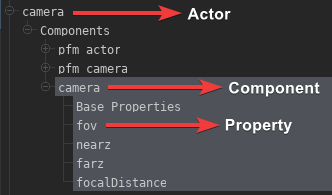
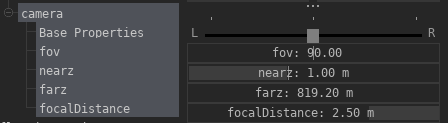
Every actor has a list of components attached to it, which define the actor's behavior and properties. If you select a component, you can edit its properties on the right-hand side of the editor:
Changing the value of a property will change it for the entire film clip, unless the graph editor ( ) is active. If the graph editor is selected, a keyframe will be added at the current playhead position and the value will be animated instead.
Some properties (like the model of an actor) are exempt from this, as they cannot be animated.
Animated properties have a yellow outline around them: 
In this case the property will be unmodifiable (and appear greyed out) outside of the graph editor. If you're not in the graph editor, you can just click the property and you will be directed there.
You can right-click a property on the right-hand side which will give a list of several actions:
- Set To Default: Resets the value to the original value.
- Remap Slider Range: Allows you to change the min/max range of the slider.
- Copy to clipboard: Copies the current value of the property to the clipboard.
- Set Expression: Allows you to specify a math expression to change the effective value of the property. This will only work if the property is animated.
- Copy property path: Copies the internal panima animation path to the clipboard.
- Clear Animation: Clears all animation data for the property.
Adding new Actors
To add a new actor, you can use the  -button at the top of the actor editor.
If you want to add a model-based actor, you may want to use the scene-drop feature of the model catalog instead.
Here is a description of some of the available actor types:
Static Props
A static prop is a prop that isn't animated and will never move. While you can technically still move and animate static props, you should avoid doing so, as it can interfere with some sub-systems. Static props are also automatically included in lightmap bakes, which is another reason why they should not be moved or animated.
If you wish to add a static prop to your scene, select New prop from the -menu, which will create a model explorer window. You can double click a model and it will create a new static actor in front of the camera with the selected model.
Alternatively you can also drag-and-drop models from the model catalog directly into the viewport to create static props more quickly.
Dynamic Props
Dynamic props are props that may be moved or animated, but don't have skeletal or facial (morph targets / flex controllers) animations. For instance, a soccer ball being kicked or a glass falling off a table.
Articulated Actors
Articulated actors can be animated whichever way you want. These should be used primarily for characters in the scene.
Actor components
You can add new components to an existing actor by right clicking the Components-item in the tree and selecting a component to add, however you should only do this if you know what you're doing or if a wiki article explicitly mentioned it. Many components are Engine-level components that are not intended for use in the Filmmaker, and can cause crashes or instability if added. Handle with care!
Actions
Right-clicking an actor in the actor editor gives you a list of actions. These are mostly the same as in the viewport window, you can find more information about them here.
This is also where you can delete, rename or copy actors:
No comments to display
No comments to display