
Inverse Kinematics
To be able to animate using inverse kinematics, you have to set it up first. Luckily doing so is fairly straight-forward:
- Create an articulated actor in your scene
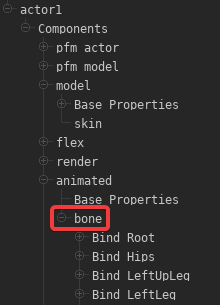
- Expand the bone list
actor > Components > animated > bonein the actor editor
- Right-click the bone for which you want to add an IK chain. This bone will be the effector. Now choose
Add IK Control > <ParentBone>from the menu. An IK chain will be created, which will include the<ParentBone>, the effector and all of the bones in-between in the hierarchy. - Scroll down to the bottom of the
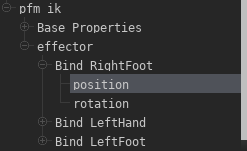
Componentslist and you should find a new entry calledpfm_ik. Here you will find all of the effectors you've added:
- Use the viewport transform modes to move the effector position and you should see the IK in action.
The IK configuration data is model-dependent and project-independent. If you use the model of the actor that you've added a IK chain for in another project (or the same one), the pfm_ik component of the new actor should already list all of the IK chains you have created for the model previously, i.e. you only have to create them once per model.
The IK system currently does not support limits. This means that, for instance, an arm can bend in ways that wouldn't be possible in real life.
No comments to display
No comments to display