
Rendering Animations
This workflow assumes that you have already set up a project ready for rendering, and that you have read the article about the rendering window.
For rendering animations, it is recommended that you use the Pragma renderer. Using a raytracing renderer like Cycles X is possible, but even with top-of-the-line hardware it can take days, weeks or even months to render a full animation. Additionally, some rendering effects (like Motion Blur) are currently only supported for the Pragma renderer.
This workflow assumes that you're going to use the Pragma renderer, and describes the recommended steps. Setting up a reflection probe and lightmap baking in particular are essential to get good-looking results.
Lightmaps
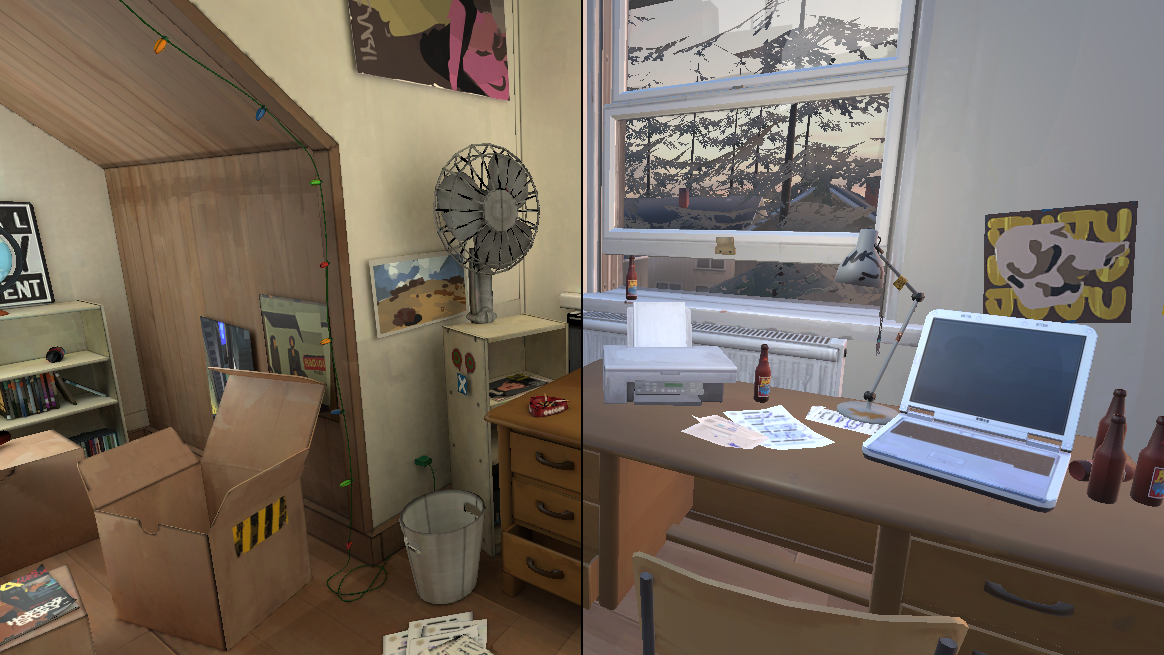
(Left = With Lightmaps, Right = Without Lightmaps)
Lightmaps are the most important step to improving the rendering quality of your scene. Lightmap baking is a way of pre-calculating lighting information for your scene before the actual render. If your scene only consists of dynamic actors (i.e. actors that are moving or animated), you can skip this step, but if you have any static actors at all, it is highly recommended that you take the time to set up lightmap baking.
Lightmap baking is a one-time process (once per scene/project), however this process can also take some time. To get high-quality lightmaps, several hours of rendering time may be required, depending on your GPU and your desired lightmap quality. However, once the lightmaps have been baked, rendering the actual animation will be very fast (and still significantly faster than using a raytracing renderer overall).
Here is another example of a scene in Pragma with pre-baked lighting:
Setup
Map
If your project is a pure scene build and does not use a map as a base, you can skip this step.
Lightmap baking only works with scene builds. If you're using a map that isn't completely empty (i.e. has visible geometry), you will have to convert it to a scene build first. To do so, simply select Tools > Convert Map to Actors from the menu bar. This will convert the map and its props to actors in your project. Please note that since the map is now part of the project itself, you should not load the map anymore the next time you want to use the project. Instead, load an empty map instead.
Static Actors
This step is only required if you have static props in your scene that don't have the light_map_receiver component.
First of all you have to specify which actors should be included in the baked lightmaps. This should be all static props (and only the static props) in your scene. To do so, simply add the light_map_receiver component to those actors:
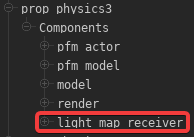
Depending on how the actor was created, the component may already be there and you can skip this step entirely. If the component doesn't exist, you can add it manually. Only actors with this component will considered. Do not add this component to any actors that move around in the scene or that are otherwise visibly animated (e.g. with skeletal or facial animations).
Light Sources
To bake lightmaps, you will have to place some light-sources first. However, not just any light-sources will do, so please make sure to closely follow the next steps.
First, go to the Render window and make sure the Render Engine is set to Cycles X. Then, go to the Primary Viewport window, and enable Live Raytracing on the right-hand side. PFM may appear frozen for a few seconds or more.
What you're seeing in the viewport now is an approximation of what it will look later once the lightmaps have been baked. Now you can place some light-sources in the actor editor and change their properties until you're satisfied with how the scene looks.
Make sure to click the light component of each light-source and enable the baked property! Also do not check the castShadows property for these light sources. Baked light sources always cast shadows and enabling this property would put a significant strain on your GPU resources for no reason.
You can place as many light-sources as you like, but do not animate them in any way. Any baked light-sources will also only affect static actors, for dynamic actors you will have to place some additional non-baked light-sources later on.
Once you're done, you can disable Live Raytracing mode. The baked light-sources should not be visible anymore, but they will re-appear once the lightmaps have been baked.
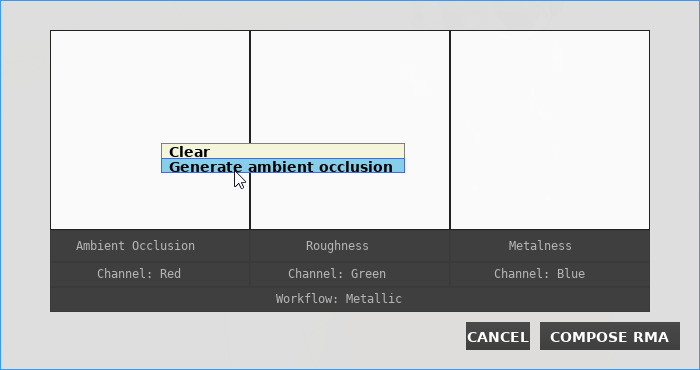
Baking
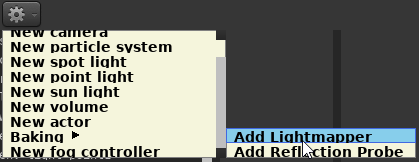
Make sure to place a Lightmapper actor in your scene (if there isn't one already):
Select the pfm_baked_lighting component of the lightmapper actor in the actor editor. On the right-hand side, you should see options like these:

You don't need to worry about most of these. Set the Quality Preset to either Low or Medium. On these settings the baking will be significantly faster than on the Production settings, but you will likely see a lot of blurry shadows and odd artifacts. Once you're satisfied with the lighting conditions, and you're ready for the final render, you can bake the lightmaps with one of the Production settings, but until then you should stick to Low/Medium.
The larger your scene is, the higher the resolution will need to be to avoid blurry shadows, but that comes at the cost of significantly increased baking times. For smaller scenes Production 4K should be sufficient.
There are also ways to optimize the usage of the lightmaps to improve their quality, which are described further below.
The final step is to actually initiate the baking process. To do so, simply click the Bake lightmaps button. Please note that this can take a significant amount of time (i.e. several hours, depending on the scene complexity, quality preset and your GPU). If you don't want to keep PFM/Pragma running the entire time, you can also use the external render tool.
Once the baking is complete, a window such as this will appear:
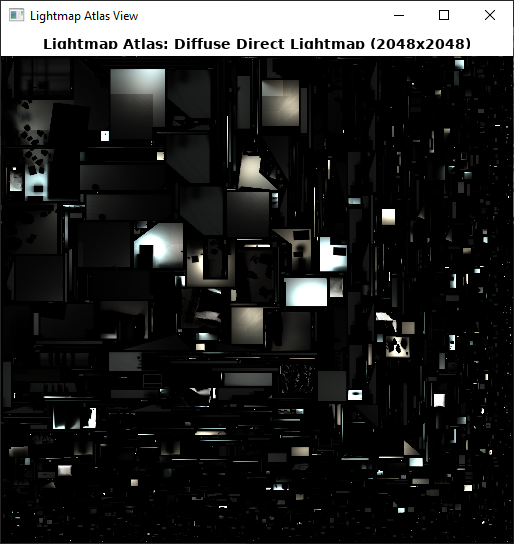
This means the baking was successful. Close the window and make sure to save the project, or the lightmap data will be lost. If you move around in the viewport, you should see the updated lighting right away.
If you make any changes to the scene in the future, such as moving, deleting or adding new static actors, you will have to bake the lighting again.
External Baking
Baking can take a very long time and you may want to do other things in the meantime and not keep PFM running throughout. Fortunately there is a very simple solution to do just that:
Instead of clicking the Bake Lightmaps button, click Generate Render Job. This should open the "Lightmap Atlas View" window, which you can close right away, as well as an explorer window with a directory containing a "render.bat" file. To make the lightmaps, you can now close PFM/Pragma and double click the .bat-file. This will still take a while, but allow you to do other things in the background.
Once rendering has been completed, two files with the endings "_direct.dds" and "_indirect.dds" should have been created. These will now have to be imported into PFM. To do so, simply open your project again, and select the pfm_baked_lighting component. Now press Import Direct lightmap button, navigate to "render/lightmaps/" and select the file ending with "_direct.dds". Then do the same with Import Indirect lightmap and the file ending with "_indirect.dds". Save the project. You should be able to see the effect in the viewport right away.
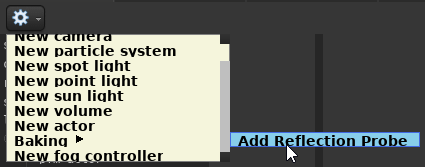
Reflection Probe
A reflection probe contains a cubemap image of the scene, which contains lighting information used by reflective objects. Without a reflection probe, reflective objects will look unnatural. Reflection probes also use static lighting, so you should make sure to set up lightmap baking first, or at the very least place some baked light sources. Beyond that, luckily setting up a reflection probe is very simple.
You can create a new reflection probe via the actor editor:
In most cases one reflection probe will suffice. During rendering, whichever probe is closest to the camera will be used, and all others will be ignored.
Placement
Reflection probes are not visible in the viewport, but you can see its location by selecting it in the actor editor, and entering move mode by pressing the  button:

Move the probe somewhere near the center of your scene, but not too far from the camera. Make sure the probe is not obstructed by any objects and not too close to any walls and that most of your scene is visible from the reflection probe's position. The rotation of the probe does not matter. Once your probe is in place, you're ready to bake it:
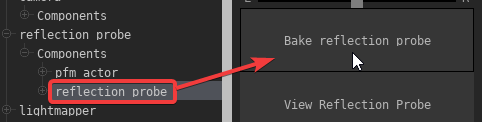
Baking
To bake a reflection probe select the reflection_probe component from the component list, and press the Bake reflection probe button:
The baking process may take a minute or more, you'll see a progress bar at the button which indicates how far along the baking is. You can also hover over the button to see the progress in percent.
Once baking is complete, a window like this should pop up:
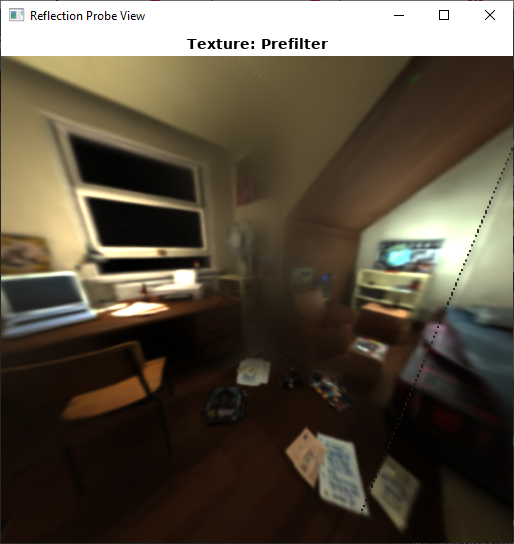
You can rotate the view of the image by clicking and dragging. All of the static actors in your scene should be visible. If something is obstructing the view, you may want to move the probe somewhere else. The image will probably look very blurry, but that's okay. You can now close this window and save the project. The effect of the probe may not be immediately noticeable, but it can subtly improve the overall quality of the scene a fair bit, especially if you have very reflective objects in the scene.
The reflection probe will have to be re-baked if you move any of the static actors, add any new static actors to the scene or move the probe itself. For this reason it's best to do it right before you're about to do the final render of your scene.
Example
Here is an example video on how to set up a reflection probe. The purpose of the golden cube is to highlight the effect that the probe has on the scene (and on reflective/metallic objects in particular):
Advanced
These steps are optional, but can increase the quality of the lightmaps if applied correctly.
Excluding invisible Actors
The quality of the baked lightmaps is highly dependent on the overall size of the scene and the actors within it. If you have any large actors in your scene that don't need lightmaps (e.g. a large building not visible through the camera, or a skydome covering the entire scene), you should remove the light_map_receiver component. Only actors that can be seen through the camera, and that actually require lighting should have the component.
You can click a particular area in the lightmap atlas view to find out which object occupies it, or you can select a specific actor from the "Actor:" drop-down menu to see which areas it occupies:
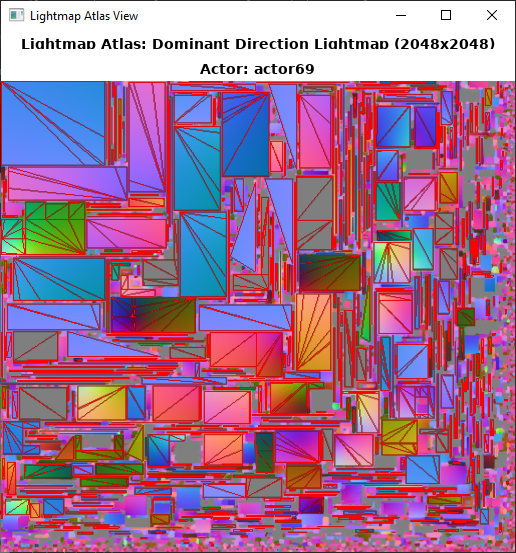
Actors that cover a large area in the lightmap atlas will decrease the overall quality. If possible actors like this should be removed from the lightmap baking (by removing the light_map_receiver component), or the area bounds should be decreased to cover fewer meshes of such actors.
Lightmap Area Bounds
You can also change the lightmap area bounds, which will make it so only actors within the cuboid bounds will be considered for baking. All actors (and meshes) outside of this area will be ignored, even if they have the light_map_receiver component:
The smaller the area, the higher quality the lightmaps will be, which means the area should fit around the visible scene as tightly as possible. This is especially important if your scene is part of a large map, but only covers a small portion of it.
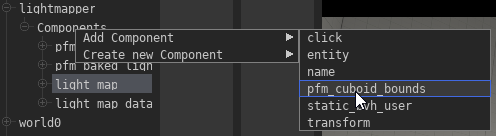
To define the bounds, right-click the Components-entry of the lightmapper actor, and add the pfm_cuboid_bounds component (if it's not there already):
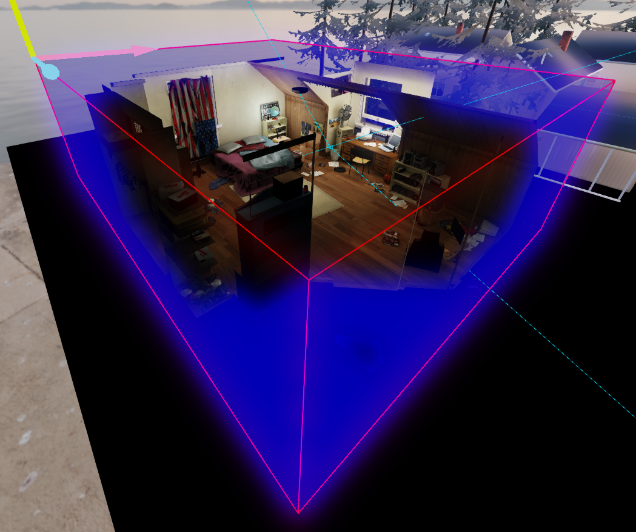
Select the new component and make sure the showDebugBounds property is checked to enable the blue cube visualization of the bounds. Since the bounds are initially 0 0 0, you will not see anything right away.
Next, select the minBounds property and select the Move-Tool ( ) tool in the viewport window. Move the arrows in the widget to one corner of the scene:
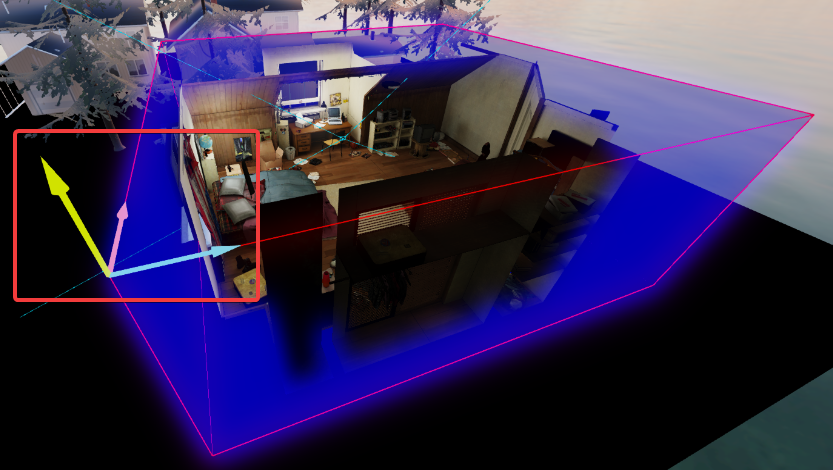
Then do the same with maxBounds and move the arrows to the opposite corner of the scene. You should see a cube forming around it.
Once the scene is encompassed, you can uncheck the showDebugBounds property. The next time you bake the lightmaps, objects outside of this area will be excluded from baking.
Ambient Occlusion
This section is still a work-in-progress.

Shadowed Light Sources
By default all light sources you place in PFM do not cast shadows so save on rendering resources. To enable shadow casting for a light source, simply select the light component of the light source actor in the actor editor and check the castShadows property. If the shadows don't become visible right away, try moving the light source slightly.
Shadowed Light Sources are very expensive in terms of GPU resources, so use them sparingly. This applies to point and directional light sources especially, try to avoid using them if possible and stick to shadowed spot-lights, otherwise you may run out of available VRAM very quickly.
Recommended Effects
Motion Blur
If your animation is set up for 30 FPS or less, enabling Motion Blur is highly recommended. At higher resolutions it may not be as effective, but should still be considered, as the setup is very simple. Check out this article for more information on how to enable Motion Blur.
Fog
Check out this article on information on how to enable fog.
Spot-light beams
Spot-light sources support a basic volumetric effect. See this article for information on how to enable it.
No Comments